Hobbyboss 1/72 Spitfire Vb/trop
| KIT: | Hobbyboss 1/72 Spitfire Vb/trop |
| KIT #: | 80213 |
| PRICE: | $9.00 MSRP |
| DECALS: | Two options |
| REVIEWER: | Brian Baker |
| NOTES: | Some modification required. |

| HISTORY |
 The Spitfire is, or should be, well
known to any serious aviation enthusiast and modeler, and almost anyone with the
slightest interest in aviation has probably heard of the type. First blooded
during the Battles of France and Britain, the Spitfire was progressively
improved during the war years, and remained in production well after the end of
the war. Therefore, I would refer interested readers to consult some of the
numerous reference materials on this aircraft.
However, the development of the various marks is sometimes confusing, as each variant had subtle differences that need to be addressed when modeling this aircraft. Merlin and Griffin engined developments are fairly obvious, but the differences in wing structure, armament, and other details are not so apparent, and therefore, suitable references should be consulted before attempting to build models of this aircraft. The Squadron “In Action” series has a brief rundown on Spitfire development.
| THE KIT |
As most modelers are aware, Hobby Boss is a Chinese firm attempting to capture the market of young, inexperienced modelers who are probably building models for the first time, or who intend to play with the finished product until destruction occurs. The models are certainly robust, and although such appendages as the landing gear, propellers, etc. will probably disappear with time, the basic structure will probably survive for some time.
But for the serious modeler, these kits do have some value. First, they are fun, and the “I want it NOW!” impulses that we all have after spending weeks on some obscure kit, correcting errors and adding infinite details, sometimes losing interest due to the time and effort involved. If you can put down the complicated model, pick up one of these quickies, and have it together, painted, and detailed within at most a couple of days, you’ll find renewed vigor in pursuing the long term project you are working on.
 Hobby Boss 1/72 scale kits are as
simple as I’ve seen, with the main fuselage structure almost solid, a solid wing
set at the proper dihedral angle, tail units and props that snap into place, and
landing gear and wheels that usually cannot be installed any way but correctly.
I have now built six of these, and my overall impression is favorable. But
check the photo on each box, as some of these kits have some major problems.
The Spitfire Vb /Trop is typical of Hobby Boss’s recent offerings. Relatively accurate, with very little flash, these kits omit certain details that a serious modeler will want to add, but they go together with almost no filler required. Consisting of approximately 26 parts, of which several will not be used, the kit can be assembled almost immediately, with the wings and fuselage going together easily. Since this is the Trop version, the large scoop under the nose snaps into place with almost no effort. The tailplanes can then be added. They just snap into place, although I trimmed mine somewhat so they went into place more easily.
The interiors of these kits are very stark, with a seat, control stick, and a forward wall on which some kind of an instrument panel can be attached. Strangely, the canopies offer include two options, one open and one closed. Neither fits properly, as they overhang the side of the fuselage to a scale 3 or 4 inches. This shows clearly on the box art, as the box has a photograph of the completed model, albeit quite poorly done.
DECALS
Decals are provided for two aircraft. First is a Mk. Vc/Trop of No. 417 Squadron in the Middle East in 1942. The kit instructions don’t say what it is, hinting that it is a Mk. Vb. References I have show the aircraft to have the “C” wing, not the “B” wing with the single cannon tube, so this would require modifying the wing to correctly model this variant. The other aircraft is from No. 249 Squadron, and I don’t have any references to prove or disprove this one. Both are tropical modifications with typical RAF desert camouflage, making for very colorful models. I did not try to use the kit decals, as I wanted to do one of the American operated Spitfires that was used in North Africa and Italy during 1942 and 1943, and I had references for that one.
| CONSTRUCTION |
 As previously stated, the kit went
together very quickly, with almost no filling and flash removal. The prop is
completely useless, and must be replaced. I took a prop and spinner assembly
from an Airfix Mk. V, which uses the Rotol prop, and it works perfectly. All I
did was cut off the large crankshaft, drill a hole the size of the Airfix shaft,
and insert the prop. ” Now, what do you do with an Airfix Mk. V without a Rotol
prop?” you ask. The answer is that there are quite a few photos of Mk. V’s
with what appear to be the narrow chord DeHavilland props as used on earlier
mark Spitfires. When you work from photos, you can get away with a lot of
improvisation.
The landing gear without modification
splays too far outward and does not have enough forward slant. This is easily
corrected and the gear looks OK. The problem is that the kit for some reason
does not include the landing gear covers. I took the “gear up” covers from the
Airfix kit and trimmed off the wheel parts, making perfectly good gear covers.
A little reaming out of the wheels and they fit nicely on the axles. The tailwheel snaps easily into place. The ribbed detail on the fabric covered
control surfaces is a  little overdone, but I let this stand, and the results are
acceptable. At least the thing “looks” like a Spitfire, and that, it seems, is
the point. A British looking bomb is provided for the center section, and if you
decline to use this, the mounting notches must be filled in. I just cut the
tabs off of the bomb, glued them in place, and smoothed the surface. No problems
there.
There are a couple of other problems. Underneath the wing are some bumps and thingies that don’t seem to belong. Ahead of the cannon fairing is a small scoop that doesn’t show on any drawings or photos that I have, so I removed them. Outboard, just ahead of the aileron, is what appears to be a fuel dump chute, but I’m not sure that fuel was carried that far out on the wing, It is just outboard of the outer shell casing ejector slot, and faces to the rear. In addition, there is no pitot tube provided, so this has to be scratchbuilt. There is also no rudder post for the LF antenna wire, but this is no problem---a small piece of tiny rod will do here. The machine gun positions outboard of the cannon are not indicated, although the ammunition access bays are shown. A drilled hole in each position will take care of this omission. Incidentally, these should be marked in red on the completed model, as they were taped over before each sortie to keep dirt from entering the muzzles of the guns.
I assembled the canopy in the open position, as this hides some of the problems of fit, leaving only the windscreen to be narrowed down somewhat. Once masked, the model was ready for painting.
| COLORS & MARKINGS |
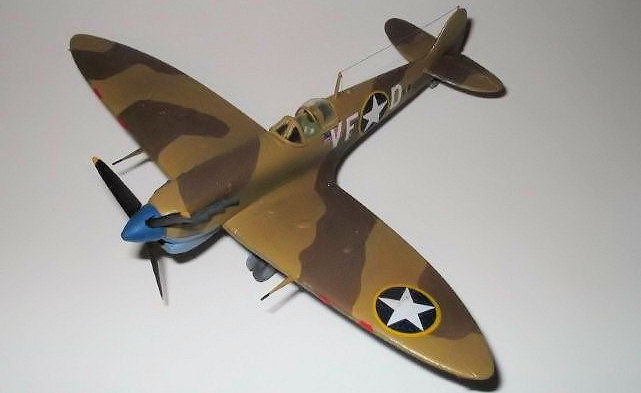
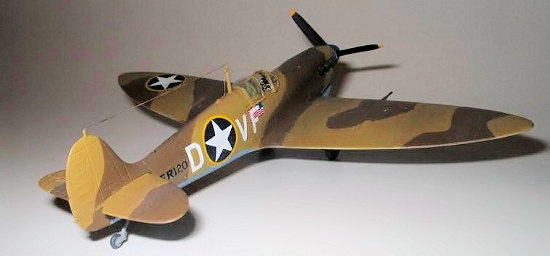
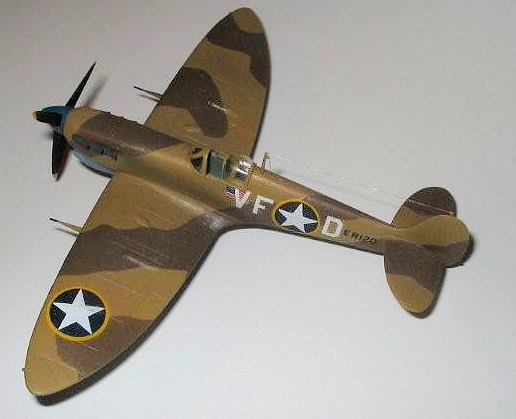
 My Spitfire is a Mk. Vb/Trop used by
the 5th Fighter Squadron, 52nd Fighter Group, probably 15th
Air Force, in North Africa during the winter of 1942-1943. Coded VF-D, this
aircraft is illustrated in several publications, and shows white codes and a
small American flag behind the cockpit. The flag is almost covered by the
squadron codes. A black RAF type serial, ER120, is in the usual RAF position.
There is no white fuselage band such as carried by most RAF fighters during this
period. The stars are, of course, surrounded by a thin yellow ring, as used
during the Torch Invasion. This makes for a very colorful airplane.
| CONCLUSIONS |
Aside from the prop issue, this was a pretty good kit. It was fun, and I had it together in a couple of days, working off and on. I believe that another kit of this mark was issued by Italeri, but I’m not sure if it has the tropical scoop or not, as I don’t have one to compare it to. Maybe Heller made this version also, but I don’t have this one either. Now that it is finished, I can go back to the biggie I’m working on, refreshed, and ready to tackle the big bomber. If you like this kind of kit, and don’t mind making the corrections and have the spare parts handy, get one of these. You’ll enjoy it.
January 2008
If you would like your product reviewed fairly and quickly, please contact me or see other details in the Note to Contributors.