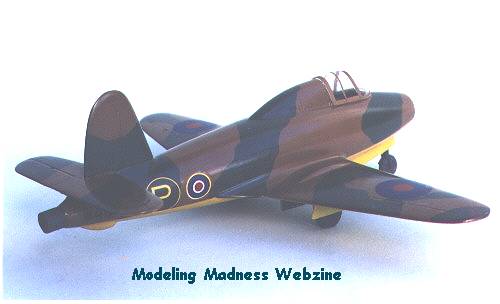
Kit: Gloster E28/39 "Whittle"
Scale: 1/72
Kit No: 72018
Manufacturer: High Planes Models
Price: $25.65 (Australian Dollars)
Media: Limited Run Injection Plastic
Decals: One version (first prototype aircraft)
Date of Review 18 July, 1998

This aircraft was the first to fly with a jet engine. Normally known as the "Gloster Whittle" (named for Frank Whittle, the genius that designed and built the engine), it first flew on 15 May 1941 for a duration of 17 minutes. It was used for testing for the rest of the Second World War when the aircraft was retired and placed in a museum. The experience gained with aircraft led directly to the development of the Gloster Meteor, and could fairly be said to have started the jet age.
The only other kit I know of this aircraft was one made by Frog back in the sixties. I had this kit as a kid and fond memories prompted me to buy this limited run injection kit. produced by Australian manufacturer, High Planes Models. The Frog kit can still be had quite cheaply on the collector's market, but I have heard it is under-scale and not very accurate.
The kit consists of one light blue sprue containing all the major components, a clear vacuum formed canopy, and a white metal nose wheel assembly. The surface detail consists of very fine engraved panel lines. There is no wheel bay detail and minimal cockpit detail. A seat and control panel are provided but the modeller must cut a cockpit floor from plastic card (template provided) and add any other details from scratch.
As this is a limited run kit there is a bit of cleaning up to be done, but when this is complete it all fits together rather nicely. Regular test fitting of parts is a must as a few adjustments need to be made here and there, especially in the wing root area.
The only real problem is in fitting the air splitter inside the intake. The part supplied needed extensive cutting and filing to make it fit as well as the addition of a backing disc to prevent see-through. I attached a floor for the nose wheel bay to the back of this assembly. The nose interior must also be packed with weight to get the model to stand on its undercarriage. I had to add weight in front of, under, an behind the cockpit to do this.
The real aircraft had small vertical stabilizers mounted on top and below the tailplanes and these are not included in the kit or mentioned in the instructions. I didn't notice this till I had started painting the model so I left them off.
I brush painted my model with Humbrol enamels, and gave it a coat of Humbrol's gloss coat varnish before applying the decals. I hid the cockpit interior with dark green paint as I did not add any extra details here. Most of the decals went on nicely but the upper wing roundels had narrow white edge around them. I replaced these with some other decals from my collection of spares. At the time the photo was taken I had not yet added the fin flashes.
The canopy was cut from the sheet and framed with painted tape, which I think looks OK. I did find it very hard to sand the canopy edges down though, with the result that it stands a little proud.
Overall, I found this kit most enjoyable to build. You do have to work at it, but if you go carefully, the parts fit is good and the finished result has a solidity and weight that is very pleasing. I understand there was only 2000 copies of this kit made so if you want one you'd better be quick!
Jet.