
| KIT #: | 48056 |
| PRICE: | $45.00 MSRP |
| DECALS: | Three options |
| REVIEWER: | Bill Koppos |
| NOTES: |

| HISTORY |
The Fulmar was the product of another one
of those very specific specifications the Brits so loved. Spec. 0.8/38 was
issued for a two place Fleet Defense Fighter. This assumed the new fighter
would only encounter enemy bombers or recon types, regular fighter traits like
maneuverability and speed being secondary to range, navigation and heavy
armament. The second crew member
 would take care of communications and
navigation, the battery of eight machine guns would take care of the rest. Fairey answered this request with a sister to it's Battle day bomber design,
sleeker with more power. The first flight was on January 13 1937. Even though
the speed was disappointing, the desperate need for modern fighters ensured an
order, this for 127 in mid '38.
First assigned to No. 806 Naval Air Squadron on HMS Illustrious, operating in the Mediterranean theatre, Italian Flying boat snoopers and bombers immediately started falling in numbers. It's role seemed truly fulfilled as, up against the opponents it was designed to fight, it's pilots scores mounted. According to Osprey's excellent "Royal Navy Aces of WW2", no less than 9 pilots of 806 Sqn. alone reached ace status flying Fulmars! Fulmars were cover for the Swordfish attacking the Italian fleet at Taranto on November 11, 1940, a highly successful operation that, unfortunately, had dire consequences for Illustrious.
It seems Adolf Hitler decided to get rid of the floating hornet's nest giving so much trouble to his Italian ally. The entire force of the Luftwaffe's Fleigerkorps X was transferred to Sicily, and ordered to sink the Illustrious.Fliegerkorps X included over 40 deadly JU87 Stuka dive bombers, piloted by experten. On 10 January 1941, the s--- hit the fan for Illustrious and her Fulmars. Two Italian SM79 bombers drew off the standing fighter patrol, and the Stukas started their dives unopposed. By the time the Fulmars got back, their home deck had been hit 7 times. Badly damaged, the ship survived only due to her armored deck, a feature of most British carriers. Limping into Malta's Grand Harbor, The 7 remaining Fairey fighters and Malta's Hurricanes awaited the further
 target
was, and a storm of fire greeted the Stukas and JU88's. The Fulmars flew right
through the barrage to get at the dive bombers, and the Germans could only
manage one more hit. As losses mounted, the German attacks petered out, and
the battered Illustrious got out of the harbor on January 23rd, for repairs in
the United States.
target
was, and a storm of fire greeted the Stukas and JU88's. The Fulmars flew right
through the barrage to get at the dive bombers, and the Germans could only
manage one more hit. As losses mounted, the German attacks petered out, and
the battered Illustrious got out of the harbor on January 23rd, for repairs in
the United States.All thru 1941 the Fulmars were very busy, escorting convoys in the Mediterranean and Atlantic, defending Crete, attacking German bases in Norway.In 1942 a new enemy presented itself in the form of Imperial Japan, Fulmars being involved in the defense of Ceylon. Encounters with enemy single-seaters didn't come out as badly as the designers feared, honors being about even. Eventually the Fulmars were replaced by the Sea Hurricane, Grumman Martlet, and Seafires. When all was done, the Fulmar did well, being there when needed; and flown with typical British Úlan, accounted for 112 enemy destroyed, more than any other Fleet Air Arm fighter.
| THE KIT |
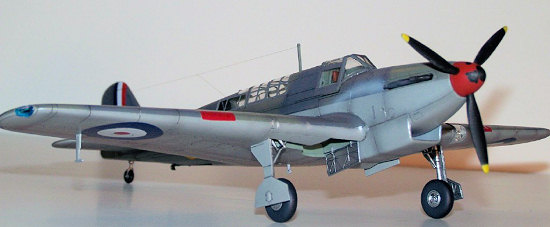
 Well, at last, a 1/48th Fulmar. The box is BIG!!! Why MPM put it
in such a big box is unsure, but you know you've got one when you buy it.
Inside, you get 6 sprues of nicely molded parts, including one clear. Engraved
detail is rather nice, typical of MPM these days. The clear parts are thin and
clear enough, but not openable. More on this later. There are no resin parts,
or photo-etch frets, meaning no seat belts. The instruction sheet is small,
folded pamphlet type, pictures only but clear enough. Decals are provided for
three aircraft, but none for Illustrious machines (OF COURSE!), and are of
good quality. Clipping the main parts off the sprues showed the general fit
would be good, and off to the bench.
WARNING! All those who must have perfectly researched and accurate models, turn the channel now. I had no books on this airplane, and research on the web did not reveal much beyond generic photos, and pictures of fat seabirds, nesting, etc. (you know what a Fulmar is, right?) So I decided to do a mostly out-of-box job on it, better for a review anyway. I disavow any obvious mistakes, and it sure looks like a Fulmar.
| CONSTRUCTION |
 I glued the wings together first just to be different. Inserts
are given to box the wheel wells. No problem. I noticed the gaping hole in the
left wing for the landing light. Problem. A clear part is given for the light,
but there ain't no place to put it. The plans show the light part, (F7) with
an arrow going into the gaping hole. Just ain't gonna work. Improvisation
time. I put sides in the outer glass (F8) with sheet styrene, glued F7 to a
rear styrene plate covered with bare metal foil, painted everything aluminum,
and glued the plate with light to F8. It's better to look at the photos.
That'll teach me not to start in the cockpit!
The cockpit areas are busy enough,
with radio stuff, black boxes, and oxygen bottles all round. The IP gauges are
engraved well, and respond to dry brushing and glossing. The bulkhead
locations are a bit vague, but follow the molded in guidelines and they work
out OK. I painted the interior British interior green, with black instruments
and boxes, light blue oxygen
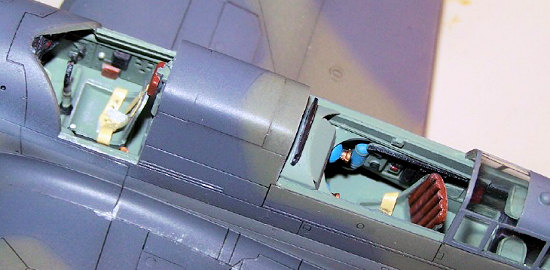 bottles, and dashes of red here and there, taking
my cue from other Britfighters I have done. Again, I have no interior
references at all, so the plans had to be trusted here. One weird thing is
that there are no color callouts at all, except for the main camouflage.
| COLORS & MARKINGS |
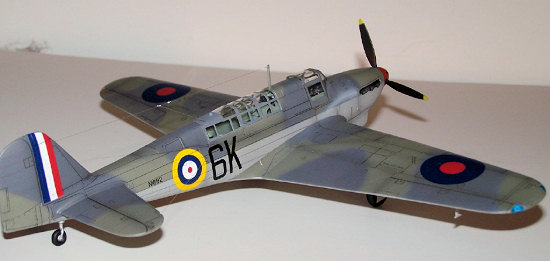
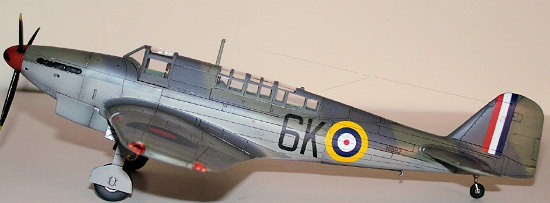
Fleet Air Arm camo was-Extra Dark Sea Grey/Slate gray uppers,
and Sky Grey lowers early on. In 1940 the Sky Grey extended up the sides of
the A/C, about half way. Only one option in the kit has this as on the box
art, and this was the one I liked. I had on hand in my preferred Modelmaster
ena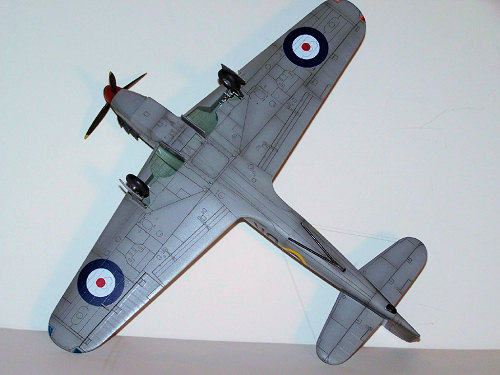 mels the upper colors but could find no Sky Grey except for Tamiya acrylic.
Uppers were done first, Slate Grey then darkened "Extra" dark sea Grey was
freehanded to match the pattern in the instruction sheet. Then the tops of the
wings and fuselage covered up, and the lowers done with the Acrylic. Here I
forgot to lighten the Sky Grey, as experience has shown me that my usual Testor's Metallizer Sealer gloss coat will darken acrylic paints too much. So
the final product is too dark underneath. Must learn those lessons. Major
panel lines were given a very thinned Panzer Grey post shading.
Anyway, upon the gloss coat drying (20 minutes), it's decal time. The kit decals are excellent, going on nicely with just a light use of solvaset, to make them conform to the panel lines. The set I used represent a plane from HMS Victorious in 1940, busy covering convoys and attacking German targets in occupied Norway. A "sludge" wash of acrylic black, water and soap was used to highlight the panel lines and create oil stains and grunge. Decals were sealed in with another gloss coat, as I find if I immediately use flatcoat after decaling, the carrier film will show up too much. All pics I had of Fulmars showed them very
| FINAL CONSTRUCTION |
The landing gear doors are nice, inner ribbing being busy
looking and well done. The retraction mechanism is done in 4 parts per side,
finely molded and detailed, and going together well for small parts. Again let
me say for a limited run kit, all of the parts are pretty finely molded,
really improving with each new kit from MPM. I painted the struts and doors
aluminum with black washes, wrapping the oleo cylinder area with bare metal
foil. The axles are too long, keeping the wheels too far from
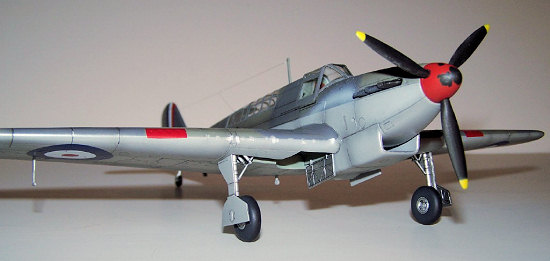 the struts, so these were
trimmed down. The strut attachment points are just shallow holes, but super
glued in, the gear is strong enough and the gear doors fit well, no fussing
necessary. The seats were now put in after installing Tamiya tape seat
harnesses, painted Cream and detailed with a pencil.
At this point I had to tackle the part most people on this website seem not to like-canopy frame time! I always mask and paint my glass off the model and glue 'em on later, this time I got in trouble. It seems I forgot the "Extra" part of the Extra Dark Sea Grey I used on the airframe, and did not darken the mix I used on the frames. SOOO the frames are lighter than the rest. I tried to camouflage it with some sludge wash, but it still shows. I'll blame it on being done at 11:30 at night, after working on the kitchen all day. I am not about to mask these things all over again, so lets call it sun fading, shall we? Then, after never test fitting the canopies, I found the fit pretty poor. The front piece is molded closed, and does not sit right at all, requiring being squeezed down and glued. Even if cut apart, the sliding section would never fit over the fuselage spine. So closed it is. The rear portions fit OK, but also stay closed. A vacuform canopy set is needed. Hey Squadron, how 'bout it?
Well then, it's downhill from here. Arrestor hook-Metallizer Gunmetal, dry brushed with aluminum. Wingtip landing lights- Tamiya Clear Green and Red. Catapult loops, pitot tube, antennas. The complicated aerial array was done up according to the box art. Do hope it's right.
| CONCLUSIONS |
There it is, Fairey's finest. I enjoyed building this one, it went really well for a 'limited run" job. I found it a well made simple kit, doable by beginners as well as advanced modelers. My "Fleet Defense Fighter" looks great on the shelf next to it's smaller brethren. It looks every bit as cool as I remember that cereal box card model looking, all those years ago!
| REFERENCES |
References
"Fleet Air Arm, British Carrier Aviation,1939-1945" Ron
Mackay, Squadron/Signal pub., #6085
" Royal Navy Aces of WW2", Andrew Thomas, Osprey Aircraft of
the Aces, #75
Fairey Fulmar Mk.1, Wikipedia ISBN 155750-082-7
June 2007
If you would like your product reviewed fairly and fairly quickly, please contact the editor or see other details in the Note to Contributors.