| KIT #: | 48056 |
| PRICE: | €30 when new |
| DECALS: | Three options |
| REVIEWER: | Spiros Pendedekas |
| NOTES: |

| HISTORY |
The Fairey Fulmar was a British carrier-borne
reconnaissance/fighter aircraft. Named after the northern fulmar, a seabird
native to the British Isles, it served with the Royal Navy's Fleet Air Arm (FAA)
during the Second World War.
The design of the Fulmar was based on that of the 1936 earlier Fairey P.4/34
land-based fighter, which was supposed to replace the Fairey Battle. Although
performance was expected to be unspectacular, the design looked solid, reliable
and sturdy, with long range and effective armament. The fact that it could be
manufactured relatively quickly also contributed to the decision for the type’s
mass production, with the first example making its first flight On 4 January
1940 and deliveries commencing shortly thereafter, followed by the improved
Fulmar Mk II roughly one year later.
The type was used by the FAA and the RAF during the war, being withdrawn from
front line service in February 1945. A total of 600 units were produced at
Fairey’s Stockport factory between January 1940 and December 1942.
| THE KIT |
 When
MPM came in 2007 with its new-tool quarter-scale Fulmar, a good number of
modelers thought it would more or less be a kit per the then “classic” MPM
tradition, meaning “limited run” style plastic parts with heavy sprue gates and
lots of flash, a gazillion of resin to cater for the “detailed” parts and,
maybe, a PE fret and vacform transparencies. To their surprise, the kit was done
in full styrene, including the clear parts, looking “mainstream” in almost every
respect!
Needless to say I grabbed a copy back then from one of my usual beloved Athens
Hobby shops (which, gradually and sadly, either diminish or transform into “pure
internetic” shops - meaning forgetting the epic visits and the usual modeling
chat…). It was offered at a sensible price which became even more sensible upon
the usual “pay cash” discount the owner treated me with!
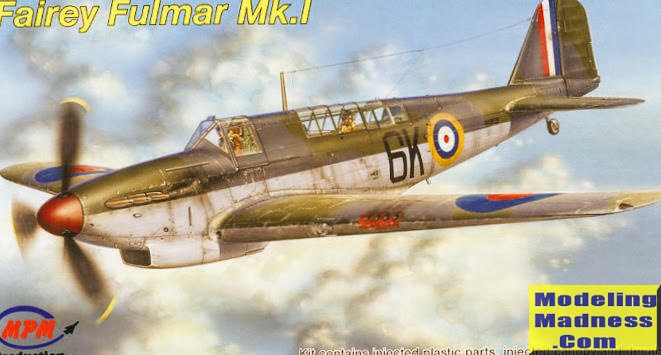
The kit comes in a well made top opening box with a very nice box art of an HMS
Victorious machine, lightly descending. The fact that the box is too big for the
ingredients is not necessarily a negative thing, as you are more or less left
with a big, sturdy box which you can use for your future projects that come in
less than perfect or too small boxes.
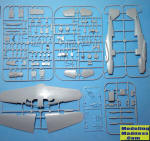
Upon opening the box, I was greeted with 105 dark gray styrene parts arranged in
5 sprues. One sprue holds the fuselage halves, another holds the main wing
parts, while the other three hold all the rest. Molding is first class and very
crisp with almost no flash, just a couple of sink marks and some mold release
agent at a few spots. I would put a bet that those molds were CAD/CAM designed
and manufactured. All parts are numbered, there are locating pins and, in fact,
the kit could easily be mistaken for a modern Hasegawa one!
Panel lines are recessed all over and very nicely done. The highly visible
interior is very well appointed with a lot of “detail” parts. Indeed, I was
pretty amazed to see MPM providing that multitude of small well cast cockpit
“detailing” parts. The seats look tad plain, which might have nevertheless been
the case in reality. No seat belts are provided.
The main wheel wells are nicely boxed and feature good wall detail. Landing gear
is also well detailed, with its delicate parts featuring scale thickness. The
distinctive air intake and radiator/oil cooler chin looks good. Two styles of
prop blades are provided, but without clear explanation of which to use.
Transparencies are well molded and exhibit good clarity. Interestingly, the
front canopy is one piece with the windscreen, meaning it cannot be posed
“open”, whereas the rear canopy is provided as separate pieces. Instructions
come per the usual MPM style: three A4 sheets folded in half, comprising a
12-page booklet, containing a history of the type and a parts list, with the
construction spread in 16 clear and followable steps. Color callouts are
provided where needed in both generic names and Gunze codes.
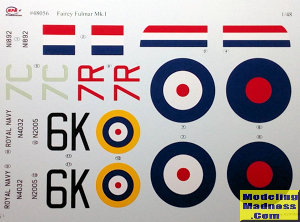
 Three
schemes are provided, for an 809, an 803 and an 800 Squadron machines, all in
the usual FAA extra dark sea gray / dark slate gray over sky. Decals are very
thin and well printed by AVIPRINT. The blues and reds might look a tiny tad on
the bright side, but look good on finished models.
Instructions start with the quite extensive cockpit assembly and want you to
first attach various components onto the sidewalls, then assemble the bulkheads,
floor and top deck parts and trap everything between the fuselage halves. Next
is wings assembly and installation, followed by the tail planes, radiator chin
and arrestor hook housing.
The landing gear is then to be assembled and attached, followed by the arrestor
hook itself. Next is prop assembly and installation (where you have to choose
between two styles of blades, without any clear indication, so, best, check any
references available). The exhausts, the two seats and the transparencies are
finally to be added, ending a build of average complexity
| CONCLUSIONS |
This looks to be an excellent kit of this important
plane. It is well molded with the general shape of parts looking accurate. Panel
lines are nicely engraved and details at key areas are plentiful. Instructions
are nice and clear and decals look very good. The kit builds nicely and can
provide a spectacular result, as Bill Koppos demonstrated in his MM review here.
This nice kit can still be found today (as of 2022) in its original package or
in its 2008 and 2015 reboxings by Special Hobby, which contain extra PE and
(only in the 2015 reissue) resin goodies, still offered at very sensible prices
(Eduard also reboxed it in 2008 with a PE fret and a set of masks, but looks not
too easy to obtain).
Happy modeling!
May 2022 Copyright ModelingMadness.com. All rights reserved. No
reproduction in part or in whole without express permission. If you would like your product reviewed fairly and fairly quickly, please
contact the editor
or see other details in the
Note to
Contributors.