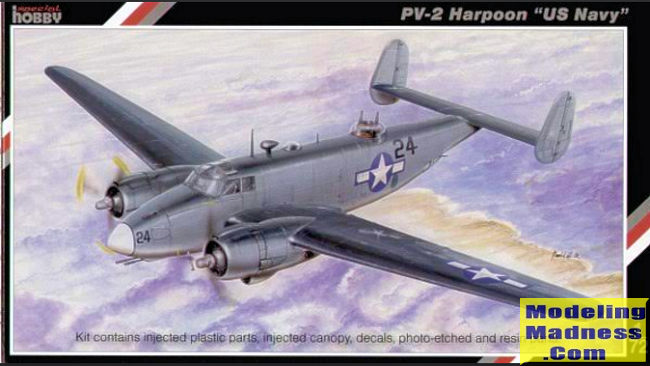
Special Hobby 1/72 PV-2 Harpoon
|
KIT #: |
SH 72093 |
|
PRICE: |
$ |
|
DECALS: |
Four options |
|
REVIEWER: |
Kevin Dolin |
|
NOTES: |
Guide holes? We don’ need no steenking guide holes. |

The roots of the PV-2 Harpoon go back to 1935 with the introduction
of the famed Lockheed Model 10 Electra (Yes, that Electra). From that
aircraft came the Model 14 Super Electra, Lockheed’s attempt to break into
the passenger airline market. However, despite its excellent performance,
it’s high operating costs and the advent of the larger and cheaper DC-3
forced a rethink at Lockheed, resulting in the longer Model 18 Lodestar.
Enter the UK, looking for a support for their Anson. Lockheed sent them
plans for a militarized Model 14 which quickly became the famed Hudson. As a
replacement for the Hudson, Lockheed turned to the Model 18 and turned out
what was basically a beefed up Hudson, with a similar layout, but larger and
heavier, with a greater bomb load and armament and named it the Ventura.
Both the USAAF and the USN were interested in this craft, but after
receiving only 18 Venturas, the Army agreed to turn over exclusive use of
the Ventura to the Navy,
designated as the PV-1. A major redesign of the Ventura resulted in the
apogee of the line, the PV-2 Harpoon. which went into service in 1945.
While the Hudson and Ventura were adapted from airliners, the
Harpoon’s redesign, albeit still based on the Model 18, was meant to meet
the specific needs for the Navy to optimize it for the maritime
reconnaissance role. It had larger tail surfaces to improve stability and an
increased wing area for a substantial upgrade in load carrying capacity.
This solved one of the major problems of the PV-1: its difficulty in taking
off with a full fuel load. It first flew on Dec. 3, 1943, but structural
problems with the wings delayed its introduction into service until March
1945 where it first served in the Aleutians. The Harpoon used the same
engines as the Ventura, two Pratt & Whitney R-2800-31 air-cooled radials and
being a much larger aircraft was thus some 40 mph slower than the Ventura,
but its increased range, bomb load and an armament of two fixed 0.50-inch
machine guns in the upper nose decking plus three fixed 0.50-inch machine
guns in an undernose pack, two 0.50-inch machine guns in the dorsal turret,
and two 0.50-inch machine guns in the rear ventral position more than made
up for that. Eight 5-inch HVAR rockets could also be carried underneath the
wings. Due to its late entrance, its combat use by the Navy was fairly
brief, cut short by the end of the war in the Pacific. The Navy continued to
use the Harpoon for several years after the war finally phasing it out of
active service in August of 1948. However at one time, Harpoons equipped
eleven VP squadrons with the Naval Reserve, being in that service for about
eight more years.
The Harpoon turned out to be a thoroughly
reliable and popular aircraft. Postwar, Harpoons served with a number of
foreign air forces: Italy, the Netherlands, Peru, France and Portugal.
Ironically, it was one of the first aircraft to equip the Kaijō Jieitai, the
newly created Japan Maritime Self-Defense Force in 1951. Other Harpoons were
sold off as surplus for civilian uses ranging from luxury passenger planes
to crop sprayers.
 The
kit comes in a sturdy top opening box. Inside is a large sticky sealing bag
containing four grey sprues of hard plastic ― I left off one of the wing
sprues as, except for a couple of small bits, it’s identical ― , four pieces
of resin and the clear bits in their respective zip-lock bags and the decals
in another sticky closing bag. The sprue gates are a bit thick for my taste
and care will definitely be needed removing the tinier bits. All ejector
marks are where you can’t see them, however those on the tail fins and
horizontal stabilizer/elevators will need to be sanded or ground down. The
highest is about a millimeter, so no major operation there. I saw no sink
marks and very little flash. It looks like most of your seam scraping will
be with the landing gear parts and some of the smaller parts. Expect some
tedium here. You’ll also need to do some cleaning up in some of the clear
parts openings. The clear parts look commendably thin and clear. There’s a
bit of soft detail on the sidewalls of the cockpit, which consists of the
floor, a control panel to be painted as there’s no decal for it,
side-by-side control columns and yolk style grips. They are tiny; see above.
The seats are pretty generic. A show of hands of those who think there is
nothing in the way of seatbelts. There are two bulkheads behind the seats.
There’s a set up for the ventral gunner and the clear parts give you the
option of having the position open or closed, then a bulkhead to close off
the space behind that position. The top turret just sits in its hole and can
be left off during painting. No framing either. Yay! As is typical of these
kits, everything is butt joined. (sigh) The box says there are PE parts in
this kit. This is not true. None in the parts diagram nor in the
instructions. For some reason this does not bother me. There are six resin
parts: two nicely crafted engines and four tiny pieces for the engine air
intakes.
The
kit comes in a sturdy top opening box. Inside is a large sticky sealing bag
containing four grey sprues of hard plastic ― I left off one of the wing
sprues as, except for a couple of small bits, it’s identical ― , four pieces
of resin and the clear bits in their respective zip-lock bags and the decals
in another sticky closing bag. The sprue gates are a bit thick for my taste
and care will definitely be needed removing the tinier bits. All ejector
marks are where you can’t see them, however those on the tail fins and
horizontal stabilizer/elevators will need to be sanded or ground down. The
highest is about a millimeter, so no major operation there. I saw no sink
marks and very little flash. It looks like most of your seam scraping will
be with the landing gear parts and some of the smaller parts. Expect some
tedium here. You’ll also need to do some cleaning up in some of the clear
parts openings. The clear parts look commendably thin and clear. There’s a
bit of soft detail on the sidewalls of the cockpit, which consists of the
floor, a control panel to be painted as there’s no decal for it,
side-by-side control columns and yolk style grips. They are tiny; see above.
The seats are pretty generic. A show of hands of those who think there is
nothing in the way of seatbelts. There are two bulkheads behind the seats.
There’s a set up for the ventral gunner and the clear parts give you the
option of having the position open or closed, then a bulkhead to close off
the space behind that position. The top turret just sits in its hole and can
be left off during painting. No framing either. Yay! As is typical of these
kits, everything is butt joined. (sigh) The box says there are PE parts in
this kit. This is not true. None in the parts diagram nor in the
instructions. For some reason this does not bother me. There are six resin
parts: two nicely crafted engines and four tiny pieces for the engine air
intakes.
The instructions have 16 steps on eight pages. There are a few head
scratchers as to exactly some parts fit. You will, of course, not follow the
directions as given. I don’t understand why they’d have you put antennas,
pitot tubes and other easily knocked off bits on in the middle of a build.
There are two sets of noses, one of which you don’t use. Here again,
however, they have you do something I think is stupid. They’d have you
assemble the nose pieces first, then attach that to the fuselage. Don’t do
this. Glue each piece to it respective side, properly lined up and you will
have a much happier modeling experience. Ask me how I know.
 There
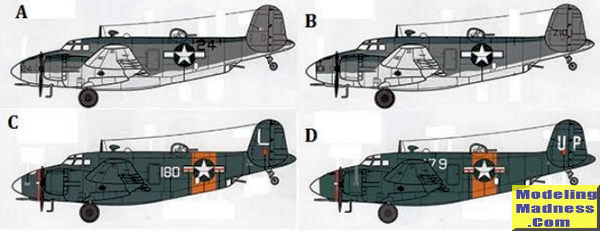
is also a beautiful color insert showing all the camouflage schemes. The
color call-outs are all in Gunze-Sangyo Hobby Color/Mr. Color. The first two
are identical as are the latter two. Schemes A and B are Glossy Sea Blue on
the top of the fuselage, horizontal stabs, the wings and the cowlings. The
sides and tail fins are Intermediate Blue. The underside is a white that is
called Grand Prix White (H21/C69 FS17875). Schemes C and D are overall
Glossy Sea Blue with an orange fuselage band at the turret area. All have
glossy white noses.
A is Harpoon No. 24, unknown BuNo., VPB-139, Attu Island, Aleutian Islands,
March 1945, flown by Alfred “Fritz” Daniel.
B is Z101, BuNo. 37101, VPB-142, NAS Kaneohe, Oahu, Hawaii, April
1945. The aircraft was transferred to VPB-153. It crashed during a night
mission on May 5th, 1945 with the loss of the entire crew.
C is L 180, BuNo. 37365, VP-772, NAS Los Alamitos, California. This
aircraft had the upper nose guns removed and the openings faired over.
D is UP 179, unknown BuNo., NAS St. Louis, Missouri, 1950.
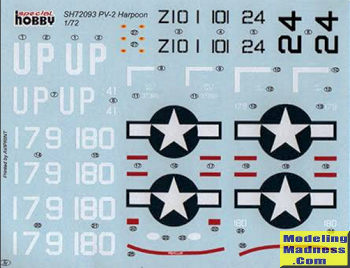
The decals are by Aviprint and look good to me. They’re not that
dark. I darkened the scan so you could see the white numerals.
As to any discrepancies in shape or size, I really don’t know and don’t
particularly care as I’m building it for me. I’ll let the AMS crowd handle
that. I just wish Special Hobby and others of that ilk would grasp the
concept of guide holes, slots and tabs. Yes, yes. I know. Using those
modeling skills and all that, but still... Anyway, with a wing span is
12½”/31.75 cm and the length 8⅔”/22 cm even in 1/72 this will build into a
large and striking model. As a native St. Louisan, I’m pret-ty sure I know
which one I’m going to build. It may even be my first build article. Stay
tuned.
Kevin Dolin
July 2017
Copyright ModelingMadness.com
If you would like your product reviewed fairly and fairly
quickly, please
contact
the editor
or see other details in the
Note to
Contributors.
Back to the Main Page
Back to the Review Index Page
Back to the Previews Index Page


 The
kit comes in a sturdy top opening box. Inside is a large sticky sealing bag
containing four grey sprues of hard plastic ― I left off one of the wing
sprues as, except for a couple of small bits, it’s identical ― , four pieces
of resin and the clear bits in their respective zip-lock bags and the decals
in another sticky closing bag. The sprue gates are a bit thick for my taste
and care will definitely be needed removing the tinier bits. All ejector
marks are where you can’t see them, however those on the tail fins and
horizontal stabilizer/elevators will need to be sanded or ground down. The
highest is about a millimeter, so no major operation there. I saw no sink
marks and very little flash. It looks like most of your seam scraping will
be with the landing gear parts and some of the smaller parts. Expect some
tedium here. You’ll also need to do some cleaning up in some of the clear
parts openings. The clear parts look commendably thin and clear. There’s a
bit of soft detail on the sidewalls of the cockpit, which consists of the
floor, a control panel to be painted as there’s no decal for it,
side-by-side control columns and yolk style grips. They are tiny; see above.
The seats are pretty generic. A show of hands of those who think there is
nothing in the way of seatbelts. There are two bulkheads behind the seats.
There’s a set up for the ventral gunner and the clear parts give you the
option of having the position open or closed, then a bulkhead to close off
the space behind that position. The top turret just sits in its hole and can
be left off during painting. No framing either. Yay! As is typical of these
kits, everything is butt joined. (sigh) The box says there are PE parts in
this kit. This is not true. None in the parts diagram nor in the
instructions. For some reason this does not bother me. There are six resin
parts: two nicely crafted engines and four tiny pieces for the engine air
intakes.
The
kit comes in a sturdy top opening box. Inside is a large sticky sealing bag
containing four grey sprues of hard plastic ― I left off one of the wing
sprues as, except for a couple of small bits, it’s identical ― , four pieces
of resin and the clear bits in their respective zip-lock bags and the decals
in another sticky closing bag. The sprue gates are a bit thick for my taste
and care will definitely be needed removing the tinier bits. All ejector
marks are where you can’t see them, however those on the tail fins and
horizontal stabilizer/elevators will need to be sanded or ground down. The
highest is about a millimeter, so no major operation there. I saw no sink
marks and very little flash. It looks like most of your seam scraping will
be with the landing gear parts and some of the smaller parts. Expect some
tedium here. You’ll also need to do some cleaning up in some of the clear
parts openings. The clear parts look commendably thin and clear. There’s a
bit of soft detail on the sidewalls of the cockpit, which consists of the
floor, a control panel to be painted as there’s no decal for it,
side-by-side control columns and yolk style grips. They are tiny; see above.
The seats are pretty generic. A show of hands of those who think there is
nothing in the way of seatbelts. There are two bulkheads behind the seats.
There’s a set up for the ventral gunner and the clear parts give you the
option of having the position open or closed, then a bulkhead to close off
the space behind that position. The top turret just sits in its hole and can
be left off during painting. No framing either. Yay! As is typical of these
kits, everything is butt joined. (sigh) The box says there are PE parts in
this kit. This is not true. None in the parts diagram nor in the
instructions. For some reason this does not bother me. There are six resin
parts: two nicely crafted engines and four tiny pieces for the engine air
intakes. There
is also a beautiful color insert showing all the camouflage schemes. The
color call-outs are all in Gunze-Sangyo Hobby Color/Mr. Color. The first two
are identical as are the latter two. Schemes A and B are Glossy Sea Blue on
the top of the fuselage, horizontal stabs, the wings and the cowlings. The
sides and tail fins are Intermediate Blue. The underside is a white that is
called Grand Prix White (H21/C69 FS17875). Schemes C and D are overall
Glossy Sea Blue with an orange fuselage band at the turret area. All have
glossy white noses.