|
KIT: |
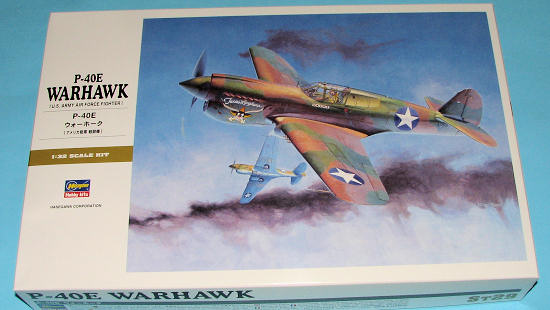
Hasegawa 1/32 P-40E Warhawk |
|
KIT #: |
08879 |
|
PRICE: |
4,600 yen from
www.hlj.com |
|
DECALS: |
Two options |
|
REVIEWER: |
Tom
Cleaver |
|
NOTES: |
New mold kit, photos by your editor |

What really needs to be said
of the P-40E?
It was the only U.S. fighter at the start of the war with much -
if any - hope of successfully opposing enemy fighters.
It was heavy, less maneuverable, and restricted in
altitude capability than its opponents.
Yet, if flown by a pilot aware of the airplanes
strengths and weaknesses, it could be successful; Erik Shilling told me
emphatically that if a pilot kept his speed above 250 m.p.h., that the P-40
could more than hold its own against the Japanese Zero. During the first year of
combat following Pearl Harbor, the P-40 stood mostly alone against the Axis
onslaught.
Overall, the P-40 series served on all fronts with nearly every
Allied air force and was considered “the best second choice.”
P-40s were still in first-line service on the last day
of the war as they had been on the first.
 The Hasegawa 1/32 P-40E has
been eagerly awaited by modelers since the first surprise announcement of its
release this past April.
The only other 1/32 kit of this famous fighter is from
Revell, and is now decidedly long in the tooth, having been first released over
35 years ago.
On opening the box, a
modeler should not be surprised at the thought “I’ve been here before.”
Indeed, the kit is a scale-up of the 1/48 kit, with all
that means for overall accuracy, detail, and fit.
First the bad news: Hasegawa
saw fit to try and cut corners by releasing the kit with a windscreen that would
be adaptable to later versions.
Unfortunately, they not only screwed the pooch for the
P-40E but also for any others, since they managed to mold in a clear vision
panel on both sides, rather than only on the left.
Since the framing is also done with engraved rather than
raised detail, solving the problem is not easy.
The good news is that if you start with a 400-grit
sanding stick, then graduate to a 600-grit stick, then move on to Micro-Mesh
pads of 2400, 3200, 4800, 6200 and 12,000-grit, you can over about 20-25
minutes, take the panel lines out of the windscreen and polish it out to the
point that after a dip in Future, the old lines cannot be seen.
A pain in the patootie?
You bet.
But not an unsolvable one.
Having heard from several
other modelers that the kit seemed to have fit problems that only magnified by
size over those found on the 1/48 kit, I proceeded with some test-fitting, which
revealed that the problems are indeed there.
However, with careful fitting - as anyone who did more
than one of the 1/48 kits learned - the fit problems can be minimized to the
point where an application of cyanoacrylate glue over the seams, followed by
careful sanding and a further application of Mr. Surfacer, all these problems
will disappear.
Past that, the kit goes together as easily as the smaller one
did.
In fact, I was interested
enough in the kit that I proceeded from test-fitting to actual assembly and
found that the kit is indeed easy to assemble.
I attached the “modular” parts before proceeding further
- left tail half to left forward fuselage half, etc. - which allowed me to work
on the joints from inside and out and get it as tight as possible.
I did the fuselage as one completed sub-assembly and the
wing as a completed sub-assembly.
There are some issues with the upper wing-to-fuselage
join, but nothing that cannot be solved with cyanoacrylate, sanding down,
applying Mr. Surfacer and smoothing out.
The cockpit is detailed
enough that only a Resinaholic will need to spend money for an aftermarket set.
A very nice multi-part pilot figure is included.
If you use this figure, you will not need to worry about
seat harness.
However, if you choose to keep the cockpit empty, do be aware
that the P-40E-1
 came out of
the factory with U.S. seatbelts and harness, which was not replaced with the
Sutton harness until the airplanes were delivered to the RAF or a Commonwealth
air force, and even then they were not always flown with Sutton harnesses.
Specifically, the two airplanes for which markings are
provided in this kit are known to have had U.S. seatbelts, for which the Eduard
multi-part seatbelt set is perfect for adding realism to the final result.
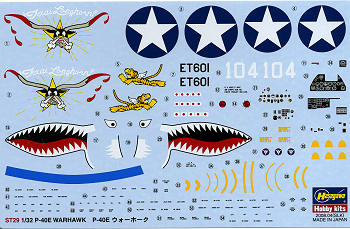
The kit provides decals with
the correct-size national insignia and full stenciling.
Individual markings are for two of the P-40E-1 version -
otherwise known as Kittyhawk 1A - both taken on charge for U.S. Forces, with one
being the P-40 flown by Ed Rector in the early days of the 23rd
Fighter Group in the summer of 1942, and one being the well-known “Texas
Longhorn” flown by Lt. John D. Landers of the 49th
Fighter Group in the Southwest Pacific, also in 1942.
With an application of “some
modeling skill required,” the final result of assembly is a model that is as
nice-looking as the other kits in the Hasegawa 1/32 lineup.
Overall, if the Ki.61 is the
best of the Hasegawa 1/32 kits for ease of assembly without a lot of hassle, and
the P-47 is the most fiddly when it comes to getting the engine and cowling to
mate with the rest of the fuselage, the new P-40 is closer to the P-47 as
regards fit, while it is closer to the Ki.61 as regards completeness of detail
and ease of assembly (with the caveat of “some modeling skill required”).
Recommended.
Thanks to HobbyLink Japan
for the review kit.
Get yours at www.hlj.com
June 2008
If you would like your product reviewed fairly and quickly, please
contact
me or see other details in the
Note to
Contributors.
Back to the Main Page
Back to the Previews Index Page


 came out of
the factory with U.S. seatbelts and harness, which was not replaced with the
Sutton harness until the airplanes were delivered to the RAF or a Commonwealth
air force, and even then they were not always flown with Sutton harnesses.
Specifically, the two airplanes for which markings are
provided in this kit are known to have had U.S. seatbelts, for which the Eduard
multi-part seatbelt set is perfect for adding realism to the final result.