Matchbox 1/72 Boston IV
| KIT #: | PK 120 |
| PRICE: | $ |
| DECALS: | Two options |
| REVIEWER: | Pat Cauthery |
| NOTES: | Falcon vac nose/turret used. |
| HISTORY |
The
Douglas Boston or Havoc started life as a private venture by the Douglas
Aircraft Company to build a light attack bomber, with the DB7 eventually
winning orders in 1939 from the USAAC and the French Armee de l’Air. In
1940 the UK placed orders for 300 DB7Bs aka the Douglas Boston. With the
fall of France, the undelivered portion of the French order was also taken
over by Britain. This resulted in a somewhat confusing array of names and
variants, but essentially the f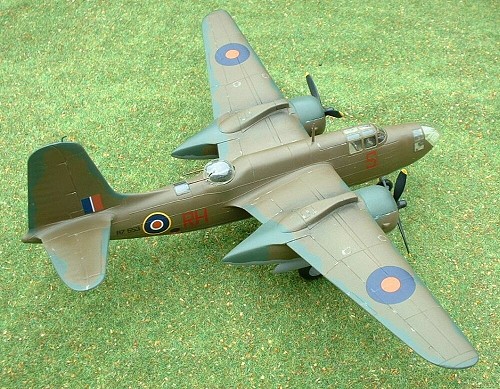 ormer French order in RAF service comprised
the Boston I, Boston II (renamed Havoc I by the RAF, some with 8 mgs in the
nose and used as interim night fighters) and Havoc II (some also with
gun-noses and A-I radar). Some of these aircraft were converted to such
bizarre purposes as towing aerial mines and acting as flying searchlights
with predictable success!!
ormer French order in RAF service comprised
the Boston I, Boston II (renamed Havoc I by the RAF, some with 8 mgs in the
nose and used as interim night fighters) and Havoc II (some also with
gun-noses and A-I radar). Some of these aircraft were converted to such
bizarre purposes as towing aerial mines and acting as flying searchlights
with predictable success!!
The RAF’s “own” order became the Boston III (roughly equivalent to what became the A-20C in USAAF service). Boston III’s were used extensively by the USAAF and RAF in Europe and North Africa and in fact the biggest user was the Soviet Union (there are some apocryphal tales of US airmen meeting Soviet Havocs in the early days of the Korean War).
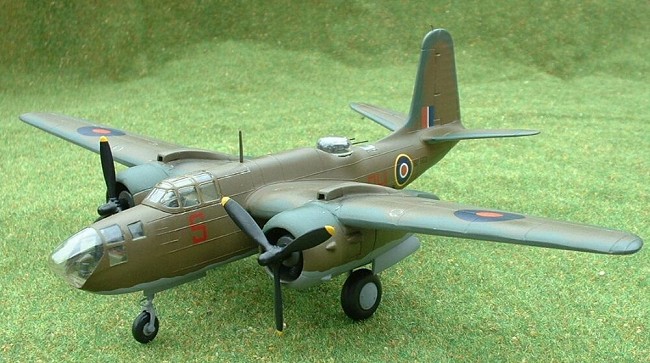
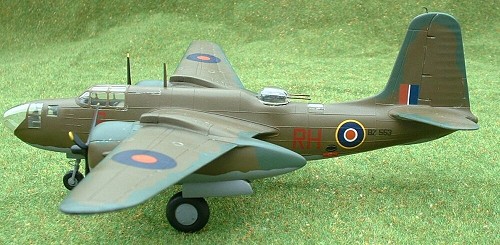
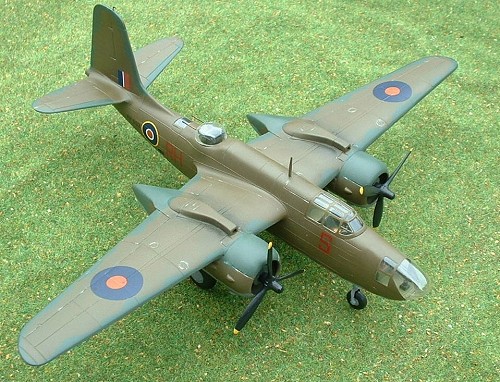
The final main variants and the subjects of this kit were the A-20J and G which saw extensive service in the Pacific and Europe. The A-20J (known as Boston IV by the RAF) featured a more streamlined glazed nose without framing, while the A-20G featured a solid nose with 4 20mm cannon or 6 .50cal mgs. The obvious difference between these and earlier versions was the replacement of the dorsal gun position with a Martin turret. The Boston V (A-20K) had uprated engines but was largely similar otherwise.
| THE KIT |
The kit is
fairly standard Matchbox, coming on three different coloured sprues,
clearly moulded with raised panel lines on the fuselage and strongly
engraved lines on the wings and tailplanes. Detail is generally rather
vague as you might expect for a kit of this vintage (1977) and a few
liberties have been taken – the small glazed cone at the back of the
fuselage is moulded in
 plastic and although both real aircraft and kit
engines feature a number of raised strakes and gills you should not
necessarily expect to see them in the same place!!. Two nose sections are
provided to enable one to build the gun-nose Havoc G or the clear nosed
Havoc J or Boston IV.
plastic and although both real aircraft and kit
engines feature a number of raised strakes and gills you should not
necessarily expect to see them in the same place!!. Two nose sections are
provided to enable one to build the gun-nose Havoc G or the clear nosed
Havoc J or Boston IV.
I vividly remember building the gun-nose variant as a child in the 70’s. Given the striking artwork on the box of this aircraft in full strafing and bombing mode over a Japanese oil refinery I imagine this was the choice of most small boys. However I picked up this kit with the intention of building this as an RAF Boston IV.
The clear nose is moulded in two halves so thought I would be adventurous and got the Falcon vac-canopy set. In fact I had to get two as an invisible force gripped my hand while trimming the first one and plunged my knife blade into its rotten heart. This way I learned that scissors offered a safer way to remove vac canopies!
| CONSTRUCTION |
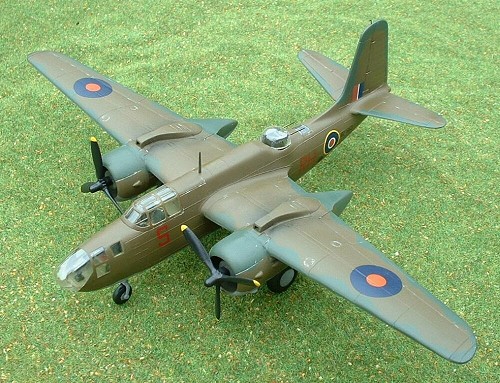
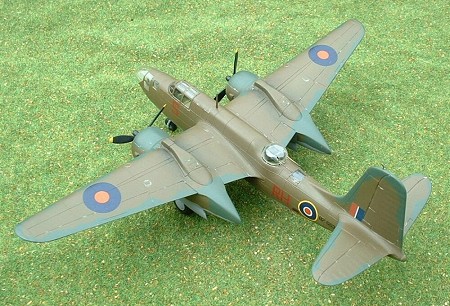
First stage was to create a hole where the turret sits as the Matchbox turret is basic to say the least, consisting of a rotating dustbin lid and three sections of steel pipe welded together. As Falcon say with impressive understatement – “considerable detail will need to be added in this area”. I used the top of a drinks bottle to form a “basket” representing the innards of the turret and glued the fuselage halves together around it. You get a cockpit floor, seat and control stick which should all be added at this stage (I painted US Interior Green – Gunze H58)and I used a small piece of plasticard to box off the cockpit behind the pilots seat. This is also a good time to get some weight in the nose section. I used lead shot covered in white glue.
 I also
glued together the two sections of the nose appropriate for the IV. This is
empty apart from a seat that is supposed to be suspended on the middle of
the bulkhead between pilot and bomb-aimer. I made a floor of plasticard
which also enabled me to hide some lead under it and added a few generic
boxes against the sidewalls. The seat was thus sited on the floor rather
than in mid-air. The right hand side window needs to be filled in, which to
their credit, the Matchbox instructions do tell you to do. I carved off
some of the front section ready to receive the vac-form nose and joined to
the main section. The kit provides blisters for the nose mounted mgs but
the photos that I could find of this aircraft appear to show these faired
over. I filled these, rather unsuccessfully, and the mg blast troughs with
Mr Surfacer. You can see from the photos where the blisters would have been
– in fact the fairings are fairly rough on the real aircraft and I felt I
have accidentally captured the effect fairly well!
I also
glued together the two sections of the nose appropriate for the IV. This is
empty apart from a seat that is supposed to be suspended on the middle of
the bulkhead between pilot and bomb-aimer. I made a floor of plasticard
which also enabled me to hide some lead under it and added a few generic
boxes against the sidewalls. The seat was thus sited on the floor rather
than in mid-air. The right hand side window needs to be filled in, which to
their credit, the Matchbox instructions do tell you to do. I carved off
some of the front section ready to receive the vac-form nose and joined to
the main section. The kit provides blisters for the nose mounted mgs but
the photos that I could find of this aircraft appear to show these faired
over. I filled these, rather unsuccessfully, and the mg blast troughs with
Mr Surfacer. You can see from the photos where the blisters would have been
– in fact the fairings are fairly rough on the real aircraft and I felt I
have accidentally captured the effect fairly well!
The engine nacelles are glued together and the main undercarriage legs are trapped between two holes in the undercarriage bays. After these were securely glued it struck me that the main undercarriage looked too short. Sure enough, without modification the kit sits too far back with its nose in the air and in my estimation 2mm needed to be added to lengthen the main gear bringing the nose more level and giving the Boston a more realistic sit. I suggest mounting the main gear on top of (looking from below) rather than in the mountings provided. Matchbox provide a bearing to go inside the wheel so that the kit can roll freely if you so wish. This sounds like a recipe for disaster to me.
The fronts of the radial engines are fitted into the end of the nacelles and the cowlings are then pushed onto the engines. At this stage I was unhappy with the fit of the engines – the orientation seemed pointed down and out when I believe they should be dead straight. So they were snapped off with much cursing and refitted with the huge gaps filled with putty. Bung some more lead in the nacelles. The engines also have a pronounced step where they join the leading edge of the wings when they should be smoothly faired in. A fair bit of filler was need at the wing roots too. Most problematic was the seam at the root of the horizontal stabilisers which despite sanding down and multiple applications of putty and Mr Surfacer 500 I never managed to perfect.
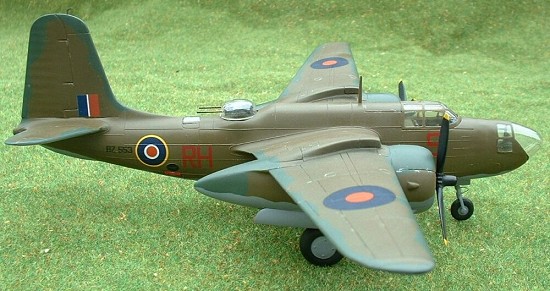
 The Falcon
vac front end was masked and fitted with white glue. It seemed slightly too
wide for the kit and was held in place with a clothes peg while the glue
set to try to squeeze it in a bit. I tried to fair it in with the rest of
the nose as best I could with a combination of white glue, paint and Mr
Surfacer – I would describe as moderately successful, but it beats a
whacking big seam right down the middle if you used the two part kit
transparency. I am sure an experienced modeller could do it better justice.
I used the kit canopy which is very clearly moulded and fits well. The
canopy frames are of course well out of scale but can be masked using
Maskol and a cocktail stick in about 5 minutes. Bliss.
The Falcon
vac front end was masked and fitted with white glue. It seemed slightly too
wide for the kit and was held in place with a clothes peg while the glue
set to try to squeeze it in a bit. I tried to fair it in with the rest of
the nose as best I could with a combination of white glue, paint and Mr
Surfacer – I would describe as moderately successful, but it beats a
whacking big seam right down the middle if you used the two part kit
transparency. I am sure an experienced modeller could do it better justice.
I used the kit canopy which is very clearly moulded and fits well. The
canopy frames are of course well out of scale but can be masked using
Maskol and a cocktail stick in about 5 minutes. Bliss.
The gun mounting for the turret was made based around two spare .50 cals from the Monogram Marauder kit with the barrels replaced with fine metal tubing and secured by superglue. The two mgs were joined with a short piece of plastic rod and then secured in the turret transparency with white glue. Of course this simplifies the actual turret mounting vastly but it is still a big improvement on the kit version.
I left off the D/F loop as I could not see one in the pictures I had and added the tail mounted pitot tube and oleo struts from spare pieces of photo-etch.
| COLORS & MARKINGS |
Most
likely colour scheme for RAF Boston IV’s is Olive Drab over Neutral Gray
with Dark Green wavy edges to the wings and tail. I used Gunze Sangyo
acrylics H52 and H53 for the OD/NG and H302 (FS34092 Green) for the Dark
Green. I took a stab in
 the dark and painted
the undercarriage and landing gear bays and door insides neutral grey as
well.
the dark and painted
the undercarriage and landing gear bays and door insides neutral grey as
well.
In RAF service, Boston IVs served with 88 Squadron 2TAF and 13, 18, 55 and 114 Squadrons in North Africa and Italy. Clear pictures are fairly hard to come by. In fact I found precisely one that identified an actual aircraft, that being BZ401 being tested at Boscombe Down. I did find some pics of unidentified 88 squadron aircraft and through interrogating other modellers was able to match up some serials and i/d letters from 88 squadron.
Roundels came from Fantasy Printshop, tail flashes from Xtradecal and the red fire extinguisher squares from the kit decals. The kit decals settled down surprisingly well, probably the best of the bunch! I used 24” dull red squadron code letters from Tally Ho and the serial codes I printed myself. Being a coward I chose not to display invasion stripes which could also have been an option.
For the finishing touches brushed on some black pastel powder to represent exhaust staining. I touched up a few of the panel lines with a silver pencil to simulate a little paint chipping.
| CONCLUSIONS |
 I believe
if you want to model this version of the Boston it is this kit or nothing.
Airfix and Revell do the more common Boston III and High Planes do some of
the earlier variants such as the night fighter. It’s a passable kit and I’m
not going to take a ruler to a Matchbox model for fear of what I might find
but I have a nagging suspicion looking at real photos of this plane that
the nose may be a touch too short.
I believe
if you want to model this version of the Boston it is this kit or nothing.
Airfix and Revell do the more common Boston III and High Planes do some of
the earlier variants such as the night fighter. It’s a passable kit and I’m
not going to take a ruler to a Matchbox model for fear of what I might find
but I have a nagging suspicion looking at real photos of this plane that
the nose may be a touch too short.
If you like the old Matchbox kits you will like this and it could be thrown together to build a nice simple model in a day (which is of course what it was designed for!). Although my “improvements” to the kit were a bit amateurish I was pleased with the way this turned out and it was the first time I had done any serious vac-canopy work or printed my own decals. The French version would look very colourful with the tricolour covering the entire tail. There is also a later Matchbox boxing of this kit featuring a USAAF aircraft with invasion stripes on the box art.
| REFERENCES |
British Warplanes of World War II – Edited by Daniel J March
American Warplanes of World War II – Edited by David Donald
http://redtears.free.fr/88%20squadron,%20mission%20au%20dessus%20de%20boulogne%20ang.htm
http://www.wpafb.af.mil/museum/research/attack/a3/a20z-3a.jpg
August 2005
Copyright ModelingMadness.com
If you would like your product reviewed fairly and fairly quickly, please contact the editor or see other details in the Note to Contributors.