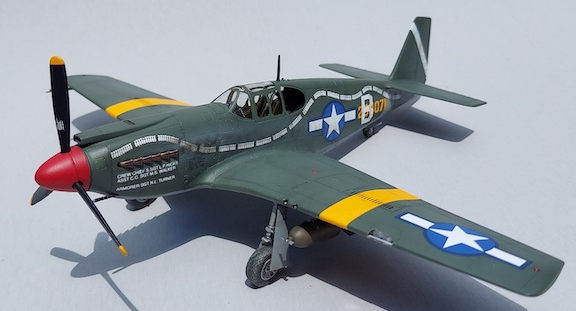
Accurate Miniatures 1/48 A-36 'Apache'
| KIT #: | 3401 |
| PRICE: | $ |
| DECALS: | one option |
| REVIEWER: | Jonathan Prestidge |
| NOTES: | Reboxed by Academy. Eduard belts and masks. |

| HISTORY |
From the kit instructions - The USAAF had become very interested in developing a dive bomber from the basic P-51 airframe and the result was the A-36. This plane is still referred to as the “Apache” but the name was never “officially” sanctioned.
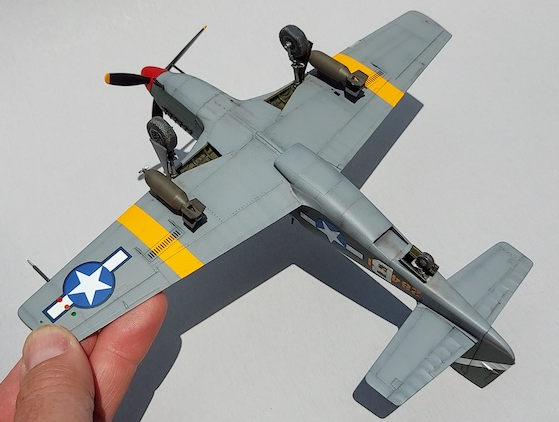
The A-36 was fitted with bomb racks to carry two 500 lb bombs and extendible dive brakes on the top and bottom of the wings. These dive brakes proved to be a problem and disturbed the balance of the aircraft when deployed. In field service the dive brakes were not often used and in many cases were actually wired shut to prevent accidental use.
 ***Though
the dive brakes were initially problematic, they were used operationally once
modifications were made to the hydraulic actuators. It was found that a nearly
vertical bomb run with the dive brakes extended delivered the most accurate
bombing results. J.P.***
The A-36 was produced in larger numbers than any of the other Allison-engined Mustangs…about 500 airplanes. They served primarily in the Mediterranean and China-Burma-India theaters as bombers and reconnaissance aircraft. Only one A-36 is known to survive and may be found at the U.S. Air Force Museum.
The markings for this A-36 kit represent an aircraft from the 27th fighter group flying in Italy in the spring of 1944. This particular airplane had compiled a considerable number of missions (190 bomb runs).
***Like all the Allison-engined mustangs, the A-36 was a formidable fighter aircraft below 15,000ft. It was significantly faster than the Spitfire V at lower altitudes and had even better flying characteristics than the later Merlin-engined Mustangs due to the lower weight weight of the Allison V-12. Although the A-36 was a dive bomber and never used purely as a fighter, there were several A-36 aces. J.P.***
| THE KIT |
When Accurate Miniatures released their early Mustang kits in the mid 1990’s they redefined state-of-the-art in the model world. The surface detailing and accuracy are still impressive today. As of this writing, they remain the only Allison-engined Mustang kits available in 1/48th scale. The kit plastic parts have very nice raised and engraved detail (where appropriate), optional weighted tires, great parts fit overall, and good clear parts (for a closed canopy only). Parts count is low without compromising detail. The decals are opaque with great color but are a bit thick. There is one marking option.
| CONSTRUCTION |
 Instead
of a comprehensive build log here, I will touch on what I did to make the kit
more accurate and problem areas to watch out for.
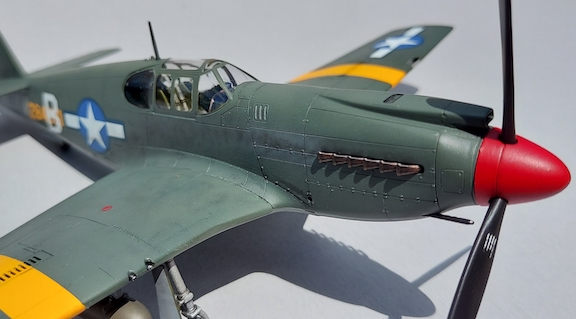
Before starting assembly, I made a few modifications to the kit for greater accuracy. First, I used thin plastic card to block off behind the dive brake openings after painting the interior of the dive brake recesses flat black. Second, I cut two pieces of clear sprue and glued them in the wing behind the landing light cover to represent the two landing lights present on the A-36. Finally, I drilled out the barrels of the six machine guns with a #11 Exacto blade.
Further build notes for this kit apply to all the Accurate Miniatures & Academy early Mustangs. On the topic of wing guns, I highly recommend gluing these to the lower wing before gluing the top of the wings in place. Otherwise, you will lose at least one as you push them into place and they disappear into the wing forever. Trust me on this - I had to fabricate a new wing gun to replace the one rattling around in the wing! This is the second time this has happened to me while building an Accurate Miniatures P-51 variant. To keep myself from repeating this a third time (since I have one more A/M P-51A on the shelf), I opened that kit up and glued the wing guns directly to the lower wing (see pic). Don’t forget to open the holes for the wing racks at this time if your version is so equipped.
The rest of assembly went smoothly, but I recommend taking extra care on the wing root fit and the main landing gear. The landing gear fit loosely in its socket and moved all around until the glue set fully. I left my main wheels free to turn on the axles so that I could position the flat spot properly once the gear legs dried.
| COLORS & MARKINGS |
 Polyscale
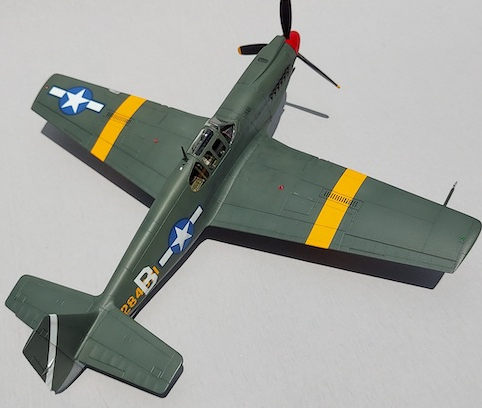
Olive Drab and Neutral Gray were sprayed with my Badger Anthem dual-stage
airbrush. The
weathering on the this aircraft was done by pre-shading the paint, post-shading
the paint, applying
pastels
with a closely-cropped paint brush,
airbrushing layers of very thin gray paint mixed with satin clear for one layer
of the exhaust stains, chipping done with a silver Prismacolor colored pencil,
washes, etc. I did a good deal of weathering prior to sealing everything with an
airbrushed coat of Future in preparation for decals.
I used the kit-supplied markings for an aircraft from the 27th fighter group flying in Italy in the spring of 1944. The kit decals were a bit thick and required lots of setting solution to conform to the engraved detail. It took patience and time to get the yellow wing stripes to conform to the wing detail. Once they had started to set up, I cut the openings of the dive brakes with a razor blade. It took many further applications of Micro Sol to settle the decals into place.
Capturing the weathering in photos was a bit difficult. The contrast of the yellow wing bands and white fuselage markings with the Olive Drab reduces the tonal variation visible in the Olive Drab. With that said, I could have gone even further with the weathering than I did since the final satin clear coat I applied toned down the weathering more than I wanted.
| CONCLUSIONS |
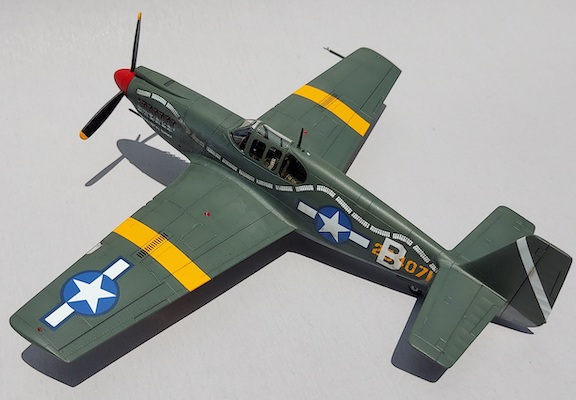 Overall,
this is still a great kit that can be turned out well. The surface detail holds
up well to today’s
standards. There are a few tricky areas to be careful of - namely the wing root
fit, the main landing gear angle, and the wing guns. The decals also require
patience and lots of setting solution. However, if you take your time and get
these right, you will be rewarded with a great model. Accurate Miniatures
A-36/P-51A is still the only game in town for Allison-powered P-51s.
Recommended for modelers with some
experience.
4 March 2022 Copyright ModelingMadness.com.
All rights reserved. No reproduction in part or in whole without express
permission. If you would like your product reviewed fairly and
fairly quickly, please
contact
the editor or see other details in the
Note to
Contributors.