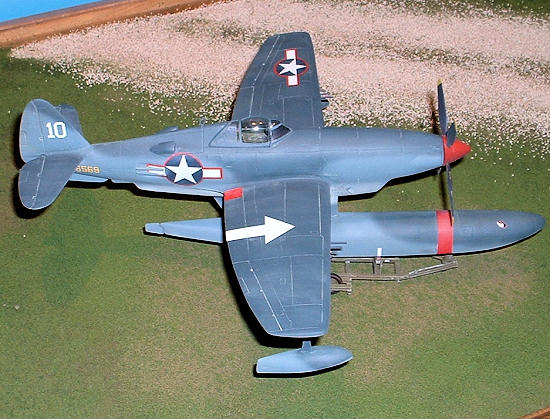
Monogram 1/48 Thunderbolt Floatplane
| KIT #: | PA-187 |
| PRICE: | $8 |
| DECALS: | Two options |
| REVIEWER: | Dale Rannals |
| NOTES: |
Kitbashing at its best.
Koster XP-47H vac/resin set: $18 from Mr. Koster . Medallion Models p-47N wing conversion: $8 from online auction. Spare floats from a wings Kyofu vac kit |

| HISTORY |
Anthony pushed the throttle forward and the big
Hemi engine roared to life. The
sound was unmistakable, you could almost hear each of the sixteen cylinders as
they forced the big propeller to claw its way through the air.
The large plane shuddered as it picked up speed….faster and faster and
still the water did not want to lessen its grip.
Finally, after what seemed an eternity, the water let go, and the Seabolt
was airborne.
After a quick scan to ensure the others were
with him, the course was set and they started climbing.
Settling out at 26,000ft, they set the mixtures to the most economical
settings….it was going to be a long flight.
Anthony scanned the instruments and looked over his craft.
“What a strange bird” he thought, “and what a strange set of
circumstances that created it.”
 flattops
that escaped the Pearl Harbor attack back in June of ‘41.
So attention was turned to floatplanes that
could defend the area without needing the airfield.
Luckily Grumman was producing some Wildcatfish fighters, but not nearly
enough, and their performance left something to be desired.
Something else was needed.
Grumman and Chance Vought both hurriedly worked on adapting their new Hellcat
and Corsair fighters to floatplanes…….and actually they succeeded in commendable
time, but for one small factor.
Quite a surprise actually, but it seemed the P&W R2800 engine didn’t play well
with water. The awesome engine just
didn’t like getting cold water splashed on it.
Cracked cylinder heads were an all too common problem…the test pilots
seldom knew how many working cylinders they would still have once airborne!!
Surely this would not do for a combat aircraft.
So while P&W struggled to find a solution, the race for another engine
began.
Enter the oddball.
Republic, never a favorite with the Navy, came forward with a solution.
They were just finishing up testing the XP-47H Thunderbolt with the
Chrysler IV-2220 16 cylinder engine and GE CH-5 turobosupercharger.
Chrysler had just finished the 2600hp, 1000hr test mark and was ready to
go into full production.
Unfortunately for them, the Army was well satisfied with the P-47J Superbolts
starting to come off the production lines, and the “H” offered no performance
benefit. So here was a great
airplane/engine combination with no future.
But Republic had kept a keen eye on the situation in the Pacific and had
developed a floatplane version, with a new wing, on its own.
The wing, slated for a different long range project, extended the span to
incorporate more fuel. The
floatplane version added even more fuel in the space of the wheel well area,
which obviously were not needed here.
After a few minor teething troubles were ironed out, the P-47H Seabolt
was put into full production. It
was just what the Navy and Marines needed, a very long range, high speed, high
altitude fighter that had no need for dirt to land on.
They had the speed and maneuverability to
defend recently taken islands until airstrips could be finished and their land
based cousins continued the job.
Then they would proceed to the next area, before an assault started, to soften
up and tire out the enemy. Once
production got to full tilt and more squadrons were formed a new mission
emerged: long range interdiction.
Extreme range missions would be flown to hamper rear areas and supply
lines, forcing the enemy to try to protect everything, everywhere……...
……extreme range indeed, Anthony thought as he
again checked his position on the map.
He was sore and stiff……..his parachute wasn’t all that comfortable to sit
on for a few minutes, let alone several hours.
Up in the thin air he barely made out the
 coastline
ahead, but he did notice the moving specks several thousand feet below.
Calling his flight, they positioned to attack the enemy planes as the
other flights continued on to bomb their target.
He couldn’t yet tell what the Japanese aircraft below him were, but it
didn’t matter. He wasn’t
going to try to maneuver with them…..Anthony thought as he smiled and nosed the
big plane over……Seabolts are just awesome in a dive.
The reality.
The Republic XP-47H was a recipient and test
bed for the Chrysler IV-2220 inverted vee 16 cylinder engine.
A latecomer to the
Nonetheless, it was a very interesting design,
basically two V-8’s mated together.
It had commendably small frontal area but was monstrous in length at nearly 10 ½
ft. (similar displacement Rolls
Royce Griffons were only about 6ft long.)
Interestingly, power take-off for the reduction gear came from the center
of the engine, as did the supercharger and accessories drives.
This substantially reduced torsional twist in the crankshaft.
Single overhead camshafts operated two valves per cylinder in a
hemispherical combustion chamber.
It was the first of Chryslers “Hemi” engines.
| THE KIT(S) |
This project started out strangely.
I had a spare set of floats from a 1/48th Wings Kyofu kit and
wanted to mate them to some aircraft for a whiffer build.
An Otaki Hellcat caught my eye, as did a Monogram “Bubbletop” P-47 kit in
the stash. But I had just finished
a Tamiya Kyofu and felt both of those would look too similar in shape.
I wanted something different.
Then my eyes rested on the weird shape of the Koster vacuform XP-47H
conversion fuselage and the little light bulb went on in my head.
That would look pretty neat, methinks.
But hey, what if I used the Medallion models P-47N resin wings also?
A long range floatplane
 interceptor…..hhhhmmmmm…that
just sounds awesome! So here we
have a strange collection of parts all designed for the Monogram T-bolt.
The fantastic Medallion Models P-47N conversion. This consists of resin wings,
wheels and bomb pylons, and white metal landing gear and propeller assembly.
The detail is awesome….very fine engraved panel lines; very nicely done.
Too bad they are no longer in business.
The floats from a Wings48 Kyofu vac kit.
A Squadron vacuform Malcom hood. I
have always liked the look of Malcom hoods on Thunderbolts.
Last but not least the necessary donor parts from a Monogram Thunderbolt kit, in
this case a bubbletop version, but it doesn't really matter as all I will need
is the cockpit and the horizontal stabs.
| CONSTRUCTION |
The first thing I had to do is cut out and sand
down the vac pieces. This really
isn’t as scary as most think it is.
Here are the steps I use:
2.
Snap, don’t cut. No need for the
score to go all the way thru, as the next step is to “snap” the parts from the
sheet.
3. Next, carefully sand down all the parts to
eliminate t he
“waste” plastic that is there.
Cutting the parts at a 45 degree angle back “into” the parts helps reduce the
waste which helps reduce the amount of sand time, and anything that reduces the
amount of sanding is a good thing.
This is also where the pencil mark comes into play.
Remember, the
pencil line rules!! Do not forget
this. Pick a suitable flat area and
tape some sandpaper to it. The idea is to sand until the pencil line just
disappears, but no farther. Check
the part often, check the line often.
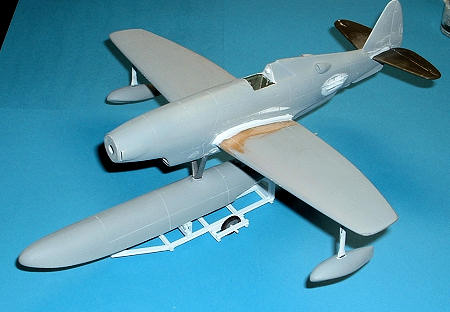
Once I had the floats and fuselage halves
sanded down, I glued small tabs on all the vac pieces to serve as alignment
aids. I then proceeded to epoxy a
copious amount of lead weights in the front of each float half.
After this was dried I glued the main and outboard floats together.
I let these dry while I turned my attention to the office.
This was assembled and painted a darkish green.
I used the kit instrument decal and glued it to the panel…should look the
part once the canopy is on. I also
used some Eduard seat belts to liven things up a bit.
I then mounted the cockpit in the fuselage, using some round evergreen
tube as mounting posts to get the alignment right.
Time to join the fuselage halves.
This went together well, but the front resin intake, which is sort of
captured by the fuselage, wasn’t so cooperative.
I kept dropping it inside, each time managing to retrieve by a
combination of special maneuvers to get the piece back out of the opening.
Once in I superglued it in place.
A few swipes with some sanding sticks and I was ready to move on.
In the Forum I had started a Work in Progress
thread, and it was at this time that I posted a pic eyeballing the float
position. Some of the members
suggested that I lengthen the float…it looked too short for the Seabolts
fuselage. I agreed but was
apprehensive…I had never done any surgery of that type before and was nervous
about screwing up the only float I had.
They responded with suggestions and mucho support, so I gave it a try.
I cut the assembled float in half and extended it about six scale feet….1
¼” or so. Using the keel as my
straightedge I wrapped Evergreen sheet around it and got out the putty and
sanding sticks. When done the “new”
float looked much better; much more proportional to the length of the fuselage.
I was happy .
.
I “took a break” in between float sanding
sessions and turned my attention towards the resin wings.
My next step was to cover up those gorgeous wheel wells…this craft is not
going to need them. In keeping with
the “long range” theme, I declared it would be more space for fuel.
I used the Monogram kits landing gear doors to cover the bays….with just
a little sanding and some Evergreen tube for them to sit on, they fit very well.
I then puttied and sanded the area smooth, then scribed some new  panel
lines. Presto….no more wheel wells.
Next on the agenda was to glue the wings and
stabilizers to the fuselage and putty and sand things smooth.
Considering both these conversions were meant for the same Monogram kit,
the fit was actually pretty good. I
still had to putty and sand, but that’s what we live for, right?!?!
Okay, time to join the craft with the main
float. Here I glued some brass rod,
for structural strength, into the fuselage and down into the main float…..I
really didn’t want this falling apart on me.
Trying to get these parts and the two forward struts all aligned before
the CA glue dried was cause for some heart palpitations for sure!!!
So here we are with a mostly complete figment of imagination. Time for some paint!!
| COLORS & MARKINGS |
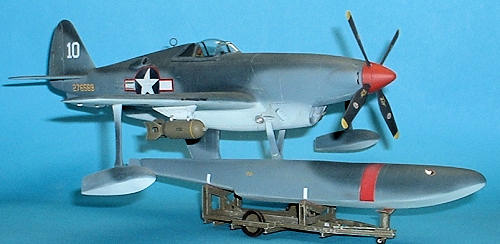
I settled on a navy tri-color scheme after
pondering some of my own and several very interesting ideas from the forum
members. It was one of the really
difficult parts of this build, trying to decide on just one.
But with scheme in mind, I went for the spray booth.
First color down was
 After this
dried I gloss coated the model with Future and then also let this dry for a day.
Then it was time for decals.
Again a member of the forum came to my rescue and suggested the red-surround
insignia to give it a splash of color.
This idea I liked and found some suitable units in the decal dungeon.
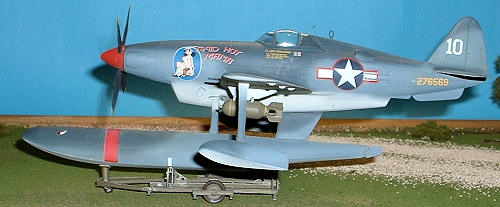
I also knew this bird was to have a scantily clad vixen on the nose…this
I found in Eagle Strike's "American Jabos" #48053.
The "Raid Hot Mama" moniker is from a P-47D of the 510th FS, 405th FG.
It has always been one of my favorites....I just never got around to
building, well, a "normal" P-47 in a while.....so I decided to use it here. The
propeller warning stripe on the float is from Monogram's Devastator sheet...a
wing chevron or some such. And the float "eyes" came from a severely used up
Warhawk sheet...I saw them and thought that would look really cool floating in
the water with those eyes peeking out.
These all snuggled down well with a coat of Solvaset.
Also, as a rule of thumb, any decal that has clear areas on it…i.e., that
could “silver”, I add a drop of Future to the area before I lay the decal down.
It has worked so far……….
Next on the agenda was going over the panel
lines with a yellow-ish white oil wash to highlight them.
And then I tried a new technique……laying down a
multi-colored oil paint “film” that I learned about in the forum to
subtly change the hue of the paint.
Here you “dot” the surface with various oil colors, then you blend them in with
a soft brush damp with thinner (I used Turpenoid here) till you get a slight
color film. It is hard to see in
the pics, but I really like the result and will be doing this more often.
I duly gave the model a coat of Future/Tamiya flat base to dull things
down, and at this stage we are ready for the final bits.
| FINAL CONSTRUCTION |
I added a DF loop antenna I found in the
stash…figured it would be needed for those long flights over the Pacific.
The canopy was attached and here I ran into a small problem.
I had some unsightly gaps on the front windscreen to deal with.
Not a fault of any part, more on my not getting the canopy cut out co rrectly.
No worries though, I filled
the offending gap in with white glue…it is a great gap filler for canopies due
to its drying clear and self-leveling ability.
It shrinks as it dries so several applications were necessary.
I touched up the paint in this area and all looked well.
Next to go on were two 1000lb bombs that were painted and decaled, glued
on to some nifty little sway braces from the stash (never throw parts away!).
I added gun barrels made from brass tubing, and that pretty much
completed the beast. Well, except
for a place to sit.
Halfway thru this build I scratch built a
beaching trolley for this to sit on.
This was made from Evergreen I-beam, square tube, and sheet.
It wasn’t all that difficult, as it is just straight beams, no hard
curves to fabricate. Wheels came,
again, from the stash.
| CONCLUSIONS |
I can’t really comment on this kit, ‘cause it
isn’t a kit, really.
- I can say the old Monogram Thunderbolt,
bubbletop or razorback, is a still great kit that can be had real cheap.

- I can say that the Koster conversion set is
very well done and a great way to have something different in your collection.
The vac and resin pieces are very well molded.
I will be ordering more from Mr. Koster.
- I can say that the Medallion Models
conversion set is also extremely well done.
The detail is fantastic.
Again, it is sad that they are out of business.
- I can say that I had a blast putting this
concept and all these different bits together.
My love of float planes is what got this “off the ground” and it was a
good excuse to try so many different things. Kitbashing,
scratchbuilding, panel line and rivet engraving, different weathering
techniques….a lot of firsts for me here.
And the help and support I got from the forum members was truly
fantastic. Thanks guys!!!
I had fun.
And that’s what it’s all about.
| REFERENCES |
- The web
-
(ISBN
978-1-58007-109-3)
- Allied Aircraft piston Engines of WWII (ISBN
1-56091-655-9)
- Squadron/Signal P-47 In Action
Kits courtesy of me and my love for anything
different. ( especially with floats on them!.)
If you would like your product reviewed fairly and fairly quickly, please contact the editor or see other details in the Note to Contributors.