The Martin PBM Mariner was
designed as a stable mate to the immensely successful PBY Catalina. It is a
large cantilever, gull winged, twin engine flying boat. The wing and tail
surfaces required no external bracing like so many flying boats that
preceded it making it highly aerodynamic.
The first PBM-1’s en tered
service with the U.S. Navy in September of 1940 and subsequent models would
serve with the U.S. up until about 1956. Other countries like Uruguay would
operate them well into the 60’s.
The PBM-5 for which this kit is based on would
herald in retractable landing gear making her one of if not the largest
amphibious aircraft ever. For a piston, prop, twin engine bird this thing is
a WHOPPER. With its deep fuselage and wingspan of 118’ it dwarfs four engine
bombers like the B-17 out spanning it by almost 15’.
Going to keep it brief at this point. I’ve
heard a rumor that a patron of this site who is far more qualified to write
about the history of the PBM may be posting an article on this subject here
at MM. Not to mention far more interesting.
This
is the first mainstream 1/72nd
scale, injection molded kit of this aircraft that I am aware of. Revell
released it back in the 50’s in an oddball box scale that can still be found
on eBay. This one is molded in light gray styrene. Molding is clean and
flash free. The plastic is relatively soft not too unlike that of an AMT kit
and the clear parts are good and transparent. There are markings for two
aircraft printed by Cartograph and I found them to live up to the high
standards of that company.
As usual the interior was first up to
bat. I painted the flight deck interior green and the rest of the insides
chromate yellow. The myriad of windows were glued from the inside with
Testors clear parts glue which if I were to guess is an acrylic polymer. I
masked them on the outside before the fuselage halves were joined together
just in case this clumsy oaf were to knock one or more of them out while
pressing on them with the masking film. This method also allows you to put pressure
on them from the inside.
The engine nacelle bomb bays were also
painted in chromate yellow. While there is no ordinance supplied in the kit
I found the bomb bays well appointed and too nice to close up. All the frame
work and spars are slightly fiddly but for the most part go together pretty
well.
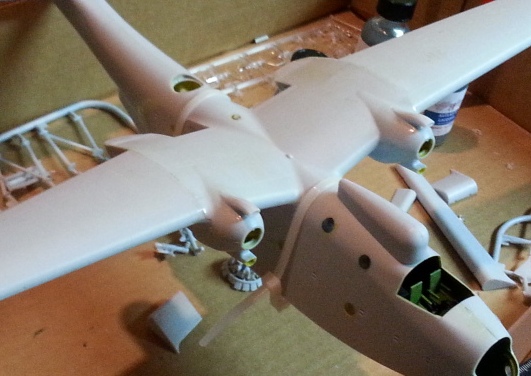
Now we come to the part that seems to be giving
modelers the most trouble which is joining the wing to the fuselage. After
the wing assembly is complete you’ll notice they sag sadly downward way out
of the line of proper dihedral. Do not fret. The wing sets in a recessed
saddle on the fuselage. It is a TIGHT fit to say the least but not
impossible. When you glue the top and bottom parts of the wing assembly
together make sure the strips in the rear on each side that butt up into the
“saddle” either are not cemented and float free of each other or what I did
is to alligator clip them where they sit in line with each other top to
bottom and then liquid cement them and let them dry thoughroly. There is a
little light dome on top of the wing. I drilled a hole in the saddle
directly underneath it to give the clear part more clearance. For a little
more assurance of a proper fit I filed down the very top of the saddle a
little for good measure. After a lot of dry fitting I laid down the liquid
glue in the saddle where
 the
wing would meet. Zippy ties in the front and back pull the wing into the
fuselage and up into proper dihedral and liquid glue was then applied fairly
generously around all the seams. I let this dry for a whole day before
cutting the zippy ties. After this is all done there is a gap where the
inner, lower part of the wing meets the fuselage that may need a little
filler.
A couple other issues I had with this
build were self inflicted. The axle on the nose gear broke off somewhere in
the construction and I had to fabricate a new one out of a T- shaped piece
of sprue. Got a oleo strut from a P-38 kit. There are two triangular shaped
doors that cover a glazing low on the bow. I chose to leave them in the open
position. While moving one into place with a pair of tweezers the little
booger shot out like a tidally wink never to be found again like so many
other tiny parts before it. With the other one I was able to use it as a
pattern to cut new ones out of sheet styrene.
A couple of led fishing sinkers were set on top of
the nose gear wheel well through the nose turret opening and glued down with
epoxy to make her sit on her nose instead of her tail.
The last problem with the kit involved
shoe horning the front turret into the nose. It’s a little easier if you put
the turret carriage in first and then the ball to follow. I actually filed
down part of the rear of the ball glazing to give it a little more
clearance.
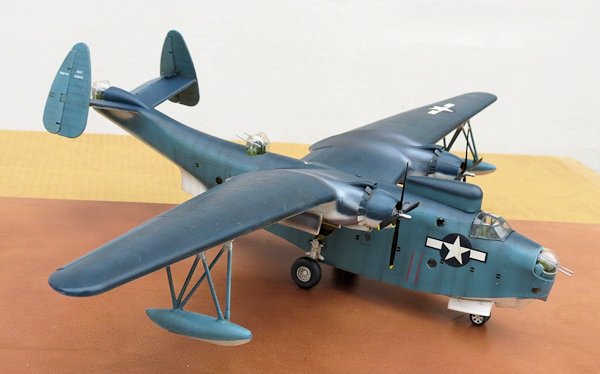
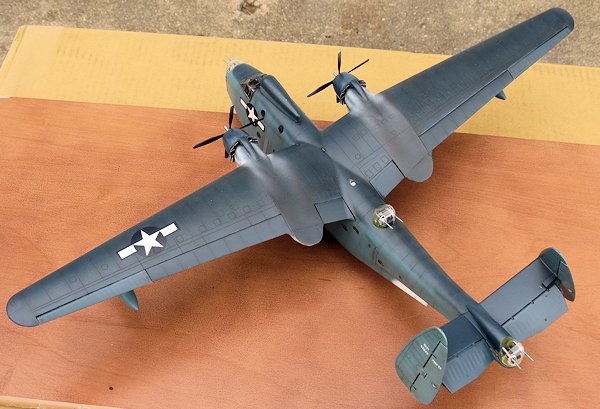
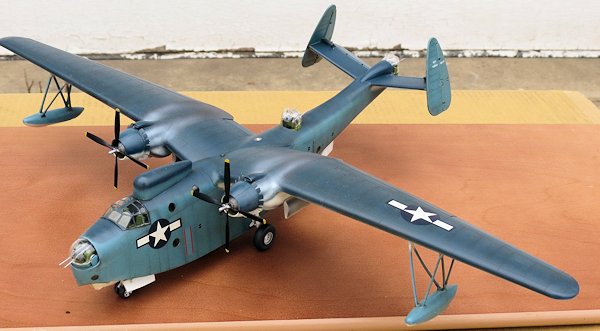
 First step in painting was to
pre-shade the panel lines. The camouflage colors are Tamiya lacquers for
which I’ve been toying with as of late. The yellow chrome is Testors enamel.
I usually leave subtle traces of panel shading. Navy aircraft often look
really dirty {as do many of the Mariner photos of them in service} so I went
heavier with the pre-shading on this project. After decals and a gloss coat
over the whole thing it gets a wash of Raw Umber oil paint followed by dull
coat. Once again the decals are superb and laid down perfectly.
I haven’t seen a new worthwhile
kit from this company since they had Academy in front of their own name.
That is until now. I really enjoyed this build and have to give Minicraft a
big SALUTE for choosing a bold, important and overlooked subject that’s
really not rooted in the safe money as far as models go. I t’s
got a few issues as do a lot of kits out there but nothing that cannot be
overcome with a little patience and dry fitting. With an 18” wingspan it is
large even in 1/72nd
scale. And since it’s not something one see’s everyday if ever in the scale
modeling universe she makes for a real conversation piece. As someone said
on a facebook page,”You just gotta love old clunky flying boats!” I’d have
to say Minicraft has a big beautiful winner here with their Mariner. Hope to
see earlier versions of the PBM in the future or maybe even the Mars. That
baby would come in with just over a 33’ wingspan in 1/72nd
Scott Weir


 tered
service with the U.S. Navy in September of 1940 and subsequent models would
serve with the U.S. up until about 1956. Other countries like Uruguay would
operate them well into the 60’s.
  on them with the masking film. This method also allows you to put pressure
on them from the inside.
  the
wing would meet. Zippy ties in the front and back pull the wing into the
fuselage and up into proper dihedral and liquid glue was then applied fairly
generously around all the seams. I let this dry for a whole day before
cutting the zippy ties. After this is all done there is a gap where the
inner, lower part of the wing meets the fuselage that may need a little
filler.
  First step in painting was to
pre-shade the panel lines. The camouflage colors are Tamiya lacquers for
which I’ve been toying with as of late. The yellow chrome is Testors enamel.
I usually leave subtle traces of panel shading. Navy aircraft often look
really dirty {as do many of the Mariner photos of them in service} so I went
heavier with the pre-shading on this project. After decals and a gloss coat
over the whole thing it gets a wash of Raw Umber oil paint followed by dull
coat. Once again the decals are superb and laid down perfectly.
 t’s
got a few issues as do a lot of kits out there but nothing that cannot be
overcome with a little patience and dry fitting. With an 18” wingspan it is
large even in 1/72nd
scale. And since it’s not something one see’s everyday if ever in the scale
modeling universe she makes for a real conversation piece. As someone said
on a facebook page,”You just gotta love old clunky flying boats!” I’d have
to say Minicraft has a big beautiful winner here with their Mariner. Hope to
see earlier versions of the PBM in the future or maybe even the Mars. That
baby would come in with just over a 33’ wingspan in 1/72nd