Eduard 1/48 Yak-3
|
KIT #: |
8029 |
|
PRICE: |
20 Euros when new |
|
DECALS: |
Four options |
|
REVIEWER: |
Spiros
Pendedekas |
|
NOTES: |
Oh, my! Yet another 1/48 Eduard Yak-3! |
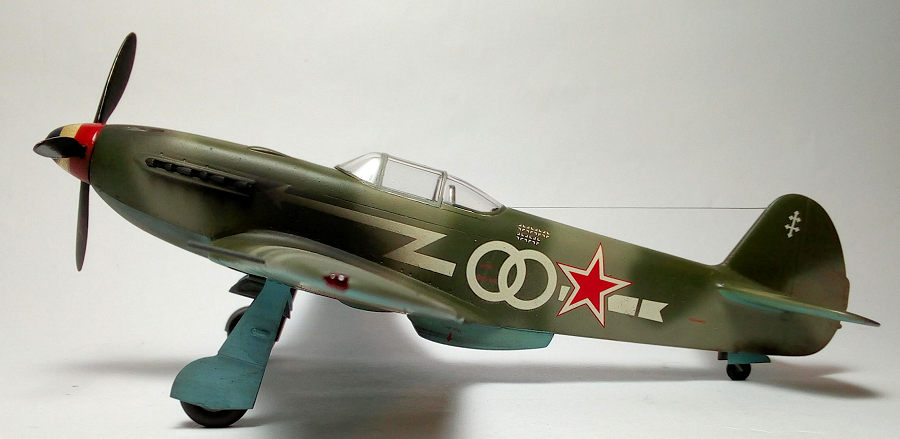
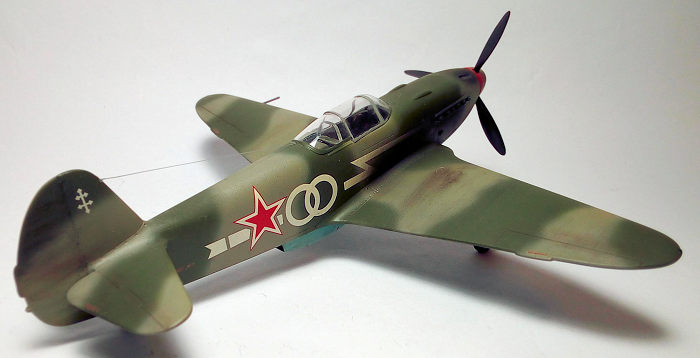 The
Yakovlev Yak-3 was a petite and lightweight single-engine, single-seat World
War II Soviet fighter. With its high power-to-weight ratio, it proved to be
a formidable dogfighter. Robust and easy to maintain, it was much liked by
both pilots and ground crew. It was used, among others, by the famous "Normandie
- Niemen" Group, during the war, with French Ace Marcel Albert, who then
flew with the Group, considering it a superior aircraft to the Mustang and
the Spitfire!
For a detailed history of the type, as well as its usage with Normandie-Niemen
Group (with a “bonus” excellent build of the 1/32 Special Hobby kit), please
refer to Tom’s thorough review here.
 Introduced
by Eduard in 1998, apart from the fact that there are no parts numbers
molded at the sprues, this kit easily falls into the mainstream kit
category. It comes in a top opening box of sufficient quality, with a nice
box art of “Normandie-Niemen” aircraft No.5 proudly flying. Inside you find
two separately bagged, very well molded dark gray sprues that contain all
the parts. External detail is nicely engraved. Cockpit detail is not bad at
all, with a believable seat and quite a few “bits and pieces” to make it
look busy. Same for the landing gear and bays, kit provided detail level is
fine (I am aware that there are “profipack” versions of the kit that take
care of the cockpit and landing gear with some nice, scale looking PE parts,
replacing, at most cases, the kit provided ones, but also adding some extra
detail as well).
Clear parts are thin, well molded and crystal clear, nicely offering a
one-piece (closed) or three-piece canopy option. Decals are superbly
printed, but look extremely thin. Instructions are very detailed and well
written with Tamiya, Humbrol, Revell, Testors and Aeromaster color codes
provided. A small but comprehensive history of the type and its “Normandie-Niemen”
days is also there. All in all, a very pleasant looking kit, begging to be
built!
I started by attaching the aft headrest plate, cockpit trim wheel and rear
wheel support at the starboard fuselage half and another trim wheel at the
port cockpit sidewall. I then joined the fuselage halves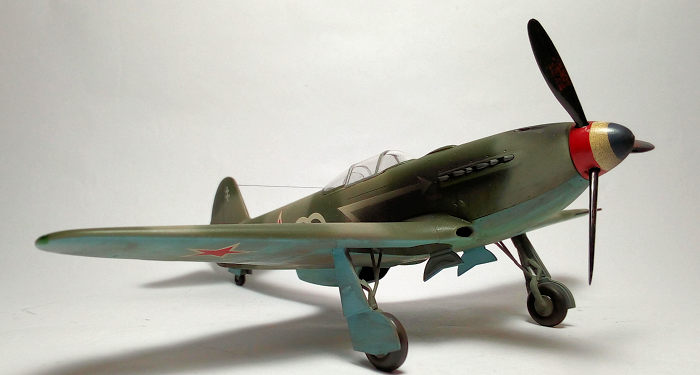 ,
with the prop axle trapped at the front, followed by attachment of the top
cowling. I continued by joining the two wing halves. The wing top middle
section doubles as the cockpit floor, so I built up the cockpit onto it. It
consisted of 12 parts, the seat included. Following the instructions (yes, I
did perform that radical act), basic cockpit color was Hu92 Tank Gray, with
black instrument panel, consoles and stick grip, light brown trim wheels and
slate gray backrest. All instrument and switches areas were dry brushed with
silver and had some tiny red, white and yellow details painted with 10/0
brush, to add interest. I have to say that the (non-profipack) kit provided
cockpit looked very nice after completion!
The fuselage was then attached onto the main wing and the horizontal
stabilizers were affixed at the back. The three piece underbelly oil cooler
was assembled, had its innards painted tank gray with black, then silver
dry-brushed radiator faces (which have a nice mesh-looking surface) and
attached into position. Despite a feeling of “clunkiness” (mentioned by
other modelers, as well), overall fit was good, and in no time I had a basic
model assembled. After some minor filling and sanding, I covered the cockpit
and oil cooler areas with wet tissue and headed to the paint shop!
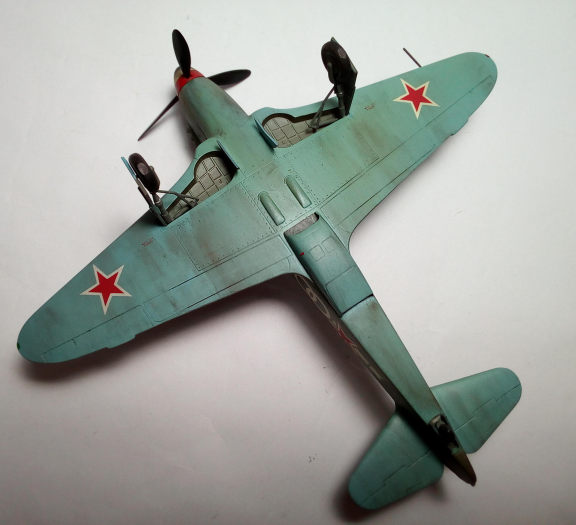
I first gave all undersides (including gear doors) a coat of Hu65 Light
Blue, then masked it off and gave the topsides a coat of Hu64 light gray.
With my airbrush at “fine” settings, I then freehanded the Hu224 Extra Dark
Slate Gray that dried to a greenish/slate-ish gray shade, which I think
comes close to how that color looked in reality.
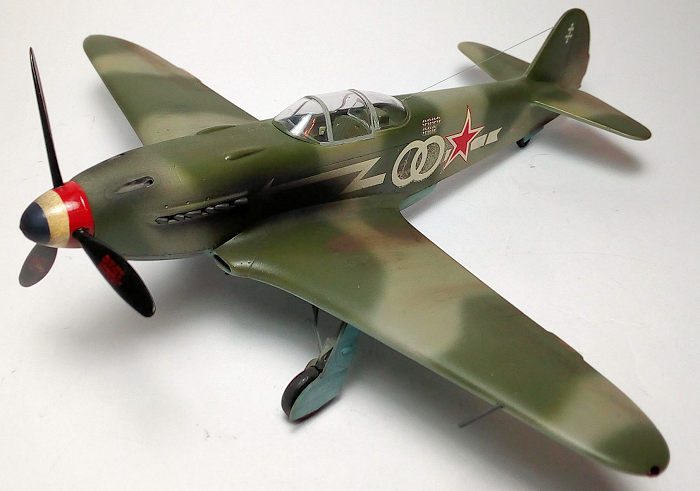 After
removing the masks, I gave the model a coat of Future and went on to apply
the decals. I used the kit provided markings, in order to represent
Commandant Louis Delfino’s plane. Due to the extra thinness, I handled the
decals very carefully. To my relief, they adhered very well, snuggling over
every surface detail with no silvering whatsoever. Of interest is the fact
that, according to instructions, no red star (which was the “norm”) is to be
applied onto Commandant Louis Delfino’s plane fin, just a very nice Lorraine
Cross, a great looking and “different” scheme. This is justified by pic
evidence, though fin red stars might have been applied at some time as well
in Commandant’s plane (this or a different one).
A coat of Future sealed the decals.
The main wheels were assembled and lightly filed to look “weighted”.
Together with the tail wheel, they had black tires and tank gray rims. After
the main gear legs had their scissors glued, I went on and attached in
position the complete landing gear, together with doors and wheels. Again,
the sense of “clunkiness” was evident, possibly due to the fact that the
parts are thin (more “scale correct” I would say), but, with some careful
approach, all were nicely installed and aligned. Door innards, landing gear
parts and bays were painted tank gray. Oleos were highlighted with my thin
tip silver pen. The scale correct (and, thus, fragile) pitot tube was
painted gunmetal and attached at the port wing, as well.
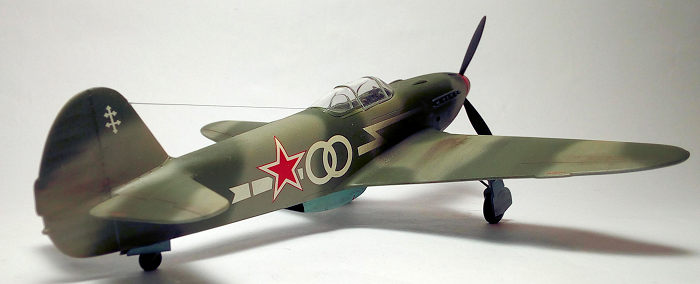 The
5-piece prop was assembled, had its cowling hand painted red/white/blue (per
the “Normandie-Niemen” style) with black blades and attached at the front.
The exhausts were painted Testors Burned Metal and affixed into place. The
top cowling bland gun recessions were also drilled out to look real. I then
went on and airbrushed a very thin black mist aft of the exhausts area, to
represent staining, and fore of the guns, to represent gun gases
“blackening”. I have to admit that the net effect is on the (very) heavy
side. To even things out, I went on and applied some generous
weathering/dirtying at places (I used black-wash and dark colored dry
pastels), in order to give the model a well-used look. After deeming the
result passable, the Yak was given its final, almost matt finish, as was the
case in reality.
The
5-piece prop was assembled, had its cowling hand painted red/white/blue (per
the “Normandie-Niemen” style) with black blades and attached at the front.
The exhausts were painted Testors Burned Metal and affixed into place. The
top cowling bland gun recessions were also drilled out to look real. I then
went on and airbrushed a very thin black mist aft of the exhausts area, to
represent staining, and fore of the guns, to represent gun gases
“blackening”. I have to admit that the net effect is on the (very) heavy
side. To even things out, I went on and applied some generous
weathering/dirtying at places (I used black-wash and dark colored dry
pastels), in order to give the model a well-used look. After deeming the
result passable, the Yak was given its final, almost matt finish, as was the
case in reality.
Since I am a “closed canopy” modeler, I hand painted the frames of the
one-piece canopy and attached it on top. Fit was very good, with the minor
gaps faired with white glue.
A wire antenna runs from the fin top area, right onto the rear glazing,
where, through a hole, it seemingly ends at the radio underneath. Fearing
that it would be risky to open a hole at the clear part and run the wire
antenna through it (which would also have to be somehow tightened), I
chickened out and run the antenna wire (silver stretched sprue) through a
hole that I opened just at the frame edge of the rear transparency,
supposing that the wire was ducted this way at this plane…).
I then called this beautiful Normandie-Niemen Yak done!
This is a very good kit of this important plane, with nice overall shape and
external details. Cockpit and landing gear are also well detailed, even at
the non-Profipack edition. Apart from some (easily manageable) “clunkiness”
in construction, fit is good and the kit can be quite easily put together.
Transparencies are crystal clear and nicely thin, instructions are superb
and decals are very well registered (but very thin, so they must be
carefully and positively applied). Due to the relatively low number of parts
and uncomplicated camo, even a novice modeler could tackle it and come up
with a very good looking Yak-3.
Until the 2012 arrival of the Zvezda, this kit had been the only serious
game in town for an accurate Yak-3. With the Zvezda offering understandably
being the “latest and greatest” (Tom’s review here),
the now (as of 2021) elderly Eduard still represents a fine kit that can
result in a good representation of this petite beautiful fighter. If you own
one, or find one at a good price, do not hesitate to tackle it!
Happy modeling!
Spiros
Pendedekas
4 June 2021
Copyright ModelingMadness.com. All rights reserved. No reproduction without
express permission.If you would like your product reviewed fairly and fairly quickly, please
contact
the editor or see other details in the
Note to
Contributors.
Back to the Main Page
Back to the Review
Index Page
Back to the Previews Index Page


 The
Yakovlev Yak-3 was a petite and lightweight single-engine, single-seat World
War II Soviet fighter. With its high power-to-weight ratio, it proved to be
a formidable dogfighter. Robust and easy to maintain, it was much liked by
both pilots and ground crew. It was used, among others, by the famous "Normandie
- Niemen" Group, during the war, with French Ace Marcel Albert, who then
flew with the Group, considering it a superior aircraft to the Mustang and
the Spitfire!
 Introduced
by Eduard in 1998, apart from the fact that there are no parts numbers
molded at the sprues, this kit easily falls into the mainstream kit
category. It comes in a top opening box of sufficient quality, with a nice
box art of “Normandie-Niemen” aircraft No.5 proudly flying. Inside you find
two separately bagged, very well molded dark gray sprues that contain all
the parts. External detail is nicely engraved. Cockpit detail is not bad at
all, with a believable seat and quite a few “bits and pieces” to make it
look busy. Same for the landing gear and bays, kit provided detail level is
fine (I am aware that there are “profipack” versions of the kit that take
care of the cockpit and landing gear with some nice, scale looking PE parts,
replacing, at most cases, the kit provided ones, but also adding some extra
detail as well).
 ,
with the prop axle trapped at the front, followed by attachment of the top
cowling. I continued by joining the two wing halves. The wing top middle
section doubles as the cockpit floor, so I built up the cockpit onto it. It
consisted of 12 parts, the seat included. Following the instructions (yes, I
did perform that radical act), basic cockpit color was Hu92 Tank Gray, with
black instrument panel, consoles and stick grip, light brown trim wheels and
slate gray backrest. All instrument and switches areas were dry brushed with
silver and had some tiny red, white and yellow details painted with 10/0
brush, to add interest. I have to say that the (non-profipack) kit provided
cockpit looked very nice after completion!
 After
removing the masks, I gave the model a coat of Future and went on to apply
the decals. I used the kit provided markings, in order to represent
Commandant Louis Delfino’s plane. Due to the extra thinness, I handled the
decals very carefully. To my relief, they adhered very well, snuggling over
every surface detail with no silvering whatsoever. Of interest is the fact
that, according to instructions, no red star (which was the “norm”) is to be
applied onto Commandant Louis Delfino’s plane fin, just a very nice Lorraine
Cross, a great looking and “different” scheme. This is justified by pic
evidence, though fin red stars might have been applied at some time as well
in Commandant’s plane (this or a different one).
 The
5-piece prop was assembled, had its cowling hand painted red/white/blue (per
the “Normandie-Niemen” style) with black blades and attached at the front.
The exhausts were painted Testors Burned Metal and affixed into place. The
top cowling bland gun recessions were also drilled out to look real. I then
went on and airbrushed a very thin black mist aft of the exhausts area, to
represent staining, and fore of the guns, to represent gun gases
“blackening”. I have to admit that the net effect is on the (very) heavy
side. To even things out, I went on and applied some generous
weathering/dirtying at places (I used black-wash and dark colored dry
pastels), in order to give the model a well-used look. After deeming the
result passable, the Yak was given its final, almost matt finish, as was the
case in reality.
The
5-piece prop was assembled, had its cowling hand painted red/white/blue (per
the “Normandie-Niemen” style) with black blades and attached at the front.
The exhausts were painted Testors Burned Metal and affixed into place. The
top cowling bland gun recessions were also drilled out to look real. I then
went on and airbrushed a very thin black mist aft of the exhausts area, to
represent staining, and fore of the guns, to represent gun gases
“blackening”. I have to admit that the net effect is on the (very) heavy
side. To even things out, I went on and applied some generous
weathering/dirtying at places (I used black-wash and dark colored dry
pastels), in order to give the model a well-used look. After deeming the
result passable, the Yak was given its final, almost matt finish, as was the
case in reality.