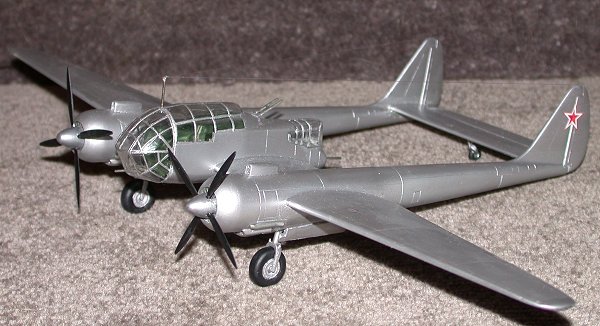
Moldova 1/72 Su-12
|
KIT # |
? |
|
PRICE: |
? |
|
DECALS: |
One aircraft |
|
REVIEWER: |
|
|
NOTES: |
Limited run kit |

|
HISTORY |
|
THE KIT |
 Moldova's Su-12 is
packaged in a rather flimsy box with a computer generated picture of the
aircraft on the front. Two main sprues hold all the major components with
a little plastic baggie containing the odd bits that they had missed off
the sprues! The canopies are thankfully packaged in a separate bag to
protect them from scratches. Surface detail on the main assemblies is
very nicely done with fine engraved panel lines and raised rivets but at
the other end of the scale items like wheels and cockpit detail are
nothing more than shapeless blobs of plastic. In fact it almost looks
like two different companies were used to make the molds.
The plastic is like none other that I have ever come across, being very
hard and extremely brittle making it difficult to work with, in fact most
of my usual solvent type glues were useless as the plastic defied all
attempts to dissolve. Superglue and white glue were used to assemble the
Su-12, pay close attention to the cutting of the parts off the sprues, as
it's easy to break small pieces and/or send them flying across the room.
|
CONSTRUCTION |
 Yes well were to
start? with twin boom aircraft you are opening up a whole new can of
worms with alignment of the two booms and fuselage. The easiest way I
found was to assemble the two booms first, fit was reasonably good with
the only filler needed was around the cowlings. once assembled they can
be put to one side and the fuselage halves assembled again fit was better
than average for a short run kit, at this stage I left out all the
cockpit interior as it can be added right at the end.
The inboard wings were glued together and that's when the fun started,
the profile of the wings and the profile of the fuselage were so
completely different that a major amount of surgery was required to get
wings to blend in with the fuselage. Basically you have to attack the
wings with a file and sand down about 0.5 mm at the upper leading edge
and fill about 0.5 mm at the trailing edge to get a smooth transition
between fuselage/wing/boom joints, course all that detail was sanded off
in the process. The hard plastic made this job even more work as getting
the scratches out proved to be almost impossible and was going to come
back and haunt me in the future.
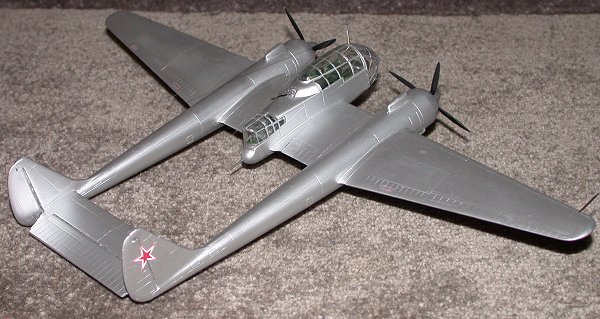
Outer wings had the same fit problems and required a huge amount of work
to get the step out of the wing/boom joint. Aligning the booms, wings and
fuselage was an exercise in patience as a couple of times I thought I had
got it right only to find that the rudder was off centre or the rudder
was correct but the dihedral was off. talk about frustrating. with the
help of numerous jigs, plasticine and a lot of rude words I finally
managed to get everything to stay were it was! At this point I put the
plane on hold for a week or two to recover my sanity.
 The fuselage was
built up and painted 'Russian interior Green' as described in the
painting instructions, like all East European kits the colour call outs
are in Humbrol colour only, great for Kiwi's but a little frustrating to
our US friends who find it hard to get Humbrol paint sometimes. Detail
items like the seats were a joke so new ones were made up out of plastic
card and the side consoles were added using my homemade bog panels to add
a little bit of busyness to the 'office' at this point the canopies were
masked up and glued into place, masking those big greenhouse canopies was
not my idea of fun but it wasn't too difficult due to the well defined
raised lines. It just took forever!
Undercarriage legs were carefully removed and yes I managed to break both
of them, I then discovered that it is a lot easier to install them if you
put them in before you join up the boom halves, but with a little bit of
trimming and a bit of a shove you can pop them in at the end though. The
propeller blades are all separate with a three piece hub, so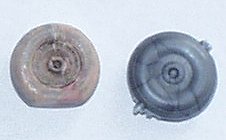 all up each prop is made up with seven pieces. Trying to get each one of
the four blades aligned evenly was yet another test in absolute patience.
Moldova do however provide a plan layout in the instructions for the
props.
As construction drew to an end the only major items left was the main
wheels which were a complete joke, with no definition or detail what so
ever. New ones were cast using my hot glue gun method with the donor
wheels coming off a Dragon He-219 as they were the same diameter as the
Su-12 ones. as you can see from the photo just how crude the Su-12 wheels
really are.
|
CAMOUFLAGE & MARKINGS |
This is were the Su-12 got me, looking at the box art and NOT reading the
instructions I was all through the build under the impression that this
plane was finished in light grey but nnnooooo it would have to be natural
metal, the one finish that I just can not master. The Su-12 went back to
the desk and had days of sanding, polishing, polishing and sanding in an
effort to 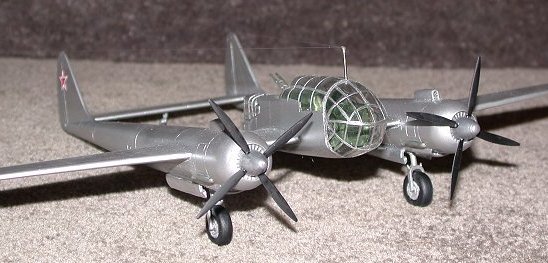 hide all
the sanding marks left from the drastic bog job to get the wings to fit.
the hard plastic again defied all attempts to polish out tiny scratches.
Finally I gave up and looked around for a Natural Metal covering, now
Alcad II was out and SNJ was out as both of them are unavailable in New
Zealand, Bare Metal foil was a option but I'm not a skilled enough
modeller for that sort of thing, that left Humbrol Metal coat and
Rub-n-buff.
I have used Humbrol Metal coat in the past but have had the stuff rub off
at the slightest touch so I thought I would try Rub-n-buff, after all the
Poms had been using it for years as a natural metal finish. I discovered
that you can thin Rub-n-buff with enamel thinner and spray it though the
airbrush thus giving a halfway decent impression of natural metal but
without the swirls and fingerprints from applying by hand. Once dry
(about five minutes) I masked off the odd panel and buffed it up with a
buffing pad on my dremel.
With only two aircraft built there isn't much choice in marking apart
from four Russian stars and some red stencils around the wings, they went
down well and snuggled down without any need for decal softeners.
|
CONCLUSIONS |
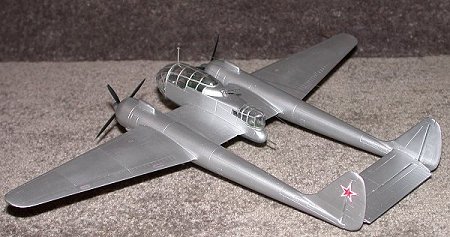 A very difficult
model to do. Three months went into the Su-12 which for me is unheard of
in a 1/72nd scale model, saying that if you have the patience to finish
the beast you will be rewarded with a very unusual and striking model
that will draw a lot of comments at a club meet. Not a competition grade
model but if you are comfortable with short run kits and don't mind lots
of sanding pick one up and give it a go. My thanks to FBN productions for
the review kit and advancing my modelling skills.
May 2003
|
REFERENCES |
Almost nothing to go on in the way of text but plans and a few photos are available if you 'Google' Su-12
Copyright ModelingMadness.com. All rights reserved. No reproduction in any form without express permission from the editor.
If you would like your product reviewed fairly and fairly quickly, please contact the editor or see other details in the Note to Contributors.