|
KIT: |
ProModeler 1/48 Ta-154 'Moskito' |
|
KIT # |
85-5959 |
|
PRICE: |
$31.95 |
|
DECALS: |
See review |
|
REVIEW BY: |
|
|
NOTES: |
KURT TANK'S "MOSKITO"
Building Pro-Modeler's 1/48 Ta-154A-0/V15
|
HISTORY |

In the years leading up to the Second World War, the Luftwaffe - from Oberbefelshaber der Luftwaffe Hermann Goering on down - refused to think defensively. On December 18, 1939, the Luftwaffe decisively defeated a force of Wellingtons operating off Heligoland in daylight, forcing the RAF to change its tactics from daylight to night bombing. Between 1939 and 1942, RAF's Bomber Command was largely ineffective in its "offensive" against Germany; in early 1942 a scientific study concluded that fewer than ten percent of the bombers were dropping their loads within five miles of the target, and over half were completely unable to find the target at night. It was in this period that Goering stated publicly that "you can call me Meyer," if enemy bombs fall on the Reich; from 1944 onward, those words would come to haunt him, since that was exactly his name among the German citizenry, though not publicly.
The turning point was Operation Millenium, the first Thousand Bomber raid, directed against Cologne on May 31-31, 1942; 1,034 RAF bobmers, including every old war-weary Wellington in the OTUs, actually struck the target. The Luftwaffe's night fighter defenses were swamped. The inadequacy of the improvised Bf-110 and Ju-88 night fighters was clear, when the RAF lost only 3.8 percent of the attacking force. One new RAF aircraft that would appear over Germany for the first time the following morning to take post-strike photographs would be responsible for provoking the design of what was arguably the most-advanced German night fighter designed during the war - that airplane being the wooden de Havilland Mosquito.
Heinkel was already engaged in the development of the He-219. Focke-wulf's Kurt Tank was invited to submit a proposal for a dedicated night and bad-weather fighter. The result was the Ta-154, which would come to be unofficially known as the "Moskito" because - like its RAF namesake - the airframe was completely wooden. The RLM was apalled by this, stating that the German aircraft industry had too little experience in wood construction, that the necessary skills no longer existed in the woodworking industry, and that the airframe might not be capable of high-speed flight. Tank was able to counter these arguments by pointing to the existence of the de Havilland aircraft.
Detail design of the Ta-154 was the responsibility of Oberingenieur Ernst Nipp. Apart from the forward fuselage and engine nacelles, which were of duralumin, and the fabric-covered elevators, the rest of the airplane was covered by laminated plywood. Provision was made for the installation of two 20mm MG151 cannon with 200 r.p.g., and two 30mm MK108 cannon with 110 r.p.g. to either side of the tandem cockpit.
The Ta-154V1 flew for the first time from Hannover-Langenhagen on July 1, 1943. Carrying no radar or armament, the V1 prototype was clocked at 435 m.p.h. in level flight. The initial Techninische Amt development contract covered 15 pre-production aircraft. Each were armed, and differed from each other primarily in the form of radar antennas fitted. All of these flew successfully by early 1944, and the airplane was ordered into production in Poznan, Poland.
The first production Ta-154A-1s were delivered in June, 1944. The second example flew on June 13, 1944, ; it crashed two weeks later when the wing disintegrated in flight. It was quickly ascertained that the cold glue adhesive used in the manufacture of the wings for the production Ta-154 had rotted the component joints. The pre-production aircraft, which used a different glue, had not suffered this problem; unfortunately the factory that produced that glue had been destroyed by the RAF shortly after the pre-production aircraft were produced.
Tank was accused of sabotage by Goering when it became known he had ordered production stopped until a solution could be found. It came out shortly thereafter that the wings were being produced in a factory owned by the Gauleiter of Erfurt, who had promptly complained to Goering, who did not even know the intended role of the Ta-154, let alone the problem experienced with the glue. (Thank God if we had to fight World War II, it was against as big a bunch of morons as the Nazis.)
A further seven production aircraft had been delivered by the time the RLM cancelled the entire program on August 14, 1944, following the crash of a Ta-154A-0 as a result of an uncontrollable engine fire during single-engine climbing trials. The Deutsche Moskito never lived up to its initial potential.
|
THE KIT |
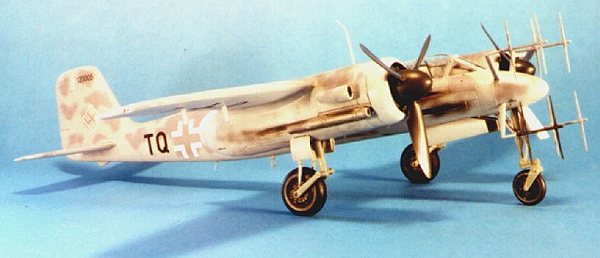
This kit was originally announced several years ago by DML, and was picked up by Revell-Monogram for their Pro-Modeler series. The kit provides markings for one aircraft, the Ta-154A-0/V-15, the eighth pre-production aircraft.
|
CONSTRUCTION |
The big problem with this kit is the fact that the first production run all appear to have warped wings, a condition which appears to run the gamut from "pretty bad" to "not so good." This is a result of lack of production quality control at the Shanghai Dragon factory in China.
I have at this point built two of these kits, one as a display model for the local hobby shop, and one as a review kit. In the first model, the wing warp was "not so good," and I solved it by bending and twisting the upper wing parts to get them straight. This ultimately didn't work that well, since the wings still droop slightly, enough to be noticeable if one holds a straitedge to the upper wing surface. For the second - which was closer to "pretty bad" - I soaked the parts in water heated to just below the boiling point, de-warped them and "froze" that by running cold water over them. They still wanted to assume the original shape, and I eventually solved this by cutting up a coat hangar and gluing a section of it into the upper wing to force it straight. Dealing with this problem will take a lot of fun out of the process for the average modeler.
I assembled the first set of wings per the instructions and discovered that there were considerable gaps between the various sub-assemblies. I also discovered that the right inner lower wing panel was a bit too thick, resulting in an overhang when the wing was attached to the fuselage. A considerable ammount of putty was required to cover the gaps between the engine nacelles, lower wing panels, and the fuselage to get a smooth fit.
The second time, I cut off all locating pins on the second set of wings. I glued the upper wing to the fuselage (with the fuselage unassembled, then positioned the inner section of the lower wing to fit tightly, and glued it. I also sanded down the lower right inner wing panel so that it would fit to the fuselage fairing. I then positioned the engine nacelles as closely as I could while getting proper alignment with the upper wing, then attached the lower outer wing panel. I had a bit of overhang to shave off of the wingtips, but the gaps between the various lower surface assemblies was so small that Mr. Surfacer was sufficient to fill these. There was still a bit of putty necessary to fill the seam where the upper wing surface joined the fuselage, but this was considerably less than the first time.
Past all this effort on the wings, the rest of the assembly was straightforward, in accordance with the instructions and no problems were encountered.
Two-thirds of the model is aft of the main gear. On the original airplane, the fact that the engines, weapons, radar and crew were all ahead of the main geat solved the problem of nose-sitting, though the airplane was noticeably tail-low without the crew aboard, and would tail-sit without ammunition aboard.
On the first model, I filled the engine cowlings with lead weight. It turned out that this was just enough to make it nose-sit with the shortened nosewheel leg; however, a tap on the rudder would have it tail-sit until the nose was tapped.
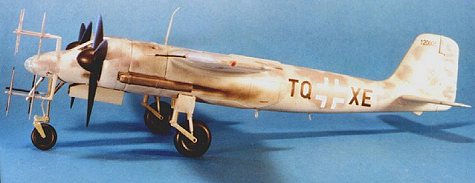
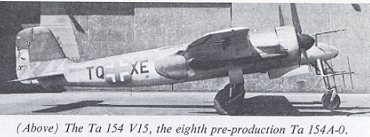
On the second model, I put weight everywhere I could ahead of the main gear: in the section of nacelle between gear well and engine cowling, inside the cowling, glued to the rear cockpit bulkhead, on the floor below the rear cockpit behind nosewheel well, and in the nose cone. This was sufficient that I could hold the model at the point where the main gear attached, and tilt it back twenty degrees with it toppling back to the nose when the tail was released. I decided I would modify the nosewheel leg to make the airplane sit as it did in the photographs of the Ta-154A-0/V15 in William Green's "Warplanes of the Third Reich." I cut off the oleo, and replaced it with a plastic dowel 1/8" longer than the original piece. I drilled out the leg to make a hole for a good solid joint, then stretched the oleo calipers and fitted them. You can see the result in the photos.
|
PAINT & DECALS |
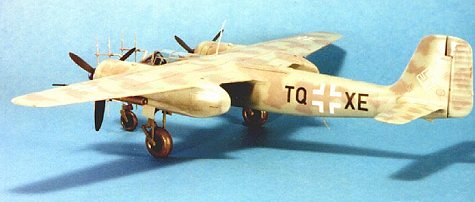
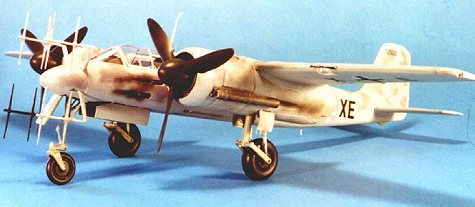
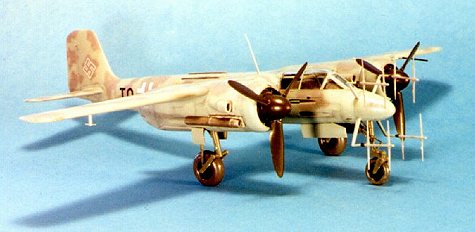
The Ta-154A-0/V-15 was painted overall RLM76 Lichtblau, with "clouds" of RLM75 Grauviolett on the upper surfaces. After "pre-shading" the airframe with flat black along panel lines and attachment points, I used Gunze-Sanyo's H-417 RLM76 overall. I substituted Gunze-Sanyo H53 "Neutral Grey" for the RLM75 color they produce, since I think the violet tinge of their "Neutral Grey" is a more accurate shade. I painted the "staghorn" radar antennas RLM74, with the lower right one flat black, per the photos of the original airplane. With the paint dry, I shot the model overall with Future and let it dry overnight.
These kit decals are much superior to most decals one gets from Revell-Monogram. They went on without trouble and laid down with a bit of Micro-Sol.
I used Gunze "Smoke Grey" to emphasize some panel shading and the oil exhaust on the cowlings, then shot Gunze Flat Black thinned 80-20 with rubbing alcohol for the exhaust and gunblast. Given the structure was wood, there was no other weathering necessary. I applied a final coat of Future, let it dry, then shot three thin coats of "flat Future" (Tamiya Flat Base mixed in Future) to get the final finish.
|
CONCLUSIONS |
As you can see from the photos of the out-of-the-box model, the kit makes up into a nice-looking representation of the real thing. I like my raised-nose model, but the trade-off is a nose wheel leg that is not as strong as you would get straight out of the box.
This is a nice-looking model of an airplane that never lived up to its potential. Personally, I can think of many far more important aircraft that should be far ahead of the Ta-154, that have yet to be recreated by the plastic kit industry. At a price of US$31.95, one receives good value for their money, however.