Revell 1/72 Fiat CR.42 Falco
| KIT #: | H-648 |
| PRICE: | $5.00 |
| DECALS: | One option |
| REVIEWER: | Chris Mikesh |
| NOTES: |
| HISTORY |
(Quote from the instruction sheet)
Strangely out of place in a
world of high-performance aircraft, the Fiat CR.42 biplane still served Italy
faithfully throughout the Second World War. Although it was clearly outclassed
by the newer model planes, the Falco was available in quantity
 at the outbreak
of the war. Its initial role was that of a bomber escort, but the superior
performance of the Allied Fighters soon discouraged this practice. The CR.42
found its greatest successes came as a night fighter and fighter bomber. As a
light bomber its agility was found to be a great advantage and the CR.42s were
used very effectively in this guise during the North African campaign. As
bombers, Falcos were designated ‘CR.42AS’ and carried two 220 lb. bombs.
at the outbreak
of the war. Its initial role was that of a bomber escort, but the superior
performance of the Allied Fighters soon discouraged this practice. The CR.42
found its greatest successes came as a night fighter and fighter bomber. As a
light bomber its agility was found to be a great advantage and the CR.42s were
used very effectively in this guise during the North African campaign. As
bombers, Falcos were designated ‘CR.42AS’ and carried two 220 lb. bombs.
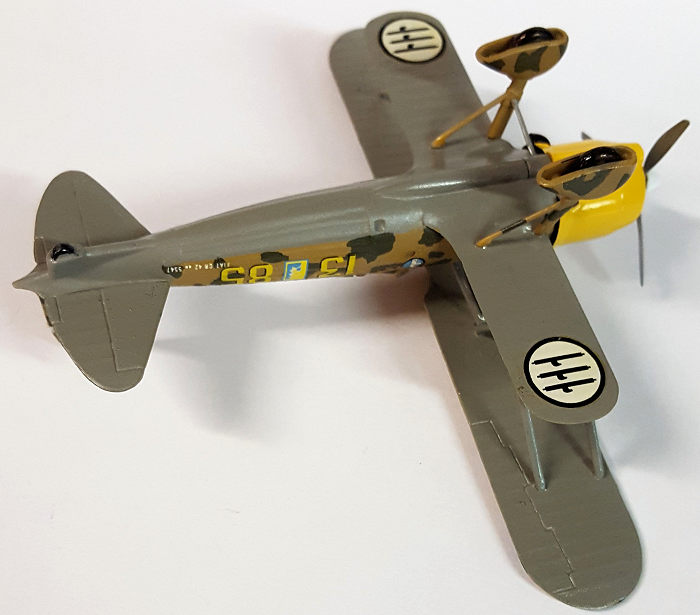
The little biplane served in nearly every Italian Fighter Squadron during the war, as well as forming substantial parts of the air forces of Sweden, Hungary, and Belgium. Many Falcos were still in operations with the Italian Air Force when that nation surrendered. Some of them continue to fight in the hands of the Anti-Fascist, Co-Belligerent Air Forces, thus holding the distinction of fighting on both sides of the conflict. The Fiat CR.42 was the last biplane fighter to be produced by the combatants, surpassing the British Gladiator which also saw service in the war. It was constructed of welded steel tubes covered with fabric. The Falco's clean lines and 840 horsepower Fiat A74 R.C. 38 engine gave the plane an unusually high speed for a biplane: 267 miles per hour! The service ceiling exceeded 33,000 feet and the maximum range was over 600 miles. The Falco, or Falcon, carried to 12.7 mm Beretta SAFAT machine guns with 400 rounds per gun. The upper Wing had a span of 31 feet, 9 in. Overall length was 27 ft, 2 inches.
| THE KIT |
 Years ago, my father had a
huge collection of models in the basement. The Revell 1/72 WWII “H” series kits
– specifically the fighters, (24 of them) were a favorite of mine and I always
wanted to build them. This is #18 of the collection.
Years ago, my father had a
huge collection of models in the basement. The Revell 1/72 WWII “H” series kits
– specifically the fighters, (24 of them) were a favorite of mine and I always
wanted to build them. This is #18 of the collection.
The CR.42 looked like it was a superior kit in 1966 – and in 2019 - it’s still not bad. Even today, it has very likeable detail and easy assembly. The molding (tan color) is well detailed with fabric and metal. The rivets – though slightly large in scale - are not “locomotive bolts” typical of many counterparts in its time. Primary parts are; 2 fuselage halves, a solid upper wing, solid lower wing, elevators, engine, cowling, landing gear, wind screen, and obvious other parts. My example still had ‘usable’ decals which were well marked to their location.
| CONSTRUCTION |
Assembly begins with the fuselage halves. No need to pre-paint the cockpit because if building out-of-the–box (OTB), you will not see the interior because of the pilot. Additionally, it is only a seat on a platform to be added before cementing the fuselage halves. Also, the interior is easily painted by brush before putting the pilot in. Simply, glue the 2 halves with the seat in place.
 The lower wing comes in one
piece fortunately. It also fits snuggly to the fuselage. However there is a gap
with the lower wing to the fuselage near trailing edge. I used Mr. Surfacer
putty to clean up that edge difference. It was slightly difficult to get into
because of the oil cooler fairing. I used a very small tooth-pick sized sanding
stick in that area.
The lower wing comes in one
piece fortunately. It also fits snuggly to the fuselage. However there is a gap
with the lower wing to the fuselage near trailing edge. I used Mr. Surfacer
putty to clean up that edge difference. It was slightly difficult to get into
because of the oil cooler fairing. I used a very small tooth-pick sized sanding
stick in that area.
Assembly hint; of course every good modeler will dry-fit their parts before you glue them. As you glue on the lower wing to the fuselage you could use the engine nacelle in front to help line up the wing. Make sure not to glue the nacelle to the fuselage at this point. This will help tighten up the wing assembly on to the fuselage.
The lower wing is the ‘foundation’ for the upper wing and alignment for the rest of the model. Make sure it fits well and lines up to the fuselage. If it is listing to the left or right the upper wing may not line up well on the struts. Also if the lower wing is not 90 degrees to the fuselage the upper wing will appear to be twisted and not parallel to the lower wing. Generally, the fit is pretty good, and there is minimal risk.
Pre-paint where you can. A bi-plane is very difficult to paint the bottom of the top wing, or to camouflage the lower wing once assembled. In this case, I pre-painted the bottom gray color (see COLOR & MARKINGS below for details) on the wings, elevators and fuselage bottom. Then I pre-painted and camouflaged the top of the wings and fuselage where I could.
Now the hard part… attaching the upper wing. It is almost a guarantee that you will not get the struts right on the first try. There are 6 strut assemblies that need to be lined up at 16 attachment points. Clean the struts from flash and seams. Make sure there is no paint on the attachment points. Dry fit each contact point for depth and angle. The upper wing has 2 struts going into the same hole at two points. VERY sparingly, use a dot of white glue to attach the struts to the upper wing (I prefer Elmer’s as it is water soluble). Estimate the point of contact on the lower wing. The struts lean forward as per the 3 view drawings once assembled. Let dry for an hour.
 Elmer’s glue remains
somewhat flexible when mostly dry but it holds generally. Now try to fit the top
wing on the plane. BE PATIENT! And be ready with the super glue. Once the struts
all line up and seat on the fuselage and lower wing, make sure the upper wing is
not twisted or at a different pitch to the lower wing. Revell did a good job
designing the model, so, it is likely you will get it right.
Elmer’s glue remains
somewhat flexible when mostly dry but it holds generally. Now try to fit the top
wing on the plane. BE PATIENT! And be ready with the super glue. Once the struts
all line up and seat on the fuselage and lower wing, make sure the upper wing is
not twisted or at a different pitch to the lower wing. Revell did a good job
designing the model, so, it is likely you will get it right.
I recommend using a toothpick with a dot of superglue (or another fast-drying thin adhesive) and ‘stick’ the contact points on the lower wing first, then if everything is lined up, glue the upper wing points (even if there is Elmer’s also). VOILA! Not much more to do if building OTB.
Engine: My example had a lot of flash on the engine. Simply trimming that flash was no problem and the cowling covers over the rough area. So detailing the engine is sort of pointless. Be cautious as the engine assembly does not fit well on my example. The row of cylinders in the front does not mate well with the back. I remember I had the same problem on a Revell Grumman F4F Wildcat. (same designer?)
Other assembly: Landing Gear is straight forward. Pre-paint the wheels and let dry. Then mount them in the wheel pants. Clean up is good with a sanding stick. Camouflage and wait until final assembly to install the landing gear. You may need to mask the bottom of the model and the landing gear gets in the way. After painting and masking is removed, make sure you mount them straight or the plane will list to one side. The listing will be more pronounced as it is a bi-plane. Pilot goes in last because you don’t want to gloss coat him!
| COLORS & MARKINGS |
Painting and Camouflage; Ummm…. Did I miss something? (Probably did…)
Looking at the painting resources; the Revell instructions, the photos of the plane at RAF Museum at Hendon, Profile Publications #16, the photos of the actual plane in 1940 (silverhawkauthor.com/… see references below) and other on-line resources, they are all different camouflage patterns – but the same plane! I’m sure there is an explanation.
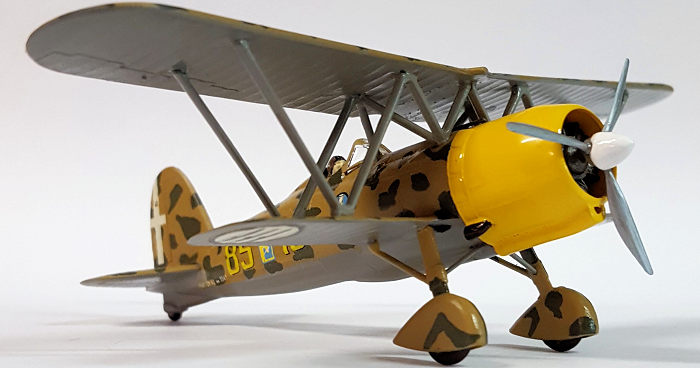
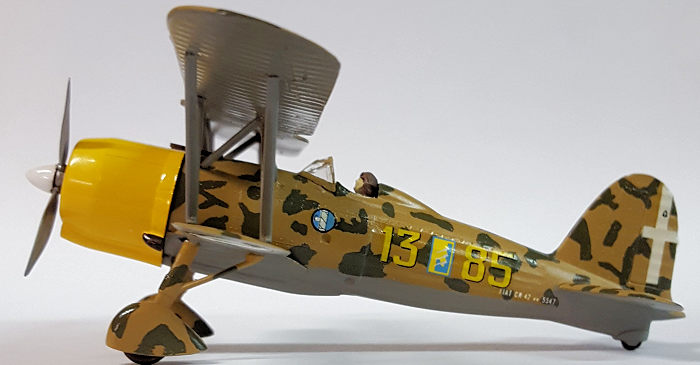
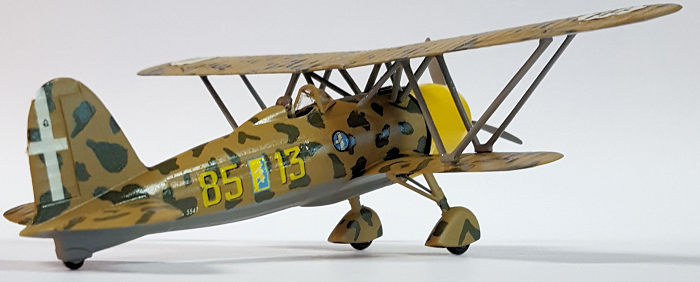
Modeler’s prerogative – I opted for the original 1940 camo version the best I could see, not Revell’s version in this case. The Revell camo and the Profile Publications look similar (like a giraffe).
I used Tamiya Medium Grey XF-20 on bottom. Upper surfaces are Tamiya Dessert Yellow XF-59 and Tamiya Dark Green 2 (RAF) XF-81. Yellow is Tamiya Chrome Yellow TS-47 Aerosol. Tamiya XF-56 Metallic Grey was used on the engine.
 Caution on these paints. I love them dearly because
they go on smooth and airbrush very well if fresh. But I recommend test painting
something before expecting the proper end result. The bottle cap colors are
misleading and once the paint is dry they tend to darken compared to the color
at the bottom of the bottle.
Caution on these paints. I love them dearly because
they go on smooth and airbrush very well if fresh. But I recommend test painting
something before expecting the proper end result. The bottle cap colors are
misleading and once the paint is dry they tend to darken compared to the color
at the bottom of the bottle.
As noted in ‘Construction’, pre-paint where you can. Masking the wing was remarkably easy after the Grey paint was on. The rest of the plane bottom was also masked and painted with the Dessert Yellow. The Dark Green camo was hand painted. I used a Silver Sharpie on the propeller. It dries smooth and almost immediately. Tamiya white was used on the nose cone.
I noticed that the 1966 decals for this model looked okay from the surface, but as I examined it with a magnifying glass; I saw very small cracks very close together. That meant that this decal sheet was going to have some problems with shattering once in water. (I had no replacement decals.) So, I mopped on some liquid decal film. This is much recommended with any aged decal sheet.
Of course the decals have yellowed slightly with age – nothing I can do about that except to trim as much as I can away. The adhesive on the decal sheet was actually in good shape. I used mostly Micro Sol and Micro Set to assist the decals. The decals laid down reasonably well and only a little Elmer’s glue (dries mostly clear) was needed on stubborn corners and trailing edges.
I used a clear coating of Future Floor Finish overall. This seals in the decals and adds a hard surface over flat paints (reduces scratching as you handle it). The Future adds a pleasant ‘sheen’ on the plane for what appears to be a bit more realistic. But beauty is in the eye of the beholder.
| CONCLUSIONS |
Is this a great kit? It depends on your end goal. Compared to more modern kits of different brands…no. For a 1966 vintage model…it can hold its own even today. It lacks a lot of details modern kits provide, but the surface textures, ease of assembly, and fit reveal a very respectable model. It’s a great kit to re-live your past. Fiat designed a pretty tough plane as I fumbled it on the bench without damage.
Re-consider what the end goal was in building this model. It is part of a series of 24 Revell Fighters of WWII kitted in the ‘60s. For me, this model is not contest competitive because of my lack of skills. But I really like it. Recommended.
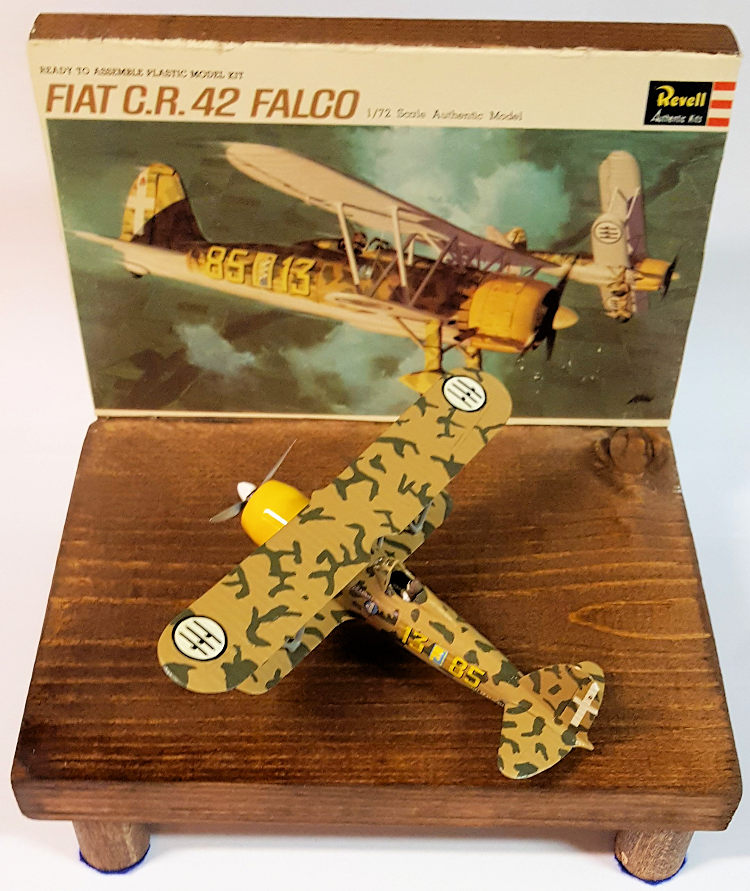
The model stand is easy to do. Here is a link if you’d like to give it a try. https://modelingmadness.com/review/allies/gb/fighters/miktem.htm
| REFERENCES |
http://www.clubhyper.com/reference/racamo1940se_1.htm
Profile Publications #16, Leatherhead, Surrey, Great Britain, Circa 1965, by Gianni Cattaneo and Cesare Milani
June 2019
Copyright ModelingMadness.com
If you would like your product reviewed fairly and fairly
quickly, please
contact
the editor or see other details in the
Note to
Contributors. Back to the Main Page
Back to the Review Index Page
Back to the Previews Index Page