|
KIT: |
Hasegawa 1/48 Ki-84 'Frank' |
|
KIT # |
JT 67 |
|
PRICE: |
$22.00 |
|
DECALS: |
See review |
|
REVIEW BY: |
|
|
NOTES: |
|
HISTORY |

Named "Hayate," (Gale)by the Japanese Army Air Force, the Nakajima Type 4 Fighter was the culmination of a line of original fighter aircraft development that had begun ten years earlier with the Ki.27, and included the Ki.43 "Hayabusa" (Peregine Falcon) and the Ki.44 "Shoki" (Demon) which were the backbone of the fighter arm of the JAAF. The specification that gave birth to the Ki.84 demanded the maneuverability of the Ki.43 with the speed, climb, and heavy armament of the Ki.44, which would make the new airplane superior to those aircraft intelligence reports indicated were being developed in Britain and the United States.
That Nakajima more than met these requirements was evident from the first moment of the Ki.84's operational debut over China in August, 1944, flying with the 22nd Sentai from Hankow. It was a formidable fighter, which possessed none of the shortcomings of its predecessors and firmly established Japanese fighter design on a par with the best the Allies had created during the war. In fact, the "Hayate" was good enough to best the P-51B and D Mustangs operated by the 23rd Fighter Group, and managed to establish air superiority over China during the last Japanese offensive of the war that fall. The Ki.84 gave good account of itself over the Philippines, Okinawa and the Home Islands, though their importance steadily declined in each theater as a result of combat losses, lack of supplies, and maintenance problems created by slipping production standards at the factory.
The Ki.84 was simple to fly and pilots with a minimum of training could be assigned to it, the majority of its pilots having only around 200 hours when they began flying it. The airplane was an ace-maker that made the average pilot good and the good pilot excellent. Like any thoroughbred, the "Hayate" was adaptable for high-, medium- and low-altitude interception, close-support and dive-bombing. Its only shortcoming was the Ha.45 Homare engine, which suffered from slipping production standards and the fact it had been placed in production with insufficient preparation.
Considered by its opponents to be the best Japanese fighter of the war, only the Zero and the Ki.43 Hayabusa were produced in greater quantities, with 3,577 Ki.84s delivered between April 1944 and the end of the war. When filled with high-test avgas and tested after the war by the USAAF, it out-climbed and out-maneuvered both the P-51H Mustang and P-47N Thunderbolt, the ultimate developments of these fighter types.
|
THE KIT |

Twenty-five years ago, Tamiya released their model of the "Hayate," a kit so good that it established the state of the art for 1/48 kits of the early-mid 1970s. The canopy was thin and could be posed open, and the cockpit had what was then an acceptable level of detail molded into the fuselage halves. This kit has now been effectively replaced on all counts other than price; however, Hasegawa's reduction in kit prices easily brings this new kit into competition with its elderly predecessor.
Hasegawa's product standards, which have always been high, have increased dramatically in the past year, since the introduction of its D3A "Val," which had the best cockpit interior of any Hasegawa kit to date when it hit the stores. This was followed by the B6N "Jill," which I considered to have the best cockpit interior out of the box of any mainstream plastic kit I had come across. The "Hayate" is even better than these outstanding examples of the kitmaker's art, and can easily be considered the best model the company has produced to date.
A look inside the box reveals seven sprues of dark grey, crisply-molded plastic parts, with excellent fabric detail on all control surfaces, 21 parts for the cockpit alone, and separate fowler flaps which can be assembled in the open position. The cockpit canopy is three separate (and thin) very clear parts, allowing it to be posed open.
Decals include markings for an aircraft of the 22nd Sentai, the first unit to take the "Hayate" into combat, and an aircraft from the Hitachi Air Base Training Flight Division.
|
CONSTRUCTION |
Let me admit up front to not being a Japanese aircraft "experten," so I followed the instructions and built this model out of the box, other than substituting SuperScale decals for the kit markings. I strongly urge anyone thinking of giving the Ki-84 a "super detailing" that you go to <http://www.j-aircraft.com> and check out what the people who really know what they are talking about have said about this kit. You will notice in the picture here of the cockpit that I had shoulder harnesses installed. After placing the cockpit inside the fuselage, I discovered a post at this site that explained the IJAAF did not use shoulder harnesses. Off they came, and the model looks better for it; I would not have discovered this elsewhere.
The comments at the Japanese Aircraft Modeling Page discussion site also led me to decide I would go with the Aotake cockpit, and painted that with a mixture of Gunze clear blue and metallic green, in a shade that is hopefully close to accurate. Given that production standards slipped badly during the production of the Hayate, I doubt there is any one "standard interior" one could be held to. Once that was painted and then given a black wash to pop out the detail, I painted all the various instrument boxes per the instructions.
This is truly the most detailed cockpit I have seen out-of-the- box on any mainstream injection-molded kit to date. No one is going to need a resin replacement. Assembling the cockpit was the most difficult part of the entire project. Once I had it done, the rest of the model came together in less than two hours' effort, and it was set aside to dry and set up overnight.
|
PAINT & DECALS |

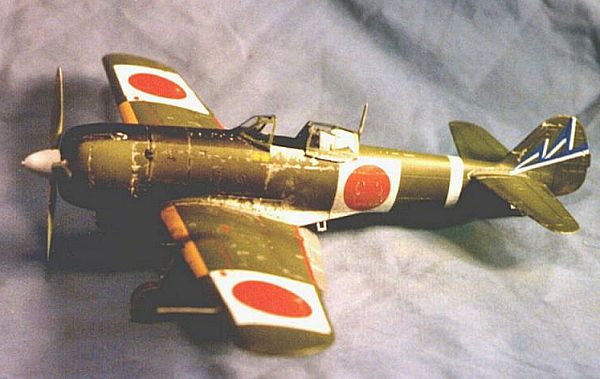
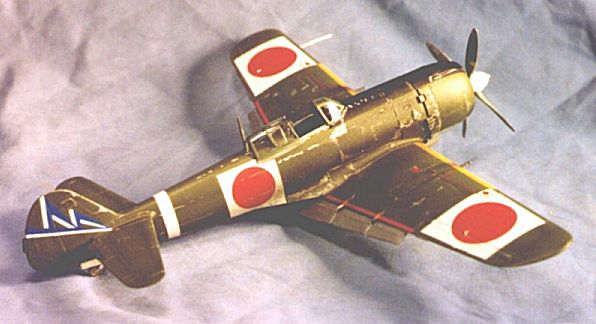
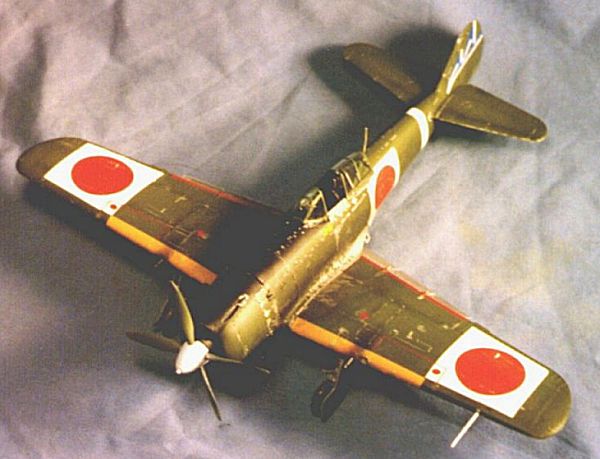
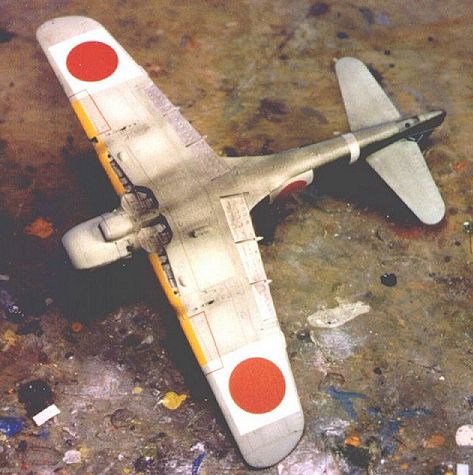
I went with doing an earlier airplane that was completely painted grey on the undersides, rather than one with natural metal finish. I used Gunze-Sanyo IJA Grey, which the IJAAF experten say may be suspect but looked okay to me. Everyone agrees the paint eventually faded out to a grey similar to this, and since my model was of a heavily-used airplane, this would have been expected. (That's my story, and I'll be sticking to it when the Kolourpolizei show up!)
For the upper surfaces, I used Gunze-Sanyo "IJA Green" mixed 50-50 with some Medium Green to make a lighter, sort-of olive green, which I applied to the upper surfaces. Once that was dry, I began working on "fading" the paint, working from darker (lower areas) to lighter (upper areas). This was accomplished with a brushful or so of IJA grey into the paint cup for each time I lightened the paint. I made sure that the fabric control surfaces, the upper area of the fuselage, and the upper areas of wings and horizontal stabilizers got most of this, with the fabric being the most-faded and the other areas being "blotched" as I went through the shades, leaving panel lines a bit darker, though lightening them on the upper areas in comparison with the lower areas.I then "Futured" the model and let it dry.
For decals, I used a Superscale sheet with the 47th Sentai markings, and the "bandages" associated with home defense squadrons for the national insignia. Most people do these as "bandages, with the white area wrapping completely around the fuselage and wings. In this case, the decal sheet provided it more as a "flag," i.e., it did not wrap around leading and trailing edges of the wings or completely around the fuselage. A glance in Don Thorpe's "Imperial Japanese Aircraft Camouflage and Markings" confirmed that this type of marking had existed.

Japanese airplanes weathered faster than those of other air forces due to the poor quality of the Japanese paints used on them. With the paint faded out, I proceeded to add chipped and scuffed areas around panels and on the wings, with chipping along the leading edges of all flying surfaces, etc. Usually, the best rule with weathering is "less is more," but with Japanese airplanes it is often the case that "more is not enough." The end result here was heavier weathering than I would do on an Allied aircraft (other than a Marine Wildcat or Corsair in the Solomons), and I am happy with it.
Once I had the"dings" finished, I Futured everything, then when it was dry applied Dullcote until I had a uniformly flat, sunbleached surface sheen (no sheen!). I then used a wash of 50-50 Tamiya semi-gloss black and Gunze-Sanyo "mahogany," in a solution 80% rubbing alcohol and 20 percent paint, for the oil smears. Sitting the airplane on its gear, I ran this along panel lines, and then let it "drip" with gravity. After that was dry, I then brushed the same solution on other areas, as it would have been blown in the slipstream. Following that, I added more black, brown, and a bit of grey, and airbrushed that for exhaust stains and gunfire stains.
|
CONCLUSIONS |
This kit will do for modelers what its 1:1 ancestor did for pilots: make the average look good and the good look great. This is an excellent model that delivers terrific value for the money. Thanks to HobbyLink Japan for the review copy.
The Hayate is available from: Hobby Link Japan (http://www.hlj.com)