| KIT # |
?? |
| PRICE: |
Out of Production (J2M3 and J2M6 still available) |
| DECALS: |
Two aircraft |
| REVIEWER: | Mike Howard |
| NOTES: |
Nicely detail OOB |
|
HISTORY |
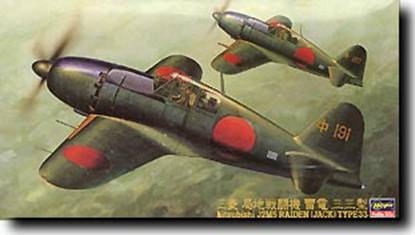
Designed from the outset as an interceptor, the Raiden gave up maneuverability for high climb rate (it could reach 20,000 ft in just under 7 minutes) and speed. The stubby body was designed to be aerodynamically efficient around the big 14-cylinder Kasei engine, which could drive the Jack to the high altitudes flown by the American bombers. Once there, it’s four 20 mm cannons proved to be effective in damaging the bomber streams attacking the Japanese homelands. It was one of the very few Japanese interceptors to be able to reach the very high flying B-29 Superfortresses.
I’ve always been attracted to the J2M family of aircraft and finally purchased the J2M5 version while cruising through the local hobby shop one day. The Hasegawa kit displays the characteristics expected of the more recent genre of Japanese manufactured kits : recessed panel lines, no flash, good parts engineering and fit and thin, clear parts. The one detractor from my initial scan of the parts was that the canopy was molded in one piece. The cockpit, being very spacious and well detailed, would be well served by having an open canopy to allow it to be shown off. As I planned on building this one following the IPMS Out-Of-Box rules, no modification would be allowed to the canopy, so I decided to just work towards a very clear canopy to show off as much detail as possible.
|
CONSTRUCTION |
 Building the kit - I
started by painting the interior parts with Aotake from the old Aeromaster paint
line. The instrument panel was painted black and the kit decal was used for
instrumentation. There are 18
parts to the
cockpit and all went together well by just following the instructions (a rarity
for me). Once the Aotake was dry, I washed all of the recesses and corners with
some heavily thinned black oil paint. Highlights were brought out with a light
drybrushing of the original Aotake mixed with a little white paint. Several of
the levers, knobs, ect were then painted red and yellow or black to add a little
color. While the cockpit paints were drying I started on the wing assembly.
The fit here was near perfect and just a little sanding was needed to clean up
the seams. The wheel wells were painted again using the blue-tinted Aotake.
Building the kit - I
started by painting the interior parts with Aotake from the old Aeromaster paint
line. The instrument panel was painted black and the kit decal was used for
instrumentation. There are 18
parts to the
cockpit and all went together well by just following the instructions (a rarity
for me). Once the Aotake was dry, I washed all of the recesses and corners with
some heavily thinned black oil paint. Highlights were brought out with a light
drybrushing of the original Aotake mixed with a little white paint. Several of
the levers, knobs, ect were then painted red and yellow or black to add a little
color. While the cockpit paints were drying I started on the wing assembly.
The fit here was near perfect and just a little sanding was needed to clean up
the seams. The wheel wells were painted again using the blue-tinted Aotake.
The fuselage halves had the appropriate
interior areas sprayed with Aotake and were then glued together, trapping the
cockpit assembly inside. I use Tenax and allow about a 3-4 second delay between
running the glue along the seams and pushing the parts together. This allows
the plastic to be softened by the solvent and, when pushed together tightly,
will force a small bead of molten plastic out of the seams. Usually this is
enough to fill in any little gaps, so little to no filler is
 needed. This trick
worked well with the Hasegawa plastic (plastic from different kit manufacturers
will react differently to the liquid glues) and I only had to wait for the
molten plastic to harden (approx 2-3 hours), cut it flush with the fuselage
using a new #11 X-Acto blade, then give it a very light sanding to complete the
fuselage seam work.
needed. This trick
worked well with the Hasegawa plastic (plastic from different kit manufacturers
will react differently to the liquid glues) and I only had to wait for the
molten plastic to harden (approx 2-3 hours), cut it flush with the fuselage
using a new #11 X-Acto blade, then give it a very light sanding to complete the
fuselage seam work.
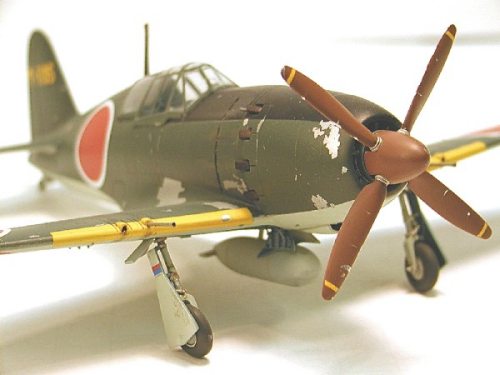
The engine cowling is one piece and only requires a little sanding along the mold lines to get it ready for attachment. All of the exhaust stacks are individual pieces and were left for installation after the rest of the painting was complete. There is no engine, but the cooling fan blades are there and actually rotate with the propeller, if assembled correctly. The section right in front of the Windscreen is also separate from the rest of the fuselage. This is nice because it is one piece and eliminates any seam clean up from the windscreen forward. Now it was time to join the fuselage to the wings. The only area where any work was needed was on the bottom where the rear of the wing and the fuselage meet. There’s a very slight step, but this is easily fixed with some sanding and dry fitting. Again, using the Tenax, the seams are non-existent. After the wings were fixed in place, the horizontal stabilizers were attached and properly aligned with the wings. Yet again, no seams to mess with here. I’m really enjoying this !!
|
PAINT |
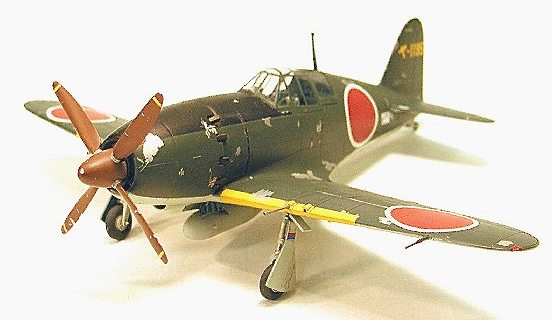
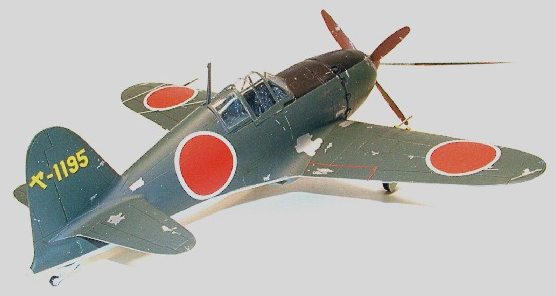
Paint time – The Raiden was
usually painted in Nakajima Green, and IJN Gray with Japanese black/blue for the
anti-glare panel. I’d previously decided to try the extensive paint chipping
that’s quite prevalent on a lot of late war Japanese aircraft. To this end, the
entire aircraft was sprayed with Testors Buffing Aluminum metallizer and allowed
to dry for a few hours. I lightly buffed the entire plane with a cotton ball,
just to smooth the metallizer paint out and give it a slight sheen. The
 aluminum finish was then oversprayed with Testors Metallizer sealer and allowed
to dry overnight. The gray/green demarcation for this aircraft is hard, so
masking tape was laid in the appropriate areas along the fuselage and wings and
the lower portion painted IJN gray from the old Aeromaster enamel paint line.
Once dry, the canopy was masked and temporarily attached with white glue. The
top of the plane was sprayed with the appropriate Aeromaster color and then the
anti-glare panel was masked and painted. The last portion to be painted was the
orange-yellow ID panels on the wings. These took a couple of coats to
completely cover over the dark Nakajima green, but looked much better than
decals. The propeller and spinner were painted IJN Brown Primer and the prop
bosses painted in aluminum. The landing gear was sprayed IJN gray (oleos
painted chrome silver) and the wheel wells Aotake.
aluminum finish was then oversprayed with Testors Metallizer sealer and allowed
to dry overnight. The gray/green demarcation for this aircraft is hard, so
masking tape was laid in the appropriate areas along the fuselage and wings and
the lower portion painted IJN gray from the old Aeromaster enamel paint line.
Once dry, the canopy was masked and temporarily attached with white glue. The
top of the plane was sprayed with the appropriate Aeromaster color and then the
anti-glare panel was masked and painted. The last portion to be painted was the
orange-yellow ID panels on the wings. These took a couple of coats to
completely cover over the dark Nakajima green, but looked much better than
decals. The propeller and spinner were painted IJN Brown Primer and the prop
bosses painted in aluminum. The landing gear was sprayed IJN gray (oleos
painted chrome silver) and the wheel wells Aotake.
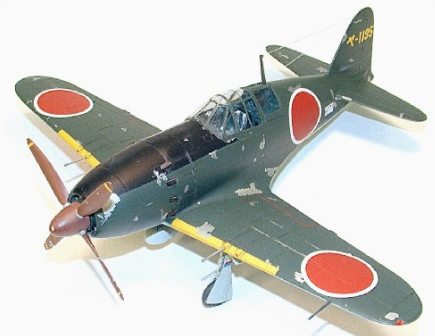
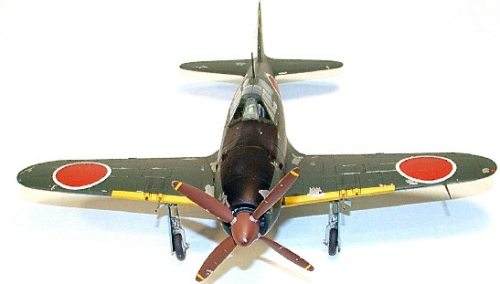
I chose to do the paint chipping before attaching all of the easily broken parts (landing gear, antennae, gun barrels, ect.). Using standard 3M masking tape (not the low tack stuff) cut into thin strips, the tape was placed on random areas of the plane, burnished down with a toothpick and then quickly pulled off. I was pleasantly surprised by the way this worked out. In some cases it would take a couple of tries to achieve the desired affect, but I never had any issues with too large of an area peeling off. In some areas I wanted just a little chipping around panel lines and this was done again using a toothpick. The toothpick was sharpened to a chisel point and then pushed along the desired area. If the result wasn’t enough, a little masking tape was applied and the quick pull method used. At first I was worried that some of the underlying metallizer might also come up with the chiseling/tape methods, but it held fast with no issues at all. A little chipping was also added to the propeller blades with a fine tip brush and some silver paint.
|
DECALS |
On to the markings - I opted to use some of the Aeromaster decals, though designed for the J2M3 (the differences between the J2M3 and J2M5 were armament and engine related, with little to no external changes), as the quality was much better than the Hasegawa kit decals. I’d previously used Aeromaster decals on several other projects and have had nothing but great results from them. The plane was sprayed with a couple of light coats of Metallizer Sealer and allowed to dry for a few hours. All decals went on very nicely, using just a little Micro-Sol. An overnight drying session was in order and by morning the decals looked as if they had been painted on.
 Wanting to try yet another new
technique, I took a mechanical pencil with 0.5 mm #2 lead and lightly traced
across all of the panel lines. The effect was distinct, but not too harsh and
also contributed a bit more to the paint chipping effect. This was repeated
until I was happy with the results (this was even done over the decals) and then
a layer of Testors Dull Cote was sprayed on.
Wanting to try yet another new
technique, I took a mechanical pencil with 0.5 mm #2 lead and lightly traced
across all of the panel lines. The effect was distinct, but not too harsh and
also contributed a bit more to the paint chipping effect. This was repeated
until I was happy with the results (this was even done over the decals) and then
a layer of Testors Dull Cote was sprayed on.
The individual exhaust stubs were installed (lost one of the 8 little beasts and had to scratch-build the replacement) after being sprayed with Testors Metallizer Burnt Iron. These were buffed a little once the glue had set. Using some black and brown oil chalk pastels, some exhaust staining was added to the fuselage. I actually like the results of the oil pastels for this type of weathering. They stay on better and the results look a little oily and sooty. Some streaks were also added on the wings by the gun barrels. The landing gear struts were given a light wash with thinned black oil paint and allowed to dry. The drop tank was also weathered with some chalks and oil paints (drips and streaks).
|
FINAL BITS |
Final assemblies next - Once
all of the paint and washes were dry, I attached the landing gear and drop
tank. Next were the gun barrels and pitot tube. Gun barrels were carefully
drilled out and painted with Testors metallizer “gunmetal” color. The wingtip
lights are molded separately in clear plastic and these were painted with Tamiya
clear Blue and Red before attaching. The canopy was also attached at this point
with Testors clear parts cement. The fit of the canopy was very nice and it
blends in perfectly with the fuselage. As I was ready to put the propeller on,
I realized that I hadn’t painted the yellow
 warning stripes on the tips.
Feeling less that coordinated at this point in time, I used the kit supplied
yellow decal strips. These went on very nicely and showed no silvering. A
little silver paint was added to the propeller and spinner for chipping effects.
warning stripes on the tips.
Feeling less that coordinated at this point in time, I used the kit supplied
yellow decal strips. These went on very nicely and showed no silvering. A
little silver paint was added to the propeller and spinner for chipping effects.
|
CONCLUSIONS |
I’m very pleased with the way the kit built up and the end results. Looking at the pictures of the kit, it looks too clean, but there really is sufficient weathering on it (IMHO) to match the chipped paint look. I also noticed that the landing gear looks very crooked in a couple of shots, but it’s all due to the camera angles. The kit took a 2nd place in it’s category (Axis 1/48th Single Prop) at the 2001 Annual OHMS (Oregon Historical Modelers Society) contest held at the Evergreen Aviation museum located in McMinnville, Oregon – home of the Spruce Goose - with which I was very happy (lots of great models to be seen at the show). I can highly recommend this kit to anyone with an interest in WW II Japanese aircraft or anyone looking for a nice, quick build kit.
Thanks to Dave Sherrill for the editorial assistance
If you would like your product reviewed fairly and quickly, please contact me or see other details in the Note to Contributors.
Back to the Reviews Index Page