| KIT #: | 61115 |
| PRICE: | $45.00 |
| DECALS: | Two options |
| REVIEWER: | Blair Stewart |
| NOTES: | Typical Tamiya detail and fit. |
| HISTORY |
The Kawasaki Ki-61 Hien ("flying swallow") was a Japanese World War II fighter aircraft. Used by the Imperial Japanese Army Air Service, it was designated the "Army Type 3 Fighter". Allied intelligence initially believed Ki-61s were Messerschmitt Bf 109s and later an Italian Macchi C.202, which led to the Allied reporting name of "Tony", assigned by the United States War Department. The design originated as a variant of the Kawasaki Ki-60, which never entered production. The Ki-61 became the only mass-produced Japanese fighter of the war to use a liquid-cooled inverted V engine. Over 3,000 Ki-61s were produced. Initial prototypes saw action over Yokohama during the Doolittle Raid on 18 April 1942 and continued to fly combat missions throughout the war.
 The Ki-61
was designed by Takeo Doi and his deputy Shin Owada in response to a late 1939
tender by the Koku Hombu for two fighters, each to be built around
the Daimler-Benz DB 601Aa. Production aircraft would use a Kawasaki licensed DB
601 known as the Ha-40, which was to be manufactured at its Akashi plant.
The Ki-60 was to be a heavily armed specialized interceptor, with a high wing
loading; the Ki-61 was to be a more lightly loaded and armed general-purpose
fighter, intended to be used mainly in an offensive, air superiority role at low
to medium altitudes.
The Ki-61
was designed by Takeo Doi and his deputy Shin Owada in response to a late 1939
tender by the Koku Hombu for two fighters, each to be built around
the Daimler-Benz DB 601Aa. Production aircraft would use a Kawasaki licensed DB
601 known as the Ha-40, which was to be manufactured at its Akashi plant.
The Ki-60 was to be a heavily armed specialized interceptor, with a high wing
loading; the Ki-61 was to be a more lightly loaded and armed general-purpose
fighter, intended to be used mainly in an offensive, air superiority role at low
to medium altitudes.
Both single-seat, single-engine fighters used the same basic construction: all-metal alloys with semi-monocoque fuselages and three-spar wings, with fabric-covered ailerons, elevators and rudders. Priority was given to the Ki-60, which first flew in April 1941, while design work on the Ki-61 did not begin until December 1940. Although the Ki-61 was very similar to the Ki-60, it featured several refinements exploiting lessons learned from the disappointing flight characteristics of the earlier design.
The all-metal, semi-monocoque fuselage was basically oval in cross-section, changing to a tapered, semi-triangular oval behind the cockpit canopy, with a maximum depth of 4 ft 5 in. An unusual feature of the Ki-61 was that the engine bearers were constructed as an integral part of the forward fuselage, with the cowling side panels being fixed. For servicing or replacement, only the top and bottom cowling panels could be removed. A rectangular supercharger air intake was located on the port-side cowling. Behind the engine bulkhead were the ammunition boxes feeding a pair of synchronized 12.7 mm (.50 in) Ho-103 machine guns which were set in a "staggered" configuration (the port weapon slightly further forward than that to starboard) in a bay just above and behind the engine. The breeches partly projected into the cockpit, above the instrument panel. The ammunition capacity was limited, having only around 250 rounds for each gun. A self-sealing fuel tank with a capacity of 44 US gallons was located behind the pilot's seat. The windshield was armored and there was a 13 mm armor plate behind the pilot. The radiator and oil cooler for the liquid-cooled engine were ventrally located below the fuselage and wing trailing edge and covered by a rectangular section fairing with a large, adjustable exit flap.
 The new
Ki-61 Hien fighters entered service with a special training unit, the 23rd Chutai,
and entered combat for the first time in early 1943 during the New
Guinea campaign. The first Sentai (Air Group/Wing) fully equipped with the Hien was
the 68th in Wewak, New Guinea, followed by the 78th Sentai stationed at Rabaul.
Both units were sent into a difficult theatre where jungles and adverse weather
conditions, coupled with a lack of spares, quickly undermined the efficiency of
both men and machines. Because the Ki-61 was so new and had been rushed into
service, it inevitably suffered from teething problems. Almost all the modern
Japanese aircraft engines, especially the Ki-61's liquid-cooled engines,
suffered a disastrous series of failures and ongoing problems, which resulted in
the obsolescent Ki-43 still forming the bulk of the JAAF's fighter capability.
The new
Ki-61 Hien fighters entered service with a special training unit, the 23rd Chutai,
and entered combat for the first time in early 1943 during the New
Guinea campaign. The first Sentai (Air Group/Wing) fully equipped with the Hien was
the 68th in Wewak, New Guinea, followed by the 78th Sentai stationed at Rabaul.
Both units were sent into a difficult theatre where jungles and adverse weather
conditions, coupled with a lack of spares, quickly undermined the efficiency of
both men and machines. Because the Ki-61 was so new and had been rushed into
service, it inevitably suffered from teething problems. Almost all the modern
Japanese aircraft engines, especially the Ki-61's liquid-cooled engines,
suffered a disastrous series of failures and ongoing problems, which resulted in
the obsolescent Ki-43 still forming the bulk of the JAAF's fighter capability.
From 1942 to 1945, the Japanese produced 2,654 Kawasaki Ki-61-I models and 404 Ki-61-II models.
| THE KIT |
 This is
another excellent kit from Tamiya, first released in 2016. For an excellent
description of what’s in the box, see
Da Boss'
Review in the Modeling Madness build review archives. I
will say that I was most impressed by the detailed cockpit and typical Tamiya
attention to detail. Crisp panel lines adorn the fuselage and wings. Canopy
options include both closed and open. There is a very nice engine included that
can be built and displayed but will not be seen if built into the model itself.
One can access the top of the engine by not glueing the upper cowl to the
airframe. The kit also includes a nicely detailed pilot figure wearing an oxygen
mask, which is fitting for the aircraft’s late war role of going after B-29s at
high altitude (the Hien’s service ceiling was over 38,000 ft).
This is
another excellent kit from Tamiya, first released in 2016. For an excellent
description of what’s in the box, see
Da Boss'
Review in the Modeling Madness build review archives. I
will say that I was most impressed by the detailed cockpit and typical Tamiya
attention to detail. Crisp panel lines adorn the fuselage and wings. Canopy
options include both closed and open. There is a very nice engine included that
can be built and displayed but will not be seen if built into the model itself.
One can access the top of the engine by not glueing the upper cowl to the
airframe. The kit also includes a nicely detailed pilot figure wearing an oxygen
mask, which is fitting for the aircraft’s late war role of going after B-29s at
high altitude (the Hien’s service ceiling was over 38,000 ft).
| CONSTRUCTION |
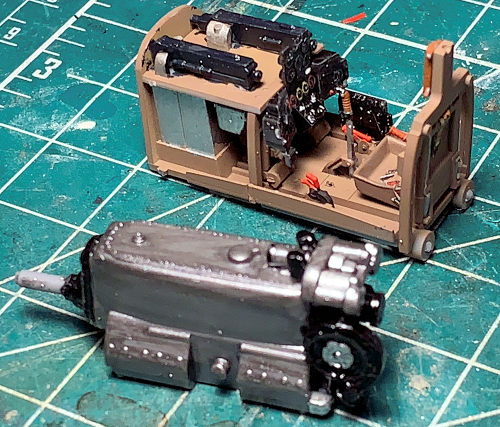
Construction begins with the multi-part cockpit, and again, Tamiya does a great job of detailing here. Per the instructions, I painted the assembled cockpit tub with Tamiya XF-59 Desert Yellow sprayed over a base of Xf-52 Flat Earth. I then painted the instrument panel with acrylic black hobby paint, which I then coated with Future for application of the excellent instrument decals provided by Tamiya. I spent quite a bit of time detailing the cockpit with various colors per the excellent instructions. Finally, I cut out and glued in a colored paper seatbelt and harness that I had purchased on Ebay (these are very well done, look good, and are a fraction of the cost of colored PE seatbelts).
I then moved to attaching the various instruments and controls to the insides of the fuselage halves, the insides of which I had painted the same colors as I used for the cockpit. Next, I assembled and painted the nicely detailed engine, even though I knew it would not be visible once I glued the fuselage halves together (oh well, at least I know it’s in there and nicely painted!). Once I finished the engine, I glued it to the right fuselage side and then glued the two halves together.
 One of
the nice things about a lot of the Tamiya kits - including this one – is the
feature of inserting the finished cockpit from the bottom of the glued-together
fuselage. This essentially eliminates having to line up the cockpit on one side
of the fuselage and then getting the other side to mate properly with the
cockpit shell. I find this to be a preferred approach to installing aircraft
cockpits.
One of
the nice things about a lot of the Tamiya kits - including this one – is the
feature of inserting the finished cockpit from the bottom of the glued-together
fuselage. This essentially eliminates having to line up the cockpit on one side
of the fuselage and then getting the other side to mate properly with the
cockpit shell. I find this to be a preferred approach to installing aircraft
cockpits.
Steps 9 and 10 involved gluing the top halves of the wings to the lower wing assembly and then gluing that to the fuselage. Note that the lower wing section also contains the scooped section that houses the radiator. Here, the fit was excellent, requiring no putty to fill the seams that usually result from this step. For some reason, Tamiya opted to provide a spline part for the rear fuselage, I suppose to avoid a sightly seam there that one would need to sand, thereby losing panel detail in the process. Step 11 glues the horizontal stabilizers and the ruder to the fuselage.
Steps 12 and 13 require assembly of the radiator. Here, I found aligning the multiple parts of the radiator air intakes to be a bit challenging, but once assembled, they fit nicely inside the radiator housing.
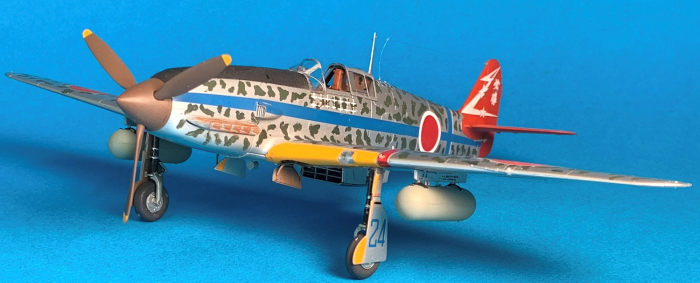
Step 14 involves the assembly of the nicely detailed drop tanks and the landing gear. I assembled, painted and decaled these and left them off the model until final assembly to avoid breaking them (which is almost a given for me these days).
Final steps include assembling the prop and spinner and the wing machine gun barrels as well as the fuselage gun barrels.
| COLORS & MARKINGS |
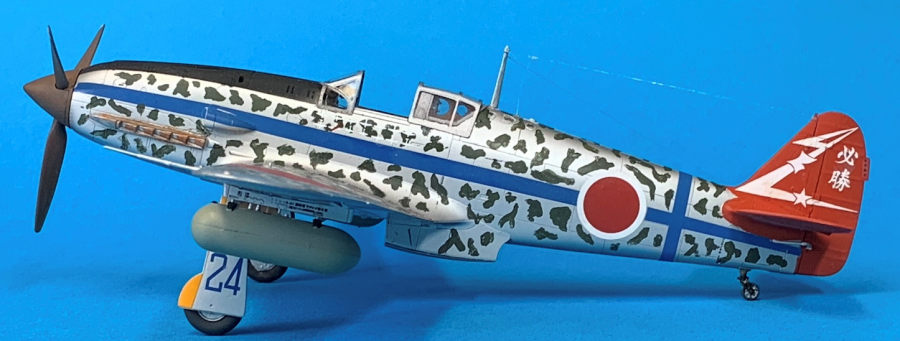
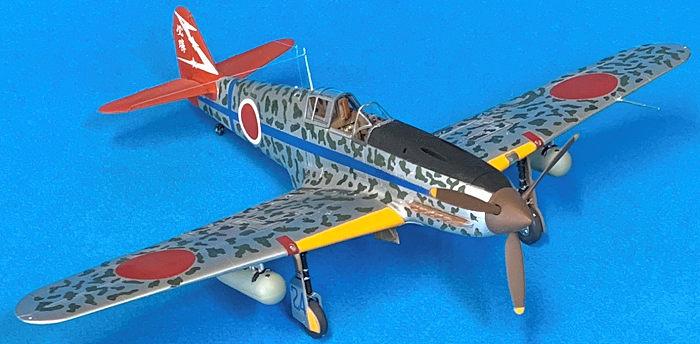
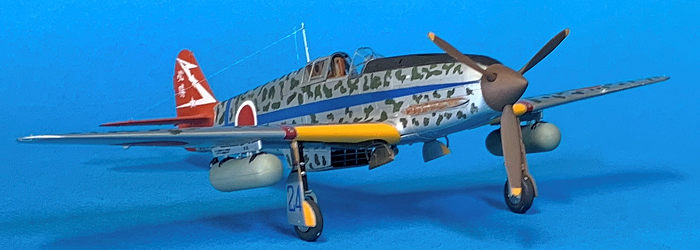
Of the two paint schemes offered by Tamiya, I opted for the more complex camouflaged aircraft of the 244th Air Group based at Chofu Airbase in May 1945. I first sprayed the entire model with Tamiya LP-11 silver lacquer. I have now switched to this paint for natural metal finishes because it can be masked over without peeling off (assuming you have provided a good primer coat over the plastic). As I have for over fifty years, I thinned this paint (as well as the other Tamiya paints I used) with ordinary lacquer thinner.
 Once the
silver paint was dry, I masked off the tail and painted it with Pactra flat Zero
Red (note that I purchased this bottle of paint in the mid-seventies, and it is
still viable!). Rather than use the kit-supplied yellow leading-edge decals, I
masked these off and painted them with Mr. Color Orange Yellow. I then masked
off the anti-glare panel and painted it flat black.
Once the
silver paint was dry, I masked off the tail and painted it with Pactra flat Zero
Red (note that I purchased this bottle of paint in the mid-seventies, and it is
still viable!). Rather than use the kit-supplied yellow leading-edge decals, I
masked these off and painted them with Mr. Color Orange Yellow. I then masked
off the anti-glare panel and painted it flat black.
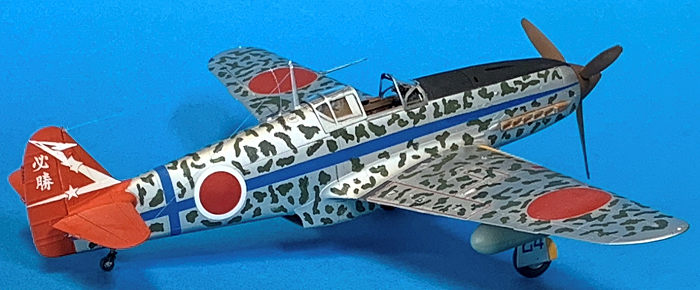
I have learned that brushing on a coat of future using a flat paint brush provides a quicker method than airbrushing for a gloss finish to support decals. This method also allows for glossing only specific areas if one chooses that route. The decals went on smoothly, the only exception being lining up the fuselage-long blue stripes and the vertical blue stripe around the rear fuselage. These required some maneuvering and constant application of Micro Set to allow the decal to be moved around until it lined up correctly.
For the camo pattern, I opted to hand paint the dark green splotches rather than airbrush them (I understand the Japanese did the same on the real airplane) using Tamiya XF-13 Japanese Army Dark Green.
After painting, I glued on the prop and spinner, the landing gear, and the drop tanks. I used fine fishing line for the radio antennas and superglued these to the radio mast, fuselage and horizontal and vertical stabilizers.
| CONCLUSIONS |
This is another fine and fun kit by Tamiya. The finished model looks great (as did the real aircraft). The fit is excellent and requires little to no filing and sanding. I highly recommend this kit for your World War II aircraft collection.
| REFERENCE |
“Kawasaki Ki-61,” Wikipedia, Worldwide Web, August 2024.
“Kawasaki Ki.61 Hien,” Aeropedia, Worldwide Web, August 2024.
Pollard, Spencer, “Research in Hien’d Sight,” Model Airplane International, June 2024.
26 August 2024
Copyright ModelingMadness.com. All rights reserved. No reproduction in part or in whole without express permission from the editor.
If you would like your product reviewed fairly and fairly quickly, please contact the editor or see other details in the Note to Contributors.