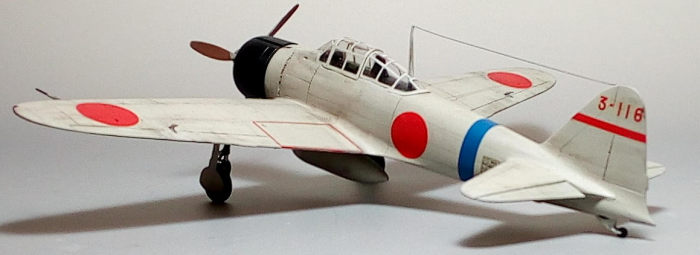
Hasegawa 1/48 A6M2a Type 11
| KIT #: | 09142 (Jt 42)) |
| PRICE: | €15 on offer |
| DECALS: | Four options |
| REVIEWER: | Spiros Pendedekas |
| NOTES: |
| HISTORY |
The Mitsubishi A6M
"Zero" was a long-range carrier-based fighter aircraft operated by the Imperial
Japanese Navy from 1940 to 1945. Combining excellent maneuverability and very
long range, it is considered to have been the most capable carrier-based fighter
in the world when it was introduced early in World War II. It was also used as a
land-based fighter by the Imperial Japanese Navy Air Service (IJNAS).
In early combat operations, the Zero gained a reputation as a vivid dogfighter,
achieving an outstanding kill ratio of 12 to 1, but by mid-1942 a combination of
new tactics and the introduction of better equipment enabled Allied pilots to
engage the Zero on generally equal terms. By 1943, the Zero was less effective
against newer Allied fighters due to design limitations, lacking, among others,
hydraulic boosting for its ailerons and rudder, rendering it extremely difficult
to maneuver at high speeds.
By 1944, with Allied fighters approaching the A6M levels of maneuverability and
consistently exceeding its firepower, armor and speed, the A6M had largely
become outdated as a fighter aircraft. However, as design delays and production
difficulties hampered the introduction of newer Japanese aircraft models, the
Zero continued to serve in a front-line role until the end of the war in the
Pacific. During the final phases, it was also adapted for use in kamikaze
operations. 10,939 were built, more than any other model of combat aircraft
during the war.
 Sub-Lieutenant
Saburō Sakai (25 August 1916 – 22 September 2000) was a Japanese naval aviator
and flying ace of the Imperial Japanese Navy during World War II. By official
Japanese records Sakai had 28-64 aerial victories (including shared), however
some diligent historians have estimated that Sakai’s actual tally probably was
more like 15.
Sub-Lieutenant
Saburō Sakai (25 August 1916 – 22 September 2000) was a Japanese naval aviator
and flying ace of the Imperial Japanese Navy during World War II. By official
Japanese records Sakai had 28-64 aerial victories (including shared), however
some diligent historians have estimated that Sakai’s actual tally probably was
more like 15.
On 8 August 1942 he was seriously wounded after
his skull was penetrated by a SBD-3 machine-gun bullet. Upon returning and blind
in one eye, he insisted on making his mission report before accepting medical
treatment! This wound left a permanent partial blindness, which, together with
his “militarist” heritage, would prevent him from returning to military service
after the war, so he started a printing business.
Sakai was not reluctant to speak out against Japanese militarism. He wrote
numerous books that were controversial in Japan, owing to his criticism of
Emperor Hirohito, who cooperated with the “militarists”, and Admiral Isoroku
Yamamoto, for flawed strategy in dispersing his forces. Sakai also decried the
kamikaze program as brutally wasteful of young lives.
A recurring topic in Sakai’s conversations was leadership, as the IJN relied
heavily upon non-commissioned aircrew, often commanded by relatively
inexperienced officers, with the Japanese aces taking pains to look out for the
good leaders while sometimes ignoring the other kind.
Whereas Sakai’s public statements were resented by many, including a number of
Zero veterans, he nevertheless was a gifted pilot and a person with a contained
personality, by no means reluctant to raise his own voice.
| THE KIT |
 The
very nice quarter scale Hasegawa A6M2 first hit the shelves in 1996 and has been
reboxed almost 40 (!) times ever since. My version was the first (1996) edition,
bought in 2005 at a very good price, featuring a beautiful Koike Shigeo boxart
of #3-112 Zero flown by Lt Minoru Suzuki. All parts were beautifully molded and
totally flash free. Clear parts were also excellent, my only minor “complaint”
being that some clear sprue gates interfered a tad with the transparent part at
a few areas (like the windscreen’s side windows).
The
very nice quarter scale Hasegawa A6M2 first hit the shelves in 1996 and has been
reboxed almost 40 (!) times ever since. My version was the first (1996) edition,
bought in 2005 at a very good price, featuring a beautiful Koike Shigeo boxart
of #3-112 Zero flown by Lt Minoru Suzuki. All parts were beautifully molded and
totally flash free. Clear parts were also excellent, my only minor “complaint”
being that some clear sprue gates interfered a tad with the transparent part at
a few areas (like the windscreen’s side windows).
Apart from their yellowed carrier film, the 27 years old decals look to be in
excellent condition. Interestingly, all four kit provided schemes feature no
white signs whatsoever, otherwise I would put a safe bet that the “white” color
would actually be represented as “ivory”, per the Hasegawa trend of past times
(which has recently stopped, with newer Hasegawa decals' "white" actually being
white).
A detailed description, as well as an excellent build of this kit, has been
performed by our Editor and can be read here.
Always keen to build a Saburo Sakai’s plane, I decided to give this
seemingly very good kit a go.
| CONSTRUCTION |
I started by putting
together the 12-piece cockpit, which consisted of instrument panel, gun sight,
machine guns rears, stick, rudder pedals, sidewalls, port side console, seat
with its adjustment lever and rear bulkhead. Everything was well appointed and
adequately detailed. Basic cockpit color was Hu78 interior green, with black
sidewalls details, gun-sight body and stick gaiter. The machine guns were
painted gunmetal. For the instruments I used the very nice kit-provided
instrument decals. The seat had its holes completely drilled out for added
realism, whereas seat belts were added from masking tape.
 The barely
visible fuselage sidewalls fore and aft of the cockpit received a coat of my
home made Aotake (essentially a coat of clear green on top of clear blue), then
the two fuselage halves were joined together, with the cockpit afterwards
inserted underneath. To obtain a perfect fit I had to trim the area flat, where
the cockpit rear bulkhead touches the rear anti-glare panel. The machine guns
top fuselage cover was attached at this time, as well.
The barely
visible fuselage sidewalls fore and aft of the cockpit received a coat of my
home made Aotake (essentially a coat of clear green on top of clear blue), then
the two fuselage halves were joined together, with the cockpit afterwards
inserted underneath. To obtain a perfect fit I had to trim the area flat, where
the cockpit rear bulkhead touches the rear anti-glare panel. The machine guns
top fuselage cover was attached at this time, as well.
Kit instructions want you to glue the top wing halves onto the lower wing, then
attach the assembled wing to the fuselage. Since I have experienced nasty
wing-to-fuselage gaps at many kits quite a lot of times by doing so, I have
established the following technique that most of the times works better. First I
attach the lower wing half onto the fuselage. Then, having beforehand removed
all locating pins, I attach the top wing halves, opting for a solid/positive
wing-to-fuselage joint, letting the wing halves “rest” towards the tips. Should
a tips area mismatch arise, it is far easier dealt than a gap at the root.
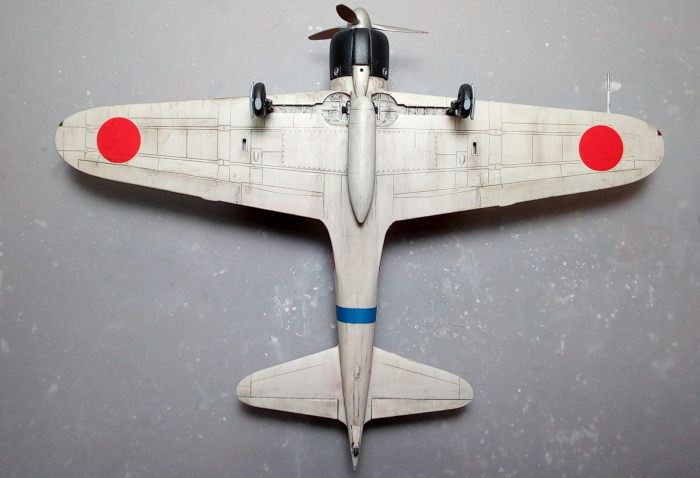
Of note is that the wheel bays are not fully contained into the lower wing half,
with a small part of them molded with the fuselage halves. This means that upon
attaching the wing to the fuselage, a seam will appear at both bays. Thankfully,
it was not that noticeable, otherwise dealing with it would not be that easy
with the bay raised detailing "surrounding" it...
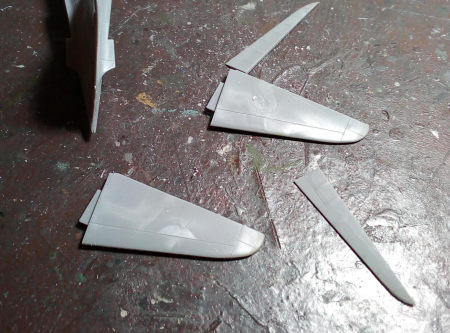 Continuing
with basic assembly, I attached the 2-piece oil cooler, the single piece tail
planes and the tail hook underside cover. The 2-piece fuel tank was assembled at
this time, as well. Some filling and sanding took place, mainly at the rear
underside fuselage-wing joint (something that has been noted by many builders of
the same kit. so it probably is a kit issue and not builder induced). In order
to liven things up, the elevators were sawed off and posed lightly drooped
(with the control stick correspondingly angled forward).
Continuing
with basic assembly, I attached the 2-piece oil cooler, the single piece tail
planes and the tail hook underside cover. The 2-piece fuel tank was assembled at
this time, as well. Some filling and sanding took place, mainly at the rear
underside fuselage-wing joint (something that has been noted by many builders of
the same kit. so it probably is a kit issue and not builder induced). In order
to liven things up, the elevators were sawed off and posed lightly drooped
(with the control stick correspondingly angled forward).
After an all-around 1500 grit sanding, I attached the fragile looking aileron
top mass balances, blanked the cockpit with wet tissue and took the model to the
paint shop!
| COLORS & MARKINGS |
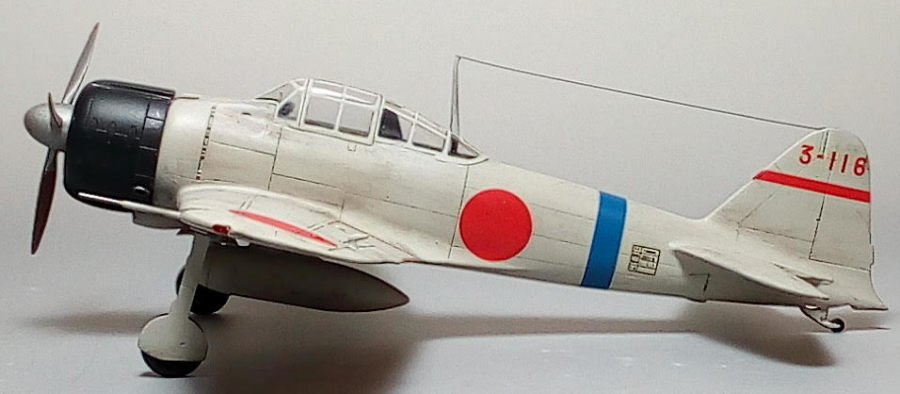
Hasegawa want you to
paint Saburo Sakai’s plane IJN “Mitsubishi” gray, which is supposed to have a
greenish hue, so I applied to the whole model, including doors and the external
tank, a coat of Hu28 Camouflage Gray that looked g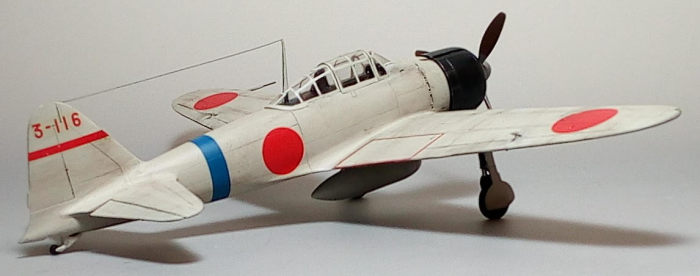 reener
than Hu196, which is my "usual" IJN gray choice. Instructions wanted you to
paint wheel wells and doors innards Aotake, however some credible research
revealed that Mitsubishi built Zeros of the time had those areas painted
fuselage color, so fuselage color it was!
reener
than Hu196, which is my "usual" IJN gray choice. Instructions wanted you to
paint wheel wells and doors innards Aotake, however some credible research
revealed that Mitsubishi built Zeros of the time had those areas painted
fuselage color, so fuselage color it was!
After a coat of Future, I went on to apply the decals. As expected, they took
ages to detach from their backing paper, but once detached, they behaved really
wonderfully, snuggling down onto every tiny detail, without needing any decal
solution whatsoever! The yellowed carrier film was minimal and, aided by the
fuselage color shade, was to a good degree unnoticeable. As stated above, no
white shades were featured in this scheme, so no Hasegawa ivory drama took place
here! A coat of Future sealed the decals.
| CONSTRUCTION CONTINUES |
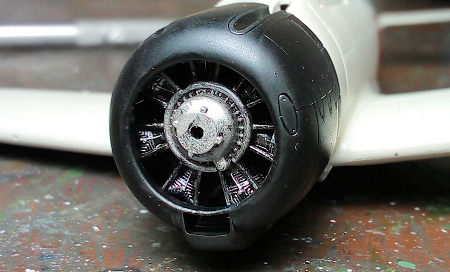 The
nice 4-piece engine was assembled (with the famous poly cap trapped inside) and
attached in position. It had steel crankcase, black push rods and burned metal
exhaust collector, whereas the cylinders were painted black and heavily dry
brushed with silver. The only thing the highly visible beautiful engine was
crying for were ignition wires, which were fabricated from stretched sprue.
The
nice 4-piece engine was assembled (with the famous poly cap trapped inside) and
attached in position. It had steel crankcase, black push rods and burned metal
exhaust collector, whereas the cylinders were painted black and heavily dry
brushed with silver. The only thing the highly visible beautiful engine was
crying for were ignition wires, which were fabricated from stretched sprue.
The one piece cowling had its prescribed exhaust marks filled and sanded
(possibly correct for some other version), then the two tiny exhausts were
attached at the position indicated by the instructions and had their innards
hollowed for added realism. The cowling was externally painted with my home made
“blue-black” mix (few drops of black with a drop of metallic blue), whereas its
innards were painted Aotake and the exhausts burned metal. It was then carefully
attached in position.
I decided to add brake lines onto the main legs. This was done by routing
stretched sprue, following the clearly visible pattern of the many net available
pics (isn't the internet a wonderful modeling "tool"?). The legs, together with
the wheel rims and auxiliary doors retraction levers were painted black and
lightly dry brushed with silver. The wheels were lightly sanded to look weighted
(the effect is not that pronounced at the Zeros) and had their tires painted
black. All landing gear parts, including doors and the tiny rear wheel, were
then attached in position and left to dry.
I attached the headrest supporting frame and painted the complete front and rear
anti-glare areas black (Hasegawa wanted you to paint them cockpit color, but my
research concluded that this Sakai’s Mitsubishi built Zero had good chances of
having those areas black). The headrest cushion was painted “leather” and
attached, as well.
 Though the
5-piece prop had separate blades, it was a breeze to assemble. It was painted
silver, with the back of the blades partially painted “propeller color”, for
which I used my preferred shade of Hu113 Rust. Again, Hasegawa instructions want
you to paint the complete rear blade faces black, but research “offered” me this
partially painted “option” with good chances being accurate and which I gladly
went for!
Though the
5-piece prop had separate blades, it was a breeze to assemble. It was painted
silver, with the back of the blades partially painted “propeller color”, for
which I used my preferred shade of Hu113 Rust. Again, Hasegawa instructions want
you to paint the complete rear blade faces black, but research “offered” me this
partially painted “option” with good chances being accurate and which I gladly
went for!
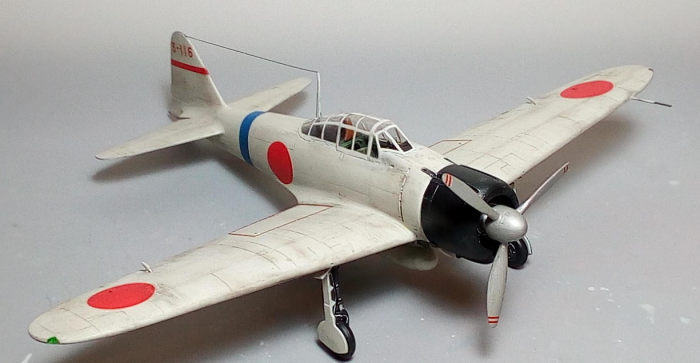
After attaching the external tank, I went on to apply some weathering. First I
gave it a coat of black wash (more heavily inside the wheel wells), which nicely
brought out all details. Then I performed some chipping by silver dry brushing
at key places, like cowling lips, hinges, prop tips, airframe/wing areas where
personnel would step onto etc. Finally, I used dark brown/black shades of dry
pastels in order to represent dirt, grim and soot at affected areas. I assumed
(with good odds) that the specific plane was properly primed and painted, thus
no extreme paint peel-offs here!
A final satin coat sealed everything.
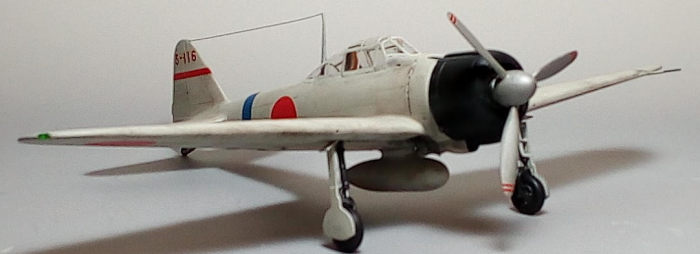
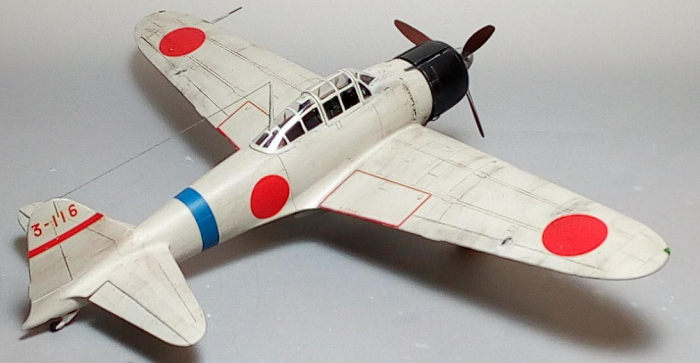
The transparencies had their well-defined frames hand painted and attached in
position, with the distinctive antenna mast having beforehand been painted and
installed. The wingtip lights were attached with Clearfix and painted with red
and green clear colors. A wire antenna was fabricated from steel colored
stretched sprue and was run from the mast to the fin, then tightened with hot
air from a hairdryer, before calling Saburo-san’s Zero done!
| CONCLUSIONS |
Not a lot can be said
for this kit that has not been said before: it is a now classic but very good
kit, with accurate shape, sufficient details and good fit (apart from the -
easily manageable - rear underside wing/fuselage joint). Kit decals performed
well, despite being elderly (if you are patient to wait ages for them to detach
from their backing paper) and, in my case, they did not contain white sections
that were represented as annoying “ivory” by Hasegawa back then.
 In my
specific build, I dared to deviate from some “standard” color callouts stated at
the instructions, by implementing guidelines of credible research results
offered by a fellow modeler. Thus, the bays and door innards were painted
underside color (not Aotake), the cockpit fore and aft anti glare areas black
(not cockpit green) and the blades rears were partially painted with the
brownish “prop color” (not fully with black).
In my
specific build, I dared to deviate from some “standard” color callouts stated at
the instructions, by implementing guidelines of credible research results
offered by a fellow modeler. Thus, the bays and door innards were painted
underside color (not Aotake), the cockpit fore and aft anti glare areas black
(not cockpit green) and the blades rears were partially painted with the
brownish “prop color” (not fully with black).
Despite the recent release of this aircraft by Eduard, the Hasegawa kit is a
great kit, by no means obsolete, offered at very sensible prices and easily
turned into an impressive model. The easiness of construction and simple scheme
makes it an ideal choice for even an inexperienced modeler, who will come up
with a great result. It has been reboxed numerous times with a wide variety of
versions and scheme options available. If you own one, or come across one, do
not hesitate to tackle it. You will be granted with a very pleasant construction
and a great result
Happy modeling!
Spiros Pendedekas
| REFERENCES |
7 June 2022
Copyright ModelingMadness.com. All rights reserved. No reproduction in
part or in whole without express permission.
If you would like your product reviewed fairly and fairly quickly, please contact the editor
or see other details in the
Note to
Contributors. Back to the Main Page
Back to the Review
Index Page
Back to the Previews Index Page