Anigrand 1/144 Daimler Benz Project B
| KIT #: | AA-4001 |
| PRICE: | $76.00 MSRP |
| DECALS: | One option |
| REVIEWER: | Mark Hiott |
| NOTES: | Luft46. A total of 11 extra planes included. Interesting subject… several Project versions can be done. |
| HISTORY |
It was conceived in an attempt to design an aircraft that could carry parasite planes closer to the target. The plane was never built and exists only on paper.
|
Carrier DB Project C |
|
|
Engines
|
6 DB 603 engines 1900 HP |
|
Weight loaded
|
73,500kg |
|
Span |
54 m |
|
Length |
35.8 m |
|
Height |
11.2 m |
|
Crew |
4 |
|
Range
|
9,000 km |
|
Armament |
1 parasite aircraft (DB
Project D) |
 As noted in
the table, there could be several variations to this aircraft. The main carrier
aircraft was known as a “Project C” aircraft. The large single engine parasite
was called “Project B”. The small parasite with the under-slung engine was
“Project E”, while the parasite with the tail mounted engine was “Project F”.
Put the “Project B” parasite under the “Project C” carrier and you get “Project
D”. Confusing yes?
As noted in
the table, there could be several variations to this aircraft. The main carrier
aircraft was known as a “Project C” aircraft. The large single engine parasite
was called “Project B”. The small parasite with the under-slung engine was
“Project E”, while the parasite with the tail mounted engine was “Project F”.
Put the “Project B” parasite under the “Project C” carrier and you get “Project
D”. Confusing yes?
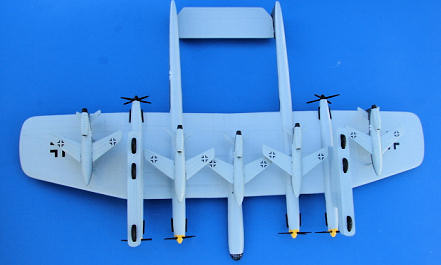
Since the box top shows the aircraft configured as a “Project E”, that is what I chose to build.
| THE KIT |
 Anyone who
has done an Anigrand kit will recognize the parts that come out of the box.
Molded in a light crème colored resin, the parts show good detail. The parts are
in poly bags and are separated into major components. The parasite aircraft are
well molded and the smaller ones have 1-piece fuselages. Also included are clear
canopies that I believe are molded in resin. They are a bit thick, but in this
scale there will not be much to see anyway.
Anyone who
has done an Anigrand kit will recognize the parts that come out of the box.
Molded in a light crème colored resin, the parts show good detail. The parts are
in poly bags and are separated into major components. The parasite aircraft are
well molded and the smaller ones have 1-piece fuselages. Also included are clear
canopies that I believe are molded in resin. They are a bit thick, but in this
scale there will not be much to see anyway.
A few of the parts have air bubbles, the engine nacelles and wheel spats had some major holes that will require care to fix. A few of the various mounting holes will also need to be redrilled. Mine had get 2 extra props blades and 1 extra parasite mount strut.
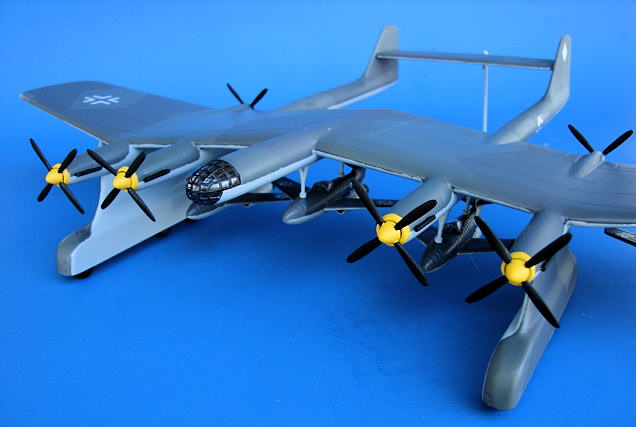
The box top shows the carrier aircraft with yellow rudders, but the instructions show yellow bands on the tail booms.
For a close up look, see Scott’s in-box review here on MM.
| CONSTRUCTION |
Carrier Aircraft:
Construction begins with removal of the various pour stubs. A couple of the stubs were in strange places… one of them was attached to the exhaust on one of the nacelles.
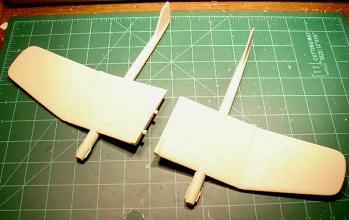 After
cleanup, I attached the tail booms to the wings. You will need the vertical tail
to help set the angle of the wings. If the angle is not correct, other parts
will be out of alignment in later steps. I then filled and sanded the tail
booms. After I was satisfied with the fit, I attached the outer engine nacelles.
Filler will be needed at most of the seams. I found the model easier to work
with this way, as the main wing is quite heavy and bulky.
After
cleanup, I attached the tail booms to the wings. You will need the vertical tail
to help set the angle of the wings. If the angle is not correct, other parts
will be out of alignment in later steps. I then filled and sanded the tail
booms. After I was satisfied with the fit, I attached the outer engine nacelles.
Filler will be needed at most of the seams. I found the model easier to work
with this way, as the main wing is quite heavy and bulky.
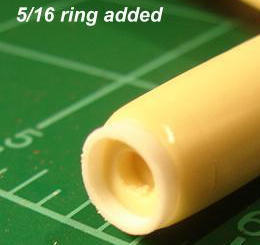 The front
of the nacelles on my kit were poorly cast. Rather then try to fill the lip or
build them up, I decided to replace them. I sanded off the originals, I then cut
small rings out of 5/16 Evergreen tube. After gluing the rings to the front of
the nacelles, I blended them in with filler. Not perfect, but better. I had
removed the
The front
of the nacelles on my kit were poorly cast. Rather then try to fill the lip or
build them up, I decided to replace them. I sanded off the originals, I then cut
small rings out of 5/16 Evergreen tube. After gluing the rings to the front of
the nacelles, I blended them in with filler. Not perfect, but better. I had
removed the 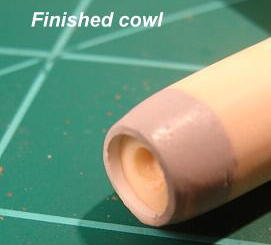 molded
on exhausts, so these were replaced with sections of round rod.
molded
on exhausts, so these were replaced with sections of round rod.
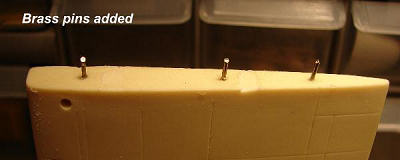
The surfaces for attaching the two halves of the wings
have pins molded in, but the holes in the port wing where blocked. I chose to
remove the molded pins and use wire for a better hold. After drilling 3 holes in
the starboard wing, I superglued in bits of wire. I attached the wings and the
horizontal tail at the same time.
 Take care
here, as you will want to make sure of the alignment. Do not try to close the
gap between the wing halves, set the tail alignment and fill the resultant gap
later. (It’s a big one!)
Take care
here, as you will want to make sure of the alignment. Do not try to close the
gap between the wing halves, set the tail alignment and fill the resultant gap
later. (It’s a big one!)
Parasite Aircraft:
Since I chose to do the Project E aircraft, I will
save the others for another time. The smaller aircraft are cast solid with
separate wings and tails. Not
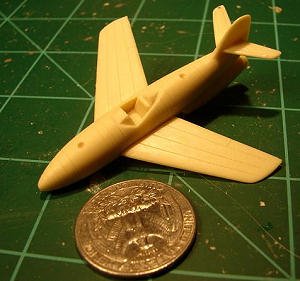 really much
to tell, as they are quite simple. Several of the alignment pins didn’t line up
with the holes in the fuselage, so I cut them off and just glued the wings on.
Note that the pins are spaced different on the left and right wings. They are
fiddly and I broke a couple of them apart in the process of building/painting
them.
really much
to tell, as they are quite simple. Several of the alignment pins didn’t line up
with the holes in the fuselage, so I cut them off and just glued the wings on.
Note that the pins are spaced different on the left and right wings. They are
fiddly and I broke a couple of them apart in the process of building/painting
them.
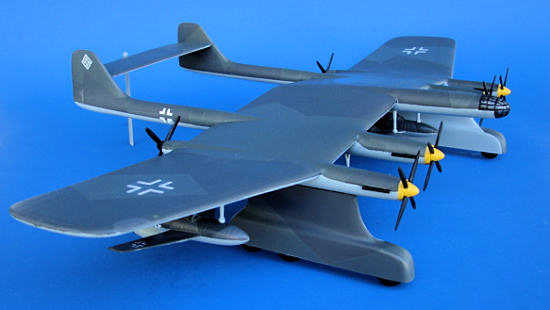
| COLORS & MARKINGS |
With this kit your imagination is the limit! It is
more or less a “Luft46” kit, so paint it however you want. The instructions call
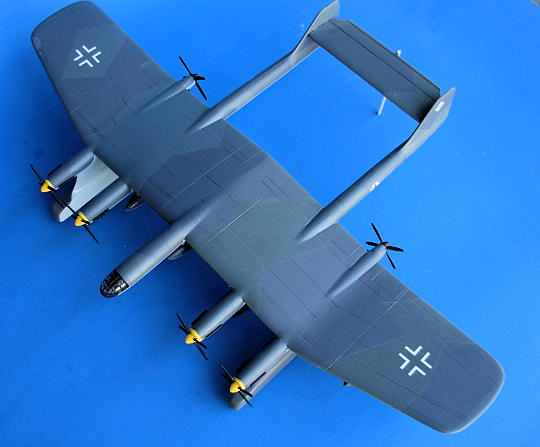
for the standard bomber scheme of RLM70/71 over 65. I chose to use the fighter
scheme RLM74/75 over 76. Why, you ask? Because I like it and that’s the colors I
had! The model was painted with MM acrylics. I scrubbed the model with warm
soapy water, but I still had a few places where the paint “fish-eyed” or just
wouldn’t stick.
I first painted the upper surface RLM74. Then I laid out the camo pattern and sprayed the 75. Since I couldn’t find RLM76 in a spray and my airbrush wouldn’t cooperate, I had to brush paint the lower surfaces. The MM acrylic goes on nicely and I was able to keep brush strokes to a minimum. I painted the insides of the wheel spats RLM76 and the outsides RLM74/75. When all was said and done, I did touch up with a brush. This is where I found out that RLM74 in a spray can and RLM74 in the bottle are two different colors! WTH…? Being too late to do anything about it, I just let it go.
I painted the prop spinners Insignia Yellow, but left off the fuselage band.
I don’t know who makes Anigrand decals, but they seem to be doing a good job. Mine were thin and went on with no trouble. The swastika decals are in two parts and the parasite decals are REALLY tiny! Care will be required to get them on properly.
| FINAL CONSTRUCTION |
 I debated
installing the wheel spats before or after the parasite aircraft. I ended up
installing them first to help me with alignment of the parasites. The mounts for
the parasites are at a right angle to the lower wing surface, but the aircraft
hang horizontal. I decided to attach the mounts, then glue the aircraft on and
set the alignment.
I debated
installing the wheel spats before or after the parasite aircraft. I ended up
installing them first to help me with alignment of the parasites. The mounts for
the parasites are at a right angle to the lower wing surface, but the aircraft
hang horizontal. I decided to attach the mounts, then glue the aircraft on and
set the alignment.
At this point a very big booboo on my part became apparent. The mounting holes in the wings were closer together then the mounting holes in the parasites! This is something I should have checked in the beginning. I ended up using a pair of dividers and marking out new mounting holes in the wings. I drilled a new set of holes farther forward for the outer and center parasites, and new holes farther back for the two under the inner nacelles. The old holes were filled with superglue and painted over. Live and learn I guess.
 After I
installed the wheels, I found it was tail-heavy. Being solid resin, there was
nowhere to put any weight.
After I
installed the wheels, I found it was tail-heavy. Being solid resin, there was
nowhere to put any weight.
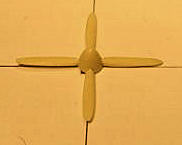
The props were added last. I cannot understand why Anigrand casts the props with separate blades. At this size, one-piece props shouldn’t be that hard. This was the only part of the build that really scared me. Out-of-align props would ruin any model, no matter how well built. I ended up making a jig to help align them. I drew 90-degree lines on a small piece of plastic and attached the piece of sheet plastic to some Styrofoam and drilled a hole in the middle for the prop shaft. I then assembled the props on my little makeshift jig and it seemed to work ok.
| CONCLUSIONS |
 This was my
first all resin model and I think I may have bitten off more then I could chew.
I made a lot of mistakes and missed a few things that I should have fixed or
were beyond my abilities. This is NOT a kit for a beginner! The props are the
only things that I would recommend Anigrand change.
This was my
first all resin model and I think I may have bitten off more then I could chew.
I made a lot of mistakes and missed a few things that I should have fixed or
were beyond my abilities. This is NOT a kit for a beginner! The props are the
only things that I would recommend Anigrand change.
I found it to be an enjoyable build and the result is quite impressive. All in all, I recommend this kit. Anyone with experience building resin models should have no trouble. I have already picked up my next Anigrand kit. So be on the lookout for an article on the 1/144 XF-12 Rainbow. (Unless DaBoss beats me too it!)
| REFERENCES |
Photos off the web
Johns Mistel Page (http://www.geocities.com/Heartland/Village/4082/mistel/mistel.htm)
Luft 46 page (http://www.luft46.com/)
If you would like your product reviewed fairly and fairly quickly, please contact the editor or see other details in the Note to Contributors.mailto:svanaken61@gmail.com
Back to the Review Index Page 2020