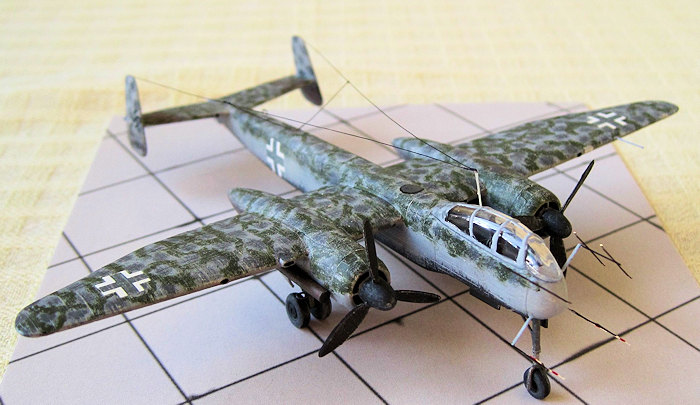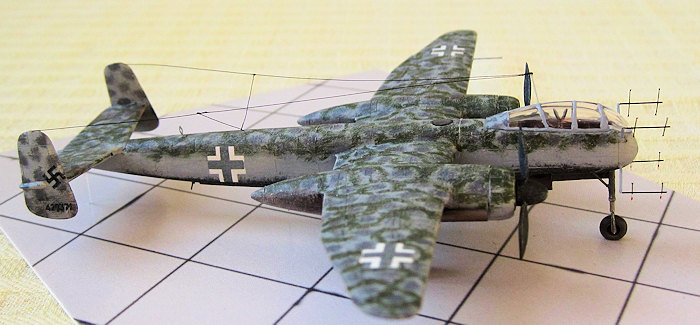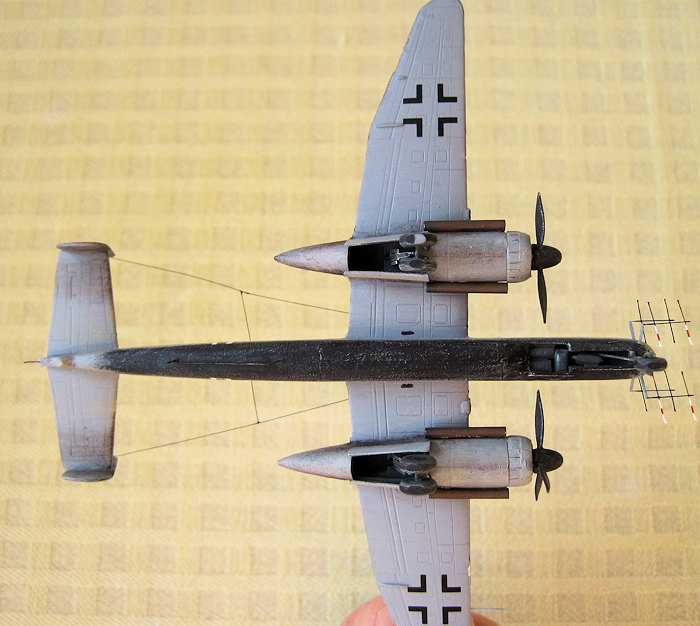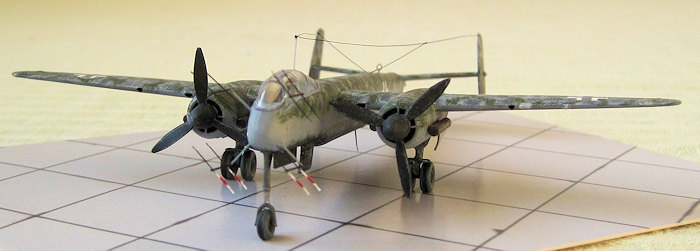
Mark 1 Models 1/144 He-219D-1
| KIT #: | MKM14425 |
| PRICE: | $20.00 or so |
| DECALS: | Four options |
| REVIEWER: | Ingemar Caisander |
| NOTES: |
|

| HISTORY |
The Heinkel He 219 "Uhu" (Eagle Owl) was the only Luftwaffe fighter designed from the outset as a dedicated night fighter, and it was planned as a counterpart to the RAF night fighter versions of the de Havilland "Mosquito".
The He 219 prototype took to the air on 15 November, 1942. The design proved an instant success; being powerful, manouverable, and having good flying characteristics. Its top speed of up to 585 kph at an altitude of 6,000 meters in combination with the powerful on-board radar equipment meant that the "Uhu" could intercept enemy bombers en-route to their targets, instead of having to wait until they were reported by ground based stations. This capable night fighter also sported the world’s first operational ejection seats.
Armament
consisted of one autocannon mounted in each wing root and two to four further
autocannons in a ventral tray. In addition, provision was also made for mounting
two 30mm MK 108 autocannons in the
 rear
fuselage. These guns, known as "Schräge
Muzik" and aimed through a
separate Revi 16 A-N gunsight, were angled forward and upwards at 65 degrees,
allowing the night fighter to engage Allied four-engined bombers from their
blindspot. Firing non-tracer rounds, these guns proved highly effective.
During the first experimental mission, flown on the night of 11-12 June, 1943, Major Werner Streib managed to stalk and shoot down no less than five British four-engined bombers, heading for Berlin, in just 30 minutes!
Built in rather limited numbers, most He 219 served with NJG 1.
The He 219 D-1 (sometimes erreonously referred to as the He 219 A-7/R5) was a special very late-war variant based on the high-performance A-7 version, and designed from the outset to be able to take on the British de Havilland Mosquito night fighters on equal terms.
Using converted and lightened A-2 airframes and fitted with reduced armament, it also replaced the standard 1750hp DB603A by the fast-running high-altitude Junkers Jumo 213E-1 engine rated at 1750hp for take off. Although this rating was identical to the earlier DB603A, the D-1 was also equipped with the MW-50 methanol-water power boosting system – when engaged at full throttle, it raised sea level power output to a staggering 2100hp per engine!
As a result the D-1 was the fastest "Uhu" produced to date: compared with a standard DB603A or DB603E powered He 219A-7, which had a top speed of about 600kph, the He 219D-1 equipped with Jumo 213E-1 engines could reach almost 640kph at altitude with the MW-50 boost engaged. Even when the supply of MW-50 was exhausted the D-1 was fast, having an un-boosted top speed of 605kph.
The radar installation was similar to the late-war A-7s, consisting of the highly advanced FuG 220 "Lichtenstein" SN-2d, featuring dipoles angled at 45 degrees for less interference. The maximum range of this sophisticated radar set was up to 8,000 meters, with a theoretical minimum range of 200 meters (seldom accomplished in service, though; a minimum range of 450-500 meters was more common).
Armament consisted of one 20mm MG 151/20 autocannon in each wingroot, and a further two MG 151/20 in the ventral tray. Each weapon could be supplied with up to 300 rounds of ammunition, although in operation this was often reduced to just 100-150 rounds per gun in order to save weight. Also, as a further weight reduction measure, no "Schräge Muzik" was installed.
 Production
of the D-1 was extremely limited with a total of only five aircraft (not
including the "V-41" prototype (Werknummer
420325)) completed at the
Schwechat assembly plant before the war ended.
Today, the restored fuselage and partly restored engine nacelles of the (until recently) only known surviving He 219 A-2 (Werknummer 290202) is on display at the Steven F. Udvar-Hazy Center by Dulles Airport, with the wings still undergoing restoration at the Paul E. Garber Facility in Silver Hill, Maryland. This aircraft was one of seven He 219s captured in (or near) airworthy condition at the Karup/Grove base of NJG 1 in South Jutland, Denmark, at the end of the war.
Incredibly, though, in April 2012 another previously unknown He 219 A-7 was salvaged from the seabed in the shallow waters of Tannis Bay north of Hirtshals, Denmark. Although severly damaged and missing many parts, the remains of this aircraft was preserved and then put on display at the Forsvars- og Garnisonsmuseum in Aalborg, Denmark. In August 2015 it was announced that the wreckage had been sold to an Austrian enthusiast for further restoration.
| THE KIT |
This is one of the three new-tool 1/144 scale He 219 kits released by Mark 1. Models in 2014. All three kits, a He 219 A-2 (MKM14419), a He 219 A-5 (MKM14425), and a He 219 A-7 (MKM14427), are basically identical with just different boxes and decals supplied.
A fourth kit (MKM14449) of a He 219 A-0/LB-79 was released in 2016. Although I have not seen this kit IRL, I suspect it is identical to the earlier three, with just a new box and different decals. The D-1 model featured here is based on the He 219 A-5 kit (due to the decals supplied, more on this later).
The light grey plastic parts of the kit are very nice and, despite the small size, rather well detailed. General dimensions appear to be correct and there is just a bit of flash present. All panel lines are recessed. Total parts count is 35, plus one very nice clear canopy.
The plastic parts of the kit is somewhat on the soft side and require a bit of care when cutting and sanding, but it reacts well to ordinary model glue. Fit is good although a bit of sanding and filler is required now and then.
 Also
included in the kit is a photo-etched fret with cockpit details such as seats,
seatbelts, foot pedals, and instrument panels. The main radar aerials, details
for the undercarriage, and some other small bits and pieces are also represented
in PE form. Some of the smallest PE pieces are thoughtfully duplicated on the
sheet – a nice touch.
You also get a display base in the form of a colour printed card of a typical Luftwaffe concrete slab airfield – this will be a good starting point for a small diorama.
Instructions are easy to follow and basically consist of a parts map, six main assembly steps, and painting and marking options in full colour. A total of four marking options are provided: G9+DB (W.Nr. 420331) of 1./NJG 1 based at Münster-Handorf in Germany, January 1945; G9+TH (W.Nr. 290123) of 1./NJG 1 based at Westerland-Sylt in Germany, spring 1945; "USA 9", a surrendered He 219 evaluated by the US Air Force in late 1945 and operated from the Freeman Field airbase; and finally "V-29", a He 219 / LB-79 completed in Czechoslovakia after the war and operated by the LVÚ Aviation Research Institute / 2nd Sq., 51st Air Regiment based at the Plzeñ-Bory airfield in Czechoslovakia, autumn 1951.
It should be noted that in reality, all of these aircraft (save for the last one) were completed to He 219 A-2 standards (no He 219 A-5 was ever built). Both W.Nr. 420331 and 290123 were part of the 45 machines captured at the Westerland-Sylt airfield in May, 1945.
Also, "USA 9" was originally operated by the Luftwaffe as He 219 A-2 W.Nr. 290060, carrying the Stammkennzeichen (factory radio code) CS+QG, before being captured by the RAF at the Danish Karup/Grove airfield in May, 1945. It was handed over to the US and shipped to the States in June, 1945, recieving the designation FE-613 (later changed to T2-613).
The last decal option, "V-29", is slightly incorrect, though, as this in reality was the second He 219 repaired / rebuilt (using various recovered components) by the Czechoslovakian company Letov. These two rebuilt machines were designated Letov LB-79 and carried the fuselage markings "32" and "34" (in white), respectively.
LB-79/II, white "34", was planned for conversion into a flying test-bed for the BMW003 and Jumo 004 jet engines, although the conversion work was never completed. These nitpicks aside, the decals are very nice and in perfect register. Swastikas are included.
| CONSTRUCTION |
 Construction
began with the cockpit – it basically consist of a plastic floor with
photo-etched seats and details. The PE seats were bent according to the
instructions, painted dark grey, fitted with seat belts, and then installed
using super glue. The perforated PE instrument panel was painted dark grey at
the front, and white at the back. By using a needle I managed to get the white
paint to flow across the perforations in the panel, thereby nicely imitating the
instrument faces.
The rear radar control panel is placed a bit too far back in the cockpit, so I beefed up the area behind it with small pieces of lead. In order to prevent the model from being a tail-sitter, you will have to add quite a bit of forward ballast – natural places for this added weight are in the nose (behind the instrument panel as well as beneath the cockpit floor), in the front of the engine nacelles, and behind the rear radar controls. Should this prove not be enough, there´s quite a bit of ballast space in the fuselage just behind the cockpit. Use either white glue or standard plastic glue if you add lead weights, as super glue has a tendency to "expand" the lead over time (in worst case leading to a cracked fuselage).
The fuselage halves were cemented together, trapping the completed cockpit inbetween. The outermost autocannon muzzles in the ventral tray are nicely represented by small indentations, but the centre muzzles are missing. For the D-1 this is not a problem, though, as only the outermost cannons were fitted, with the inner muzzle openings faired over.
The main wings are molded as one solid piece and feature very nice details. For the He 219 D-1, some modifications are necessary, though, as the Jumo 213 has the supercharger on the opposite side from the DB603, and also use different engine cowlings and radiator cooling flaps.
I began by carefully sanding away the existing engine air intakes to the left of each nacelle, and then built up new intakes on the opposite sides, using small pieces of stretched sprue and plastic glue sanded into shape.
Note that all five completed He 219 D-1s used the later "shark-mouth" intakes, and hence these need to be shaped slightly more streamlined than the original intakes featured in the kit.
When the glue had set, I carefully drilled open both engine air intakes, as well as the gun muzzles for the wing root autocannons. In the outer wing leading edge, I also drilled open the small air intakes for the Kärcher-Öfen BL 30/U de-icing heaters.
The upper part of the engine nacelles are integrated with the wing and as the Jumo 213 engine cowlings differ from the DB603 ones, the nacelles need to have the frontmost panel lines filled in. I carefully sanded the entire front part of the nacelles smooth.
In addition, I also sanded the rear
flaps of the kit radiator cowlings smooth and then new flaps were scribed – the
DB603 cowling of the kit feature small interleaved flaps, whereas the Jumo 213
flaps should
 be
larger and more rectangular. The last modification of the radiator cowling part
was adding the four braces at the front (the DB603 radiator cowling used five
braces, these are not represented on the kit parts, though).
A little bit of filler and sanding was needed in order to blend in the lower engine nacelle with the upper fixed part on the wing. For a more realistic look, I also drilled out the end section of the cylindrical flame arrestors for the engine exhausts. The propellers are nicely replicated and only need a few quick sweeps with a sanding stick in order to remove some flash and thin down the trailing edges somewhat.
The entire tailplane assembly is made up from three parts, and the only modification needed is to drill open the small air intake for the rear fuselage Kärcher-Öfen BL 30/U de-icing heater – this intake is located in the leading edge of the right tailplane, just a small distance out from the fuselage. Note that kit part #6, the end piece for the fuselage, should have its extreme tip cut off and replaced by a piece of clear plastic.
The undercarriage goes together with no problems, and is nicely detailed with some PE parts for the retraction cylinders and springs. All wheels were lightly sanded on the underside in order to simulate being weighted down by the aircraft. I also added the prominent mudguards on the main gears: these guards were made from a piece of thin copper wire bent into shape.
During this stage of construction I noticed that despite all the nose ballast added, my model would end up being a tail-sitter. As I didn’t want to add even more ballast to the model I instead superglued a thin piece of clear rod to the lower tail of the aircraft. With all the major assembly work completed, it was time to hit the paint booth.
| COLORS & MARKINGS |
As no photos of the five He 219 D-1s completed are known to exist, painting the camouflage schemes become a bit of guesswork. However, as all five aircraft were built at the Vienna-Schwechat factory, they most likely carried the typical He 219 camouflage of RLM 75 Grauviolett on the upper surfaces, with RLM 76 Lichtblau on the undersides. Furthermore, the upper fuselage and wings featured a "squiggle" pattern of RLM 76 sprayed over the base Dark Grey color.
As these aircraft mounted Junkers Jumo 213E-1 "power eggs", the propellers and spinners would have been finished entirely in RLM 70 Schwarzgrün (with or without white spirals).
The particular aircraft my model is representing is W.Nr. 420371, the first of the five He 219 D-1s produced. With minimal modification, the Werknummer decal 420331 supplied in the kit can be used (hence my choice of the He 219 A-5 kit for this D-1 modification).
 I began by
priming the entire aircraft in diluted off-white (Humbrol 121), followed by a
base coat of RLM 76 (Revell 76), this light blue coat was also diluted with
thinner so not to loose any surface details. The upper surfaces of the wings and
fuselage were then mottled with RLM 75 (Humbrol 125) using a semi-drybrushing
technique. Although this sort of mottling is easier to do using an airbrush, I
had to imitate the sprayed-on appearance of the paint the best I could, as I
always brush paint my models.
In real life during the war, the colours were also actually applied the other way round - that is, the upper dark grey RLM 75 (or, in some cases, RLM 74 Graugrün) was painted first and then oversprayed with lightblue RLM 76 in a squiggle pattern.
To make the model a bit more interesting, I also decided to give it the "Liegeplatz-Tarnung" (Airfield-Hiding-Camo): late in the war, a few of the He 219s still in operation was additionally camouflaged with black or dark grey fuselage undersides, and patches of RLM 82 and/or RLM 83 greens sprayed on top of the standard RLM 75/76 camouflage. This was an attempt to make the machines stand out less from the air when parked on the ground, and hence less likely prey to Allied fighters.
This type of additional camouflage was only applied to very few machines (I have personally only seen pictures of a single He 219, belonging to NJGr.10, camouflaged this way), but I figured that some of the very late war He 219 D-1’s would have been as good candidates for the "Liegeplatz-Tarnung" as any.
I did my own interpretation of a very comprehensive variant of this type of camouflage scheme by semi-drybrushing rather heavy lines of RLM 82/83 (Humbrol 117 and 116, respectively) in order to subdue the upper lightblue squiggles on the fuselage and wings. The fuselage underside was painted black (Revell 9).
The propellers and spinners were finished in RLM 70 Schwarzgrün (Humbrol 116 and 33 mixed 50/50), without white spirals.
 The FuG 220
radar dipoles were painted flat black, with the lowermost four aerials of the
front radar sectioned in white and red (Humbrol 34 and 19) as a ground crew
warning. The exhaust flame arrestors were painted brown (Humbrol 62) and then
treated with graphite powder, and all interior areas (cockpit, landing gear
bays, etc) were finished in dark grey (Humbrol 79), and then gently drybrushed
with off-white (Humbrol 121).
After drying a couple of days, the model was gloss-coated in preparation for the decals. These went on without any problem. As I had no information about fuselage codes for the D-1s, I simply just put on the Balkenkreuzes. As mentioned before, the kit Werknummer 420331 decal was altered into 420371 by some strategically placed dabs of paint.
The entire model was clearcoated with flat varnish and then it was time for weathering. This was kept rather limited: as the He 219s in general, and the high-performance He 219 D-1s in particular, were the "Cadillacs" of the Luftwaffe, they were well maintained and kept in good condition. I did a light overall drybrushing with off-white (Humbrol 121) on the fuselage and wings, and then some brown, black, and grey soothing behind the engine exhausts.
With general painting, decaling, and weathering completed, it was time for final assembly. This included adding the FuG 16ZY radio and FuG 25A IFF masts under the rear fuselage; both these masts are supplied as PE parts in the kit.
The main FuG 10P radio aerials, stretching from the front dorsal mast (fabricated from a piece of stretched sprue as I didn’t like the PE mast of the kit) and to both tailfins, were made from very thin copper strand. This wire was wound off from a small radio coil and then carefully burnt with a cigarette lighter to remove the laquer insulation, followed by a coat of very diluted flat black paint. The aerials with connecting leads between the main wires and the rear fuselage were attached with tiny drops of superglue. The rear fuselage trailing FuG 10P antenna was supplied as a PE part in the kit.
The shell ejector chutes for the wing-root MG151/20 autocannons were imitated by small rectangular dots of black paint, positioned roughly at the centre line of the inner wings, just next to the fuselage.
The small exhaust outlet for the rear fuselage Kärcher-Öfen BL 30/U de-icing heater was imitated in the same way – this exhaust port is located below and just in front of the left tailplane.
| CONCLUSIONS |
Mark 1 certainly has done well in producing this little replication of the most advanced German nightfighter of WWII. The completed model will only take up a fraction of shelf space, and with just a little bit of TLC and attention to details, a very realistic model can be made.
Highly recommended!
| REFERENCES |
"Heinkel He 219 Uhu" by Marek Rys, Aircraft Monograph 21 (AJ Press 2008)
"Heinkel He 219 Uhu Vol I & II" by M. Murawski & M. Rys, 3D Monographs 49 & 50 (Kagero 2012 & 2013)
"The Heinkel He 219 Uhu" by Richard A. Franks, Airframe Album 1 (Valiant Wings 2012)
"Wings of the Luftwaffe" by Eric Brown (Hikoki 2010)
"The Heinkel He 219 – A Research Paper" (3rd Ed.) by R. Francis Ferguson (2012)
If you would like your product reviewed fairly and fairly quickly, please contact the editor or see other details in the Note to Contributors.