| KIT #: | 04373 |
| PRICE: | $ |
| DECALS: | One option |
| REVIEWER: | Ingemar Caisander |
| NOTES: | Rebox of Dragon/DML kit with E.381 fighter |

| HISTORY |
The Arado 234C was an improved version of the Ar-234B Blitz twin-engine jet bomber. The C-version was powered by four 800 kg thrust BMW 003 Sturm turbojets (as opposed to the two Jumo 004 Orkan turbojets of the Ar-234B) and featured many small aerodynamic improvements. The first Ar-234C prototype flew in October 1944, and when the war ended a total of around 14 machines had been delivered to the Luftwaffe.
The Ar-234C-3 was meant to be the main production variant, being a multi-purpose aircraft capable of performing bombing, ground attack, night-fighter and reconnaissance missions.
 When configured as a bomber it could carry up to 1500 kgs of bombs on three
ETC 504 racks - one rack under the belly and one under each engine nacelle.
In the reconnaissance role it typically carried two Rb 50/30 or Rb 75/30 cameras; the two cameras were carried in the rear fuselage and each camera was canted 12 degrees from the vertical in opposite directions. They were set up to take one set of pictures every 11 seconds, covering a path almost ten kilometers wide across the direction of flight when at operating altitude.
Defensive armament consisted of two MG 151/20 20-mm autocannons fixed forward under the nose (provision was also made for an additional pair of fixed guns firing to the rear, these guns being aimed by periscope).
Performance of the Ar-234C-3 was much better than the twin-engine B-series; max speed (without external ordnance) was increased from 740 kph to around 860 kph at 6000 meter and service ceiling was raised to around 12.000 meter.
| THE KIT |
The package is typical Revell: a rather nice model kit with quite a few features, all being packed in a horribly flimsy end-opening box. You get two light grey and two (separately bagged) clear sprues along with an eight-page instruction leaflet and a rather small decal sheet covering one aircraft.
 As for equipment/ordnance, you get two 300 litre drop tanks, two cameras,
three 500 kg bombs and one BT 1400 “torpedo” bomb. Included in the kit is
also a small model of an Arado E 381 parasite fighter / bomber interceptor
(all you Luft ´46 experts out there will of course notice that this
latter extra model is a bit incorrect as it combines the pilot elbow bulges
of the E 381 V1 to the fuselage and canopy of the E 381 V2…).
Detailing is quite good, panel lines are recessed and from what I can tell the general dimensions of the model are accurate. Some finer details are a bit clumsy (tail protection guide, antennas, rudder activators etc) and the canopy is a bit on the thick side but in general this is a nice kit.
Since I received this kit as a gift I don’t know the cost of it but it shouldn’t be too expensive as Revell kits generally are quite cheap (at least here in Sweden).
My copy had a lot of mould release grease left on the sprues but this was easily washed off with soapy water.
| CONSTRUCTION |
As I intended to complete the model as a high-speed, high-altitude reconnaissance aircraft I skipped building the E 381 altogether and instead began construction with the cockpit of the main aircraft. Detailing here is ok; not a lot of details really, but considering the rather small scale and the fact that the Ar-234C canopy has less glass panels than the B-series it will look quite nice with just some detailed painting and weathering.
 If you like you can add some wiring on the backside of the main instrument
panel as this will be clearly visible through the all-glass nose.
I finished the entire cockpit and front of the aircraft, including nose wheel, and detail painted the interior so as to ease construction further on – the idea was to be able to just glue the whole “cockpit egg” to the completed fuselage as a finishing step.
Moving on, the two fuselage halves were glued together after the main gear bays had been completed, painted, and inserted into their respective cutouts.
There is a quite prominent belly cutout for the E 381; as I wasn’t going to attach this parasite fighter I used some putty to make the cutout a bit shallower as it seemed a little bit too deep for my liking.
 Fit is generally quite good and the only real difficulty I ran into was
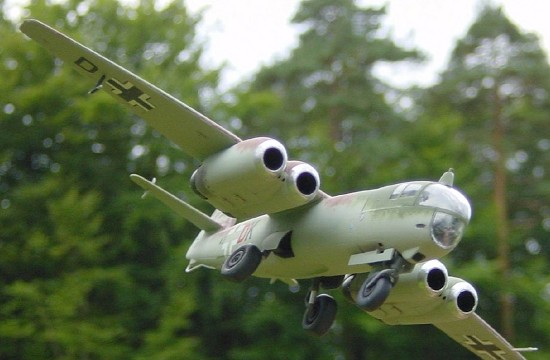
when tackling the engine nacelles. The rear exhaust guide just behind the
jet engines proved a bit difficult to get aligned both to the engine
nacelle and the trailing edge of the wing. In the end I had to glue the
exhaust guides to the top of the wings and then smoothen out the joints to
the engines themselves with a bit of putty.
A note here: be sure to add the rear of the engines before you glue the engine nacelle halves together as the rear of the engines are designed to be “trapped” in between the nacelle parts.
The wings were then super glued to the fuselage and all the antennas, nose gear bay doors and tail protection rail added. The wheels were sanded down on the underside to simulate the weight of the aircraft and pushed onto the gear legs.
The last construction step was attaching the previously completed “cockpit egg” to the fuselage.
| COLORS & MARKINGS |
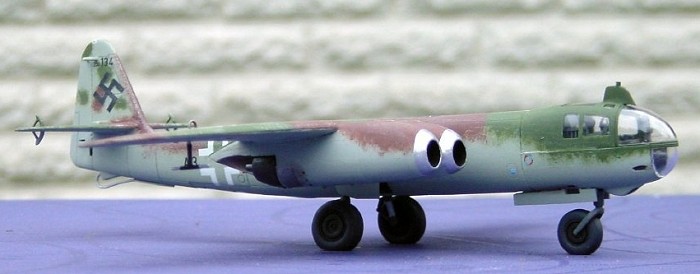
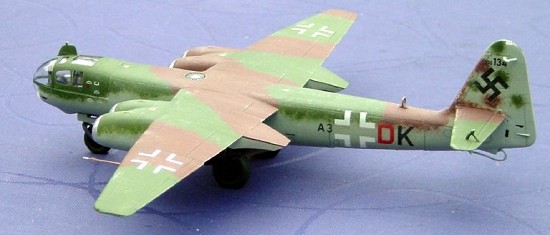
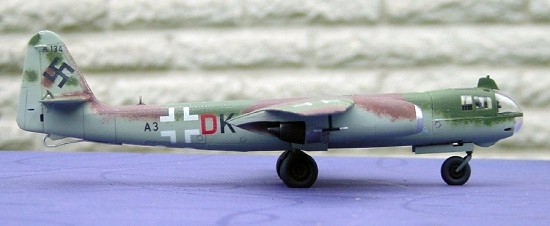
When it comes to camouflage, most of the Ar-234s seem to have been finished in either RLM 65/70/71 or RLM 76/81/82. As I wanted to depict a high-speed, high-altitude reconnaissance aircraft, and since the model really borders on being a “Luft 46” subject, I decided to use some artistic freedom and complete the model in a RLM 76/81/82 scheme somewhat similar to the one seen on some Ta-152Hs.
I began by painting the entire model in late-war slightly “egg-coloured” RLM 76 Lichtblau - using the Humbrol range of paints I mixed no. 121 and no. 175 about 50/50.
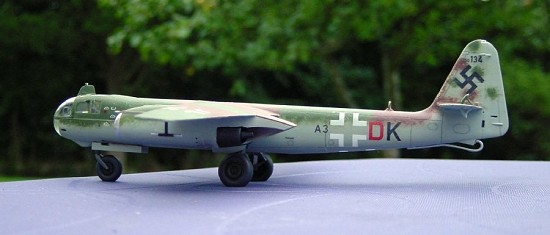 When this had dried I then added a topside camouflage of RLM 81
Braunviolett (Humbrol 160) and RLM 82
Hellgrün (Humbrol 117),
having the camouflage just slightly extending down the sides of the
fuselage and engine nacelles. As I always brush paint my models I used an
almost dry brush in order to achieve a sprayed-on appearance of the paint.
The cockpit and wheel bays where finished in RLM 02 Grau (Humbrol 111).
The engines received polished aluminum nose rings and flat black exhausts; the exhausts were then rubbed with graphite to give them a metallic sheen.
I used the kit decals depicting an aircraft belonging to 5. Staffel, 2nd Gruppe of KG 200, located at Burg bei Magdeburg in mid 1945. The only addition was the swastikas on the tailfin (these decals were “long term borrowed” from a Tamiya 1/48 He-219…).
There was some silvering when applying the decals but I think I managed to hide most of it through some paint touch-ups of the affected areas.
As these planes probably would have seen very little use (from lack of fuel etc) weathering was kept to a minimum, consisting of just a light Humbrol 121 drybrushing and some sooth around the engine exhausts.
| FINAL CONSTRUCTION |
Finally the remaining clear bits (bomb sight, tail fin position light and D/F aerial) were glued in place using white glue (as this type of glue dries transparent and doesn’t craze nor distort the clear plastic).
The suppressed D/F aerial was painted silver on the underside and as the aerial star shape itself is recessed, the non-recessed portions were just scraped with a knife. A coat of flat black on the underside then brought out the aerial star very nicely.
| CONCLUSIONS |
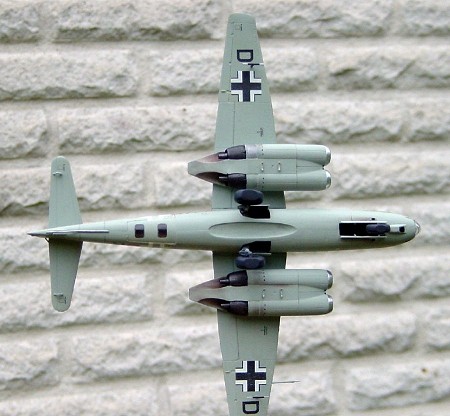 Well, there it is; my own interpretation of an Ar-234C-3 finished as a very
late war, high-speed, high-altitude reconnaissance aircraft.
To sum up, this is a rather nice kit. You get quite a few extras and the model can be finished in a number of different versions. It will look good straight from the box and with some super-detailing it can be turned into a beautiful replica of a very interesting late-war German aircraft.
Dedication
A couple of years ago there was a ”Luft 46” contest here at Modelling Madness” where I participated with a 1/72 scale model of the Arado 555. It finished second in the contest and the prize I received was this Revell kit of the Ar-234C-3.
I would like to take the opportunity to thank all of you who voted for my model back then and at the same time make a dedication of the model presented here.
This one is for you.
September 2005
Copyright ModelingMadness.com
If you would like your product reviewed fairly and fairly quickly, please contact the editor or see other details in the Note to Contributors.