| KIT #: | 861 |
| PRICE: | $25.00 when new |
| DECALS: | Several JG301 options |
| REVIEWER: | Pablo Calcaterra |
| NOTES: | Reboxed Trimaster/Dragon kit. Aires Junkers JUMO 213 Kit 4005, Eduard seatbelts 48290 |
| HISTORY |
 Inspired by
the front cover of Air Force Magazine (RCAF) on the 2020 issue commemorating the
Battle of Britain (a beautiful painting of a yellow nosed 109 about to be
pounced by a Spitfire) I started to build German planes for the first time in
more than 17 years. Galland’s 109 E-4, Hartmann’s 109 G, Hahn’s 190 and others
were built in quick succession to a point that I have almost totally depleted my
collection of German fighters. I like the lines of these planes and respect the
skills of the pilots. The history is a different story…and therefore I am not
going to dwell on it as I do with my British or Argentine subjects. Out of those
built in this last “sprint” I am going to write about only one or two.
Inspired by
the front cover of Air Force Magazine (RCAF) on the 2020 issue commemorating the
Battle of Britain (a beautiful painting of a yellow nosed 109 about to be
pounced by a Spitfire) I started to build German planes for the first time in
more than 17 years. Galland’s 109 E-4, Hartmann’s 109 G, Hahn’s 190 and others
were built in quick succession to a point that I have almost totally depleted my
collection of German fighters. I like the lines of these planes and respect the
skills of the pilots. The history is a different story…and therefore I am not
going to dwell on it as I do with my British or Argentine subjects. Out of those
built in this last “sprint” I am going to write about only one or two.
The Ta152 was the last evolution of the famous Fw190. It was designed to be a high altitude interceptor to tackle the bombers of the 8th Air Force. Most combats took place at much lower heights though and even at these the 152 proved to be superior to anything the Allies had at the time. Luckily it was another case of too little too late and the Ta152 had no impact on the war.
| THE KIT |
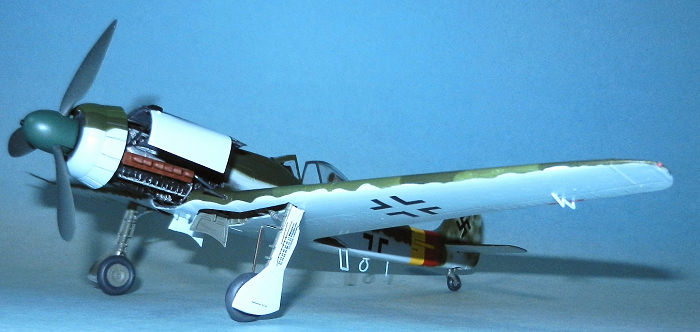
This is the Dragon kit minus the engine and the open engine panels. Luckily it comes with the engine mounts. Therefore I purchased the Aires kit which is a mix of resin, metal and photoetched parts. Great details but later on I read that it is around 3 mm too long…which proved to be right and caused a lot of headaches later on.
| CONSTRUCTION |
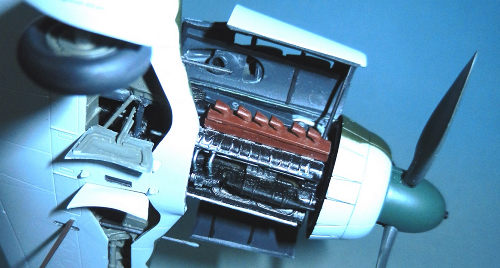
I used the Dragon instructions found on line to guide myself on the missing parts in the Italeri kit and how to replicate them. In order to install the engine and display it I cut out the cover panels. To these I added the internal frames using thin strips of Evergreen.
A couple of tanks behind the engine not present in the kit (but yes in the Dragon one) were made with spares or Evergreen. Once these parts were modified and created everything was sprayed MM Acryl RLM66 with the frames in black.
 The
high number of engine parts were painted according to pictures and assembled.
Dry fitting the engine confirmed the fact that it is too long and I had to
scrape a lot of plastic behind the propeller to make it fit. Even with this the
mounts did not match the engine properly and I had to cut them short towards the
attachment point to the bulkhead so I could move the engine away from the front
of the plane by a couple of millimeters. This exercise took a few nights of
struggle and I lost some of the paint job on the engine due to the constant
rubbing against the internal parts of the fuselage.
The
high number of engine parts were painted according to pictures and assembled.
Dry fitting the engine confirmed the fact that it is too long and I had to
scrape a lot of plastic behind the propeller to make it fit. Even with this the
mounts did not match the engine properly and I had to cut them short towards the
attachment point to the bulkhead so I could move the engine away from the front
of the plane by a couple of millimeters. This exercise took a few nights of
struggle and I lost some of the paint job on the engine due to the constant
rubbing against the internal parts of the fuselage.
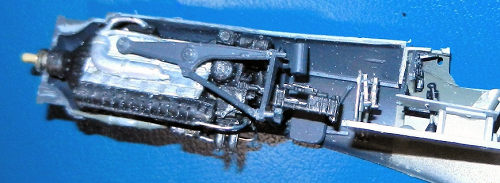
 Cockpit
parts fit very well though some I had to clean plastic flash on some of them.
Photoetched seatbelts were painted and glued. I attached the engine mounts on
each fuselage side, added the cannon and closed the fuselage halves. Then the
hard work mentioned above behind I was able to attach the engine to the mounts.
Cockpit
parts fit very well though some I had to clean plastic flash on some of them.
Photoetched seatbelts were painted and glued. I attached the engine mounts on
each fuselage side, added the cannon and closed the fuselage halves. Then the
hard work mentioned above behind I was able to attach the engine to the mounts.
The rectangular area of the engine behind the exhausts (5-sided cross section) was scratchbuilt so now these would be at the correct height. Internal frames of the wheel wells were also a painful task with not too clear attaching points and confusing instructions. Some plastic scrapping had to be done here as well.
With several dry fits and careful alignment of parts there was no putty used between wings and fuselage. Engine, cockpit and wheel wells were masked with tissue paper.
| COLORS & MARKINGS |
A base of Vallejo light grey Primer was used to improve the paint adhesion and look for mistakes.
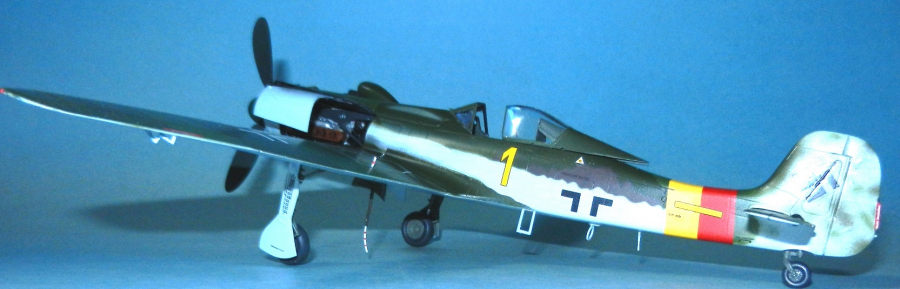
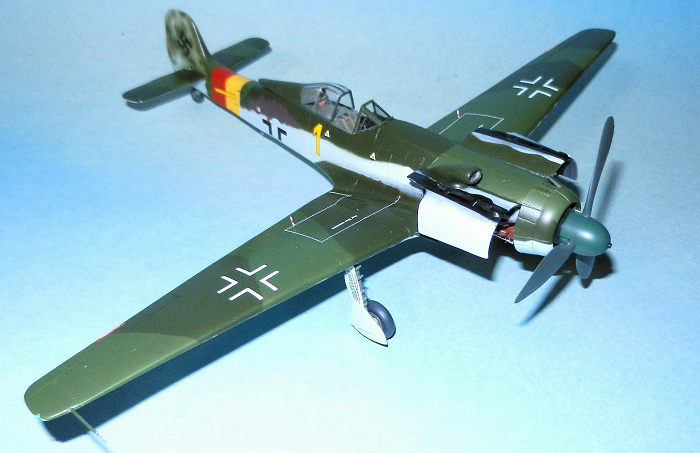
Then Vallejo RLM76 was used for the undersurfaces followed by RLM 82 and RLM 83. The overpainted top part of the fuselage cross was RLM 81 which I made with a mix of 6 parts Modelmaster 34087, 2 parts red and 2 parts black. This scheme was a bit tricky due to the low quality pictures available of this particular plane. Sundin and Bergstrom’s book has this profile and was also used a reference.
 Propeller
blades were painted RLM70 and the hub RLM 25 (MM4729). Area around the exhausts
was painted black. A bit of sanded black pastel was applied behind the exhausts
on the fuselage. Moveable surfaces were highlighted with a very thin dark
pencil. After the layers of Future were applied the plane was ready for the
decals.
Propeller
blades were painted RLM70 and the hub RLM 25 (MM4729). Area around the exhausts
was painted black. A bit of sanded black pastel was applied behind the exhausts
on the fuselage. Moveable surfaces were highlighted with a very thin dark
pencil. After the layers of Future were applied the plane was ready for the
decals.
All decals came from the kit. The ID bands were too short and I had to use some from a Tamiya FW190 D-9 from the spares which worked very well but required tens (and I am not making it up) of coats of SOL to make them conform to the fuselage as they were very stiff. A coat of Model Master Acryl semi gloss covered and protected the decals.
Once the decals were on, everything went fine and fast: I glued wheels and doors, tail wheel, propeller, gunsight with pad painted in brown, exhausts (painted in Model Master rust), navigation lights (wingtips in red and green and tail white), wing guns. The engine covers were attached with the supports supplied by Italeri. Several antennas were attached.
With the windshield and canopy in place the kit was completed.
| CONCLUSIONS |
A tricky kit that was even trickier thanks to Aires with not so clear instructions and a flimsy landing gear (the slightest touch makes the plane shake). Anyways it is a fine representations of the best of Kurt Tank’s fighters.
24 February 2022 Copyright ModelingMadness.com. All
rights reserved. No reproduction in part or in whole without express permision.
If you would like your product reviewed fairly and fairly quickly, please
contact
the editor or see other details in the
Note to
Contributors.