
Hasegawa 1/48 Hs-129B-1 'North Africa'
| KIT #: | 09344 |
| PRICE: | AUD$50.00 |
| DECALS: | Two options |
| REVIEWER: | Brad Gaff |
| NOTES: | Etched Belts used |

| HISTORY |
A grandfather of the A-10 Warthog, the Henschel 129 was born out of the
Luftwaffe’s experience in close support ground attack missions during the
Spanish Civil War. The use of the lightly armed and armoured Henschel 123 and
Heinkel 112 was effective, yet they proved susceptible to ground fire.
Consequently, when the RLM issued a tender for a new ground attack aircraft,
emphasis was put on armour protection for the pilot and engines. Two worthy
candidates emerged, the heavily modified Focke Wulf 189 and the new design of
the Henschel 129, with the Henschel winning out by way of being smaller and
cheaper to produce. The Argus 410 engines used in the prototypes was
underpowered for the aircraft, but this was solved with the fall of 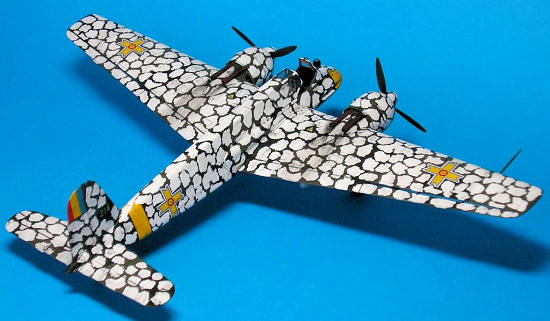 off the lines by December 1941. Several
variants of the Hs 129 were produced, yet little differed between them. From the
B-1 to B-2 models, the major differences were the deletion of the radio mast,
alternations to the fuel system, the 30mm Mk 101/103 gun pod could be slung
under the fuselage, direction finding radio antenna loop was added along with
shorter exhaust stacks. However, as both were produced at the same time, the
line between the two versions was often blurred. The B-3 was an up gunned B-2,
with either the BK 3.7cm or 7.5cm anti tank gun installed. Only 25 of these
machines were produced.
0ver 200 Henschel 129’s would serve with the Rumanian Air Force from 1943. Heavy
fighting during late 1942 around
| THE KIT |
| CONSTRUCTION |
I started with the cockpit, which has acceptable detail in it. However, I
decided to add some seatbelts to dress things up a little. To accomplish this,
you need to drill out the holes in the back armour plate as the belts ran
through this and attached to the rear bulkhead somewhere below. A few min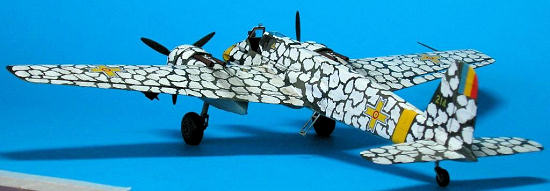 utes
with a scriber worked well here. Note also that the seat is a tight fit to the
tub, so you can’t just attached etched seatbelts to the side, they need to the
trimmed so the seat fits properly. I painted the whole lot Gunze RLM 66 and
picked out the details in black, dry brushing with white. While this was drying,
I glued the wings together which presented no problems.
I decided to leave out the seat and armour plate as it would make masking
easier. Test fitting the fuselage to the wings, I found there to be a gap where
the upper wings meet the fuselage. I really hate filling and sanding, not to
mention rescribing. Wedging a piece of plastic between the lower fuselage parts
made the wing to fuselage gap disappear. From here on in, construction was a
breeze, with no problems encountered until I struck the landing light (more on
that later). Be sure to take your time with the forward fuselage construction.
Careful work will ensure no clean up is need here.
The 30mm gun, bombs, props, canopy, step ladder, exhaust, gun sight,
landing light, landing gear and doors were left off the airframe as it
progressed to the paint shop.
| COLORS & MARKINGS |
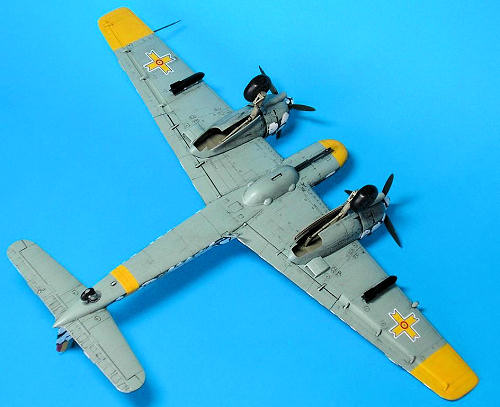
I’ve wanted to build this Henschel for quite a while, ever since dad bought the
Squadron Signal book on the Rumanian Air Force about 11 years ago but I was
simply not good enough to produce the camouflage. Experimenting with Gunze paint
earlier this
 year, I worked out I could paint it with success using a small
brush and drawing a bead of paint over the surface, rather than trying to brush
it on.
I laid down the Gunze RLM 02 for the undercarriage bays and masked them off. The
basic colours of Gunze RLM 70 and 71 were painted over RLM 65 blue under
surfaces. Masking was done with Tamiya tape for a nice hard edge to the splinted
camouflage and blutak for the curved demarcation line between upper and lower
colours. Once dry, I masked up and painted the yellow (over a white base) and
the fin flash on the tail. I hit the airframe with Humbrol gloss and applied the
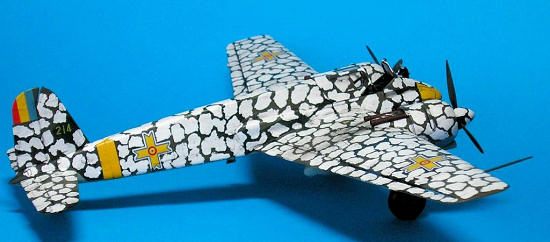
decals. The national insignia came from a Superscale 109’s sheet of decals and
the yellow ‘214’ was scrounged from the spares box. Decals were applied at this
stage because the white splotches were applied closely around the markings, but
not over them. I started the white splotches on the horizontal stabilisers, as
if I screwed this up it would be easy to repaint. By dragging a bead of paint I
eliminated brush strokes and in hindsight I probably should have done this in
winter to avoid the paint drying out, but it worked well. I did find that the
Gunze white needed two applications to get the right density. Once I was
confident enough, I would start at a random part of the airframe, paint a few
splotches and move to another part to avoid getting into a pattern. It took me 3
days to complete the white washing, but I was q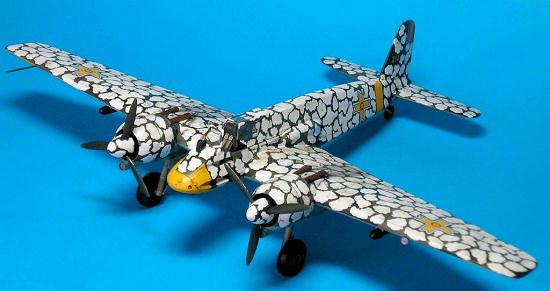 uite happy with the effect.
| CONCLUSIONS |
The Hasegawa Henschels are by far the best on the market, superior in all
aspects to the old Esci kit. If care is taken in construction, they are suitable
for every skill level. There are several boxings of the kit around with
different armament and decal options. If you aren’t too keen on Hasegawa prices,
Revell has boxed the standard B-2 version and it can usually be found cheaper
than the Hasegawa boxing.
| REFERENCES |
 “Rumanian Air Force, The Prime Decade 1938-1947”, Denes Bernad, Squadron Signal
Publications,
July 2011
Copyright ModelingMadness.com. All rights reserved. No reproduction in part or in whole without express permission from the editor.
If you would like your product reviewed fairly and fairly quickly, please contact the editor or see other details in the Note to Contributors.