
| KIT #: | St 17 |
| PRICE: | $39.95 MSRP |
| DECALS: | See review |
| REVIEWER: | Mark Gran |
| NOTES: | Lots of aftermarket, mild conversion to G-5 specs |
| HISTORY |
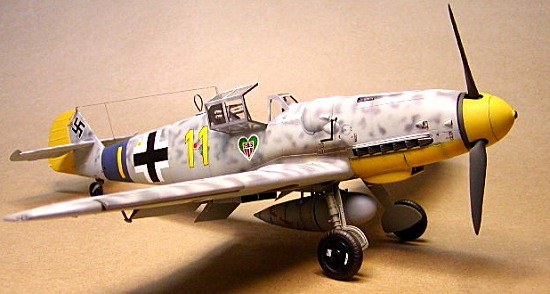
Since so much has been written on the Bf-109, I’ll focus here on the G-5. For the most part, the G-5 appears very similar to the G-6 but it was pressurized. Other structural differences (mainly bulges added to the cowling), as minor as they appeared, came as a result of the relocation of various components such as the pressurization compressor, etc. During construction, the G-5’s were not their own separate production but were built at the same time and intermixed amongst the G-6 airframes on the production line. With a little less than 500 G-5’s built they were the last of the 109’s to be pressurized.
| THE KIT |
The kit used is the lovely Hasegawa 32nd scale Bf109G-6. With this kit you get 6 gray parts sprues packed into one bag with 1 sprue for the clear parts packaged with the decal sheet. Hasegawa provides the major stencils/markings for a 109 with the personal markings for Erich Hartmann when he was assigned to 9 Gruppe/JG 52 as well as Gerhard Barkhorn’s well known “Christel.”
| CONSTRUCTION |
Where to start with
this build (which took place about 3 years ago)? Well, I guess it
all started with my pension for different paint schemes and the
introduction of the Hasegawa 32nd Bf-109G-6 a few years back. As
soon as I heard that Hasegawa
 was coming out with a new Bf–109 in 32nd,
oh boy I knew I had to have one. Following the kit came the usual flood of
resin and decal aftermarket goodies from various manufacturers …Oh boy,
-109 fans were in Utopia.
was coming out with a new Bf–109 in 32nd,
oh boy I knew I had to have one. Following the kit came the usual flood of
resin and decal aftermarket goodies from various manufacturers …Oh boy,
-109 fans were in Utopia.
Concerning the aftermarket scene, I was not immune. I ended up purchasing the Cutting Edge cockpit and exterior update set for the kit (tail wheel looked funky and I wanted to do something with the elevators and rudder). After reading the issues with the shape of the spinner, I ended up buying the Eagle Editions corrected spinner, corrected drop tank and decal sheet with a nice interesting paint scheme of a G-5. After getting all of these aftermarket goodies lined up for the build, I realized that I had spent way more on the goodies than I had for the original kit. I had satisfied my sickness for resin. One could really call this the “Various Aftermarket Goodies Kit build…Oh and toss in the Hasegawa Bf109G-6.”
The build started with the usual researching of what it was going to take to modify the kit to a G-5. A great book to start with was Prien and Rodeike’s “Messerschmidtt Bf109F, G & K Series.” The nice part about research is I found out that Hasegawa gives you pretty much all of the parts to do a G-5, especially the starboard MG 131 fairing with the compressor intake scoop and compressor fairing (part J2). After researching what needed to be added/deleted, etc. I fell into the ever-infamous mind set many of us fall into… “Instructions! We don’t need no stinking instructions!” This would come to haunt me later.
 Starting with the
cockpit it was just a matter of shaving off of the internal kit detail,
prepping the CE cockpit parts and going to town painting. I used Testors
Model Master enamels prima
Starting with the
cockpit it was just a matter of shaving off of the internal kit detail,
prepping the CE cockpit parts and going to town painting. I used Testors
Model Master enamels prima rily when painting. Once the base RLM 66 was laid
down it was off to dry brush, detail painting and wash. When this was
completed, I had a real nice rendition of a 109 cockpit. I did some minor
modifications to represent a G-5, since she was pressurized she would not
have the side vents that the pilot could open to help cool the cockpit,
these were filled in on the outside of the fuselage (forgot to remove
them from the interior parts). Also I scratch built the main canopy
armor plate and pressurization/high pressure relief valves that mounted to
the armor plate. I then added the radiator isolation handles in the
appropriate locations. Other than this, the cockpit was built as is.
rily when painting. Once the base RLM 66 was laid
down it was off to dry brush, detail painting and wash. When this was
completed, I had a real nice rendition of a 109 cockpit. I did some minor
modifications to represent a G-5, since she was pressurized she would not
have the side vents that the pilot could open to help cool the cockpit,
these were filled in on the outside of the fuselage (forgot to remove
them from the interior parts). Also I scratch built the main canopy
armor plate and pressurization/high pressure relief valves that mounted to
the armor plate. I then added the radiator isolation handles in the
appropriate locations. Other than this, the cockpit was built as is.
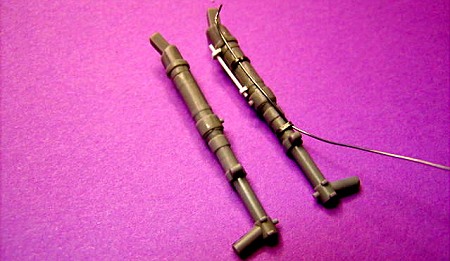
 Next were the tail
feathers. I removed the elevators and rudder from their respective stabs
and replaced them with the resin aftermarket pieces from CE. On the kit
horizontal sta
Next were the tail
feathers. I removed the elevators and rudder from their respective stabs
and replaced them with the resin aftermarket pieces from CE. On the kit
horizontal sta b, I had to sand/file a concave surface so the elevators
would fit in appropriate. Similarly, I had to remove some of the interior
plastic from the trailing edge of the vertical stab so the rudder would fit
nicely. All of this work took about an hour, nothing major but it adds a
nice bit of character to the kit. I didn’t mount either the rudder or
elevators until it was time to paint. On the front end of things, I prepped
the Eagle Editions spinner by cutting it from its casting plug, smoothing
down the back and drilling out the base where the kit blades
b, I had to sand/file a concave surface so the elevators
would fit in appropriate. Similarly, I had to remove some of the interior
plastic from the trailing edge of the vertical stab so the rudder would fit
nicely. All of this work took about an hour, nothing major but it adds a
nice bit of character to the kit. I didn’t mount either the rudder or
elevators until it was time to paint. On the front end of things, I prepped
the Eagle Editions spinner by cutting it from its casting plug, smoothing
down the back and drilling out the base where the kit blades
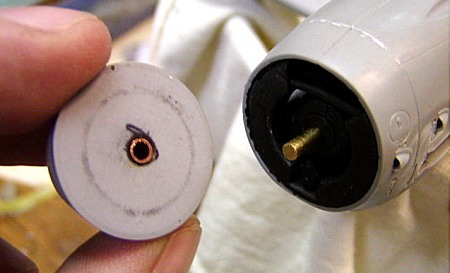 would fit. I
added a brass tube to the spinner and brass rod to the front of the engine
(part A22) so the prop could be removed when transporting. Before I
glued the blades to the spinner, I used a kit blade mounted to the kit rear
spinner plate, pressed the blade into a piece of clay. This was done so I
could get the proper incidence established when they were glued into the
new resin spinner. A little slow setting super glue and this was all taken
care of.
would fit. I
added a brass tube to the spinner and brass rod to the front of the engine
(part A22) so the prop could be removed when transporting. Before I
glued the blades to the spinner, I used a kit blade mounted to the kit rear
spinner plate, pressed the blade into a piece of clay. This was done so I
could get the proper incidence established when they were glued into the
new resin spinner. A little slow setting super glue and this was all taken
care of.
 The only oth
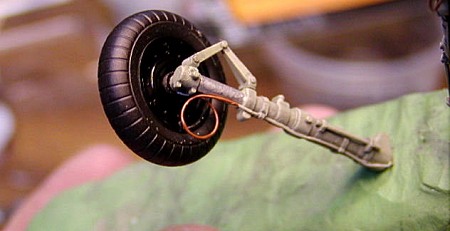 er
real modification I did for the kit was replace the brake lines molded on
the main gear. I sanded these off and replaced them with .010 lead fishing
line as well as thin lead straps. I added the mounting points of the main
gear doors to the gear legs and doors. I also cut out a small notch on the
leading edge of the port wing and filled it in with clear styrene since
this G-5 was equipped with a gun camera. Replaced the antenna
er
real modification I did for the kit was replace the brake lines molded on
the main gear. I sanded these off and replaced them with .010 lead fishing
line as well as thin lead straps. I added the mounting points of the main
gear doors to the gear legs and doors. I also cut out a small notch on the
leading edge of the port wing and filled it in with clear styrene since
this G-5 was equipped with a gun camera. Replaced the antenna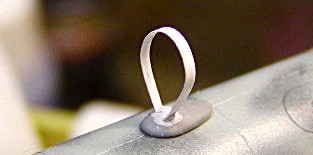 loop with a
strip of .005 styrene since the kit part is molded round and if I recall
correctly, the actual antenna is flat in shape. Time to start painting and
masking.
loop with a
strip of .005 styrene since the kit part is molded round and if I recall
correctly, the actual antenna is flat in shape. Time to start painting and
masking.
| COLORS & MARKINGS |
I started off by
applying a pre-shade of Flat Black to the panel lines. I know some people
don’t like this technique and others do. I will admit it can be over done,
me, I like to keep things subtle. Once pre-shading was completed, I painted
all of the appropriate areas RLM 04 (Yellow) and the RLM 24 (Blue) RVD band
and masked these off. After reading the information I could from the Eagle
Editions sheet, I painted my G-5 up in your standard RLM 74/75/76 paint
scheme. Now came the fun  part, painting the over lying RLM 76 pattern over
the camouflage. The only picture that was known about this aircraft (given
as part of the Eagle Editions sheet and shown on Pg. 138 of the Prien and
Rodeike book) clearly shows the pattern on the forward fuselage but for
the wings, aft fuselage and horizontal stabs; it was open for individual
interpretation. Painting the overlying camo pattern took the better part of
two hours for me to be happy. With all of this done, it was time to add all
of the stenciling and markings. I prefer to use Testors gloss coat cut with
acetone when prepping for the decals. At about the “75% completed model”
stage, I was looking at the wings, something looked odd to me but I
couldn’t quite place it. I stared and stared, couldn’t put my finger on it
and then “Poof!” there it was. In the very start of the build, I had put
one of the upper wing tire bulges on backwards! (Can you hear it?
“Instructions, I don’t need no stinking instructions!) Oh the humanity,
pop it off, glue it back, mud it in, sand, repaint, etc. Sometimes it pays
to read the instructions and pay attention. Every thing was happy back in
Messerschmitt land after about 5 hours. The remaining markings were applied
at this point. Weathering consisted of some light washes and exhaust
staining. I like to use Tamiya clear smoke followed up with some
brown/black pastels.
part, painting the over lying RLM 76 pattern over
the camouflage. The only picture that was known about this aircraft (given
as part of the Eagle Editions sheet and shown on Pg. 138 of the Prien and
Rodeike book) clearly shows the pattern on the forward fuselage but for
the wings, aft fuselage and horizontal stabs; it was open for individual
interpretation. Painting the overlying camo pattern took the better part of
two hours for me to be happy. With all of this done, it was time to add all
of the stenciling and markings. I prefer to use Testors gloss coat cut with
acetone when prepping for the decals. At about the “75% completed model”
stage, I was looking at the wings, something looked odd to me but I
couldn’t quite place it. I stared and stared, couldn’t put my finger on it
and then “Poof!” there it was. In the very start of the build, I had put
one of the upper wing tire bulges on backwards! (Can you hear it?
“Instructions, I don’t need no stinking instructions!) Oh the humanity,
pop it off, glue it back, mud it in, sand, repaint, etc. Sometimes it pays
to read the instructions and pay attention. Every thing was happy back in
Messerschmitt land after about 5 hours. The remaining markings were applied
at this point. Weathering consisted of some light washes and exhaust
staining. I like to use Tamiya clear smoke followed up with some
brown/black pastels.
 Time to add all of
the fiddly bits, main gear, tail wheel, antenna posts, rudder, main canopy,
pitot tube, etc. For the antenna wire, I like using 7x fly fishing tippet (about
the equivalent to 1.5 pound test fishing line). This stuff is very
forgiving, stays nice and tight over time and is easy to work with. On the
lower windscreen panels, I applied Mr. Surfacer 500 with a paint brush to
simulate the putty that was applied to seal up the cockpit. Everything
added, cleaned up and “ta-da” she was done.
Time to add all of
the fiddly bits, main gear, tail wheel, antenna posts, rudder, main canopy,
pitot tube, etc. For the antenna wire, I like using 7x fly fishing tippet (about
the equivalent to 1.5 pound test fishing line). This stuff is very
forgiving, stays nice and tight over time and is easy to work with. On the
lower windscreen panels, I applied Mr. Surfacer 500 with a paint brush to
simulate the putty that was applied to seal up the cockpit. Everything
added, cleaned up and “ta-da” she was done.
| CONCLUSIONS |
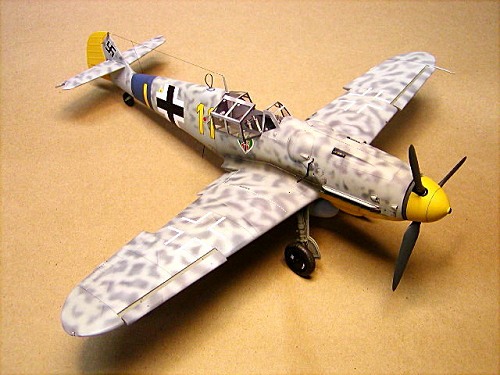
Oh I was a happy man when she was done. In looking at her sitting on the shelf, I think she turned out OK. Now the ironic part, I started thinking “I now have my 32nd Bf-109 sitting on the shelf. I don’t need anymore.” Somehow I’ve ended up with another G-6 a G-10, G-14 and K-4 in 32nd, and that’s a good thing!
Thanks for letting me stop by, the Kings are running up in Alaska and the Reds and Silvers aren’t that far behind them. I hope you like her but it’s time to spend some time fishing.
| REFERENCES |
Prien and Rodeike/Messerschmidtt Bf109F, G & K Series
June 2005
Copyright ModelingMadness.com
If you would like your product reviewed fairly and fairly quickly, please contact the editor or see other details in the Note to Contributors.