
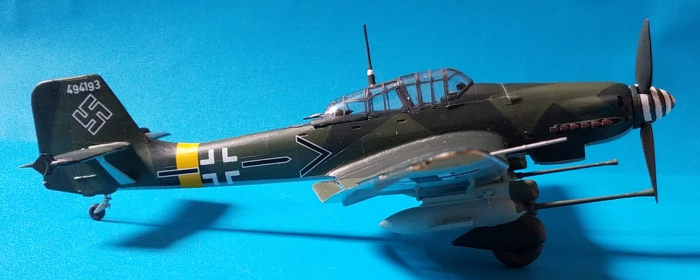
Hasegawa 1/48 Ju-87G Stuka
| KIT #: | Jt54 |
| PRICE: | $23.00 |
| DECALS: | One option |
| REVIEWER: | Francisco Santoro |
| NOTES: | Ju 87B wing with badly moulded extensions, machinegun mounting won´t allow for the cockpit floor to sit properly, wing/fuselage step if no levelling sprue is added. Get the Ju 87G in 48 from Italeri to save you all this issues. |
| HISTORY |
Hans Ulrich Rudel was born on Konrwadswaldau, German Empire, on July 2, 1916. He was an air observer when Germany invaded Poland in 1939, and served as an Adjutant during 1940 for the Vienna-based 43rd Aviators Training Regiment.
He began training in what would become his trademark aircraft, the Ju 87 Stuka, in 1941. He was posted to Stukageschwader 2 (StG 2) "Immelman," and moved to Poland to participate in the in Operation Barbarossa (invasion of the Soviet Union), in June 1941. Three months later, Rudel sunk the Soviet battleship Marat. Rudel also participated in the German efforts to capture Moscow during Operation Typhoon.
Rudel participated also in the Battle of Stalingrad (August 23rd,
1942-February 2, 1943). In February 1943, Rudel flew his 1000th mission. He
was then tasked to test the newest version of the Ju 87, the G "tank
hunter." In April of this year, Rudel was awarded the Knight´s Cross with
Oak Leaves, and given to him personally in Berlin by Hitler. After the des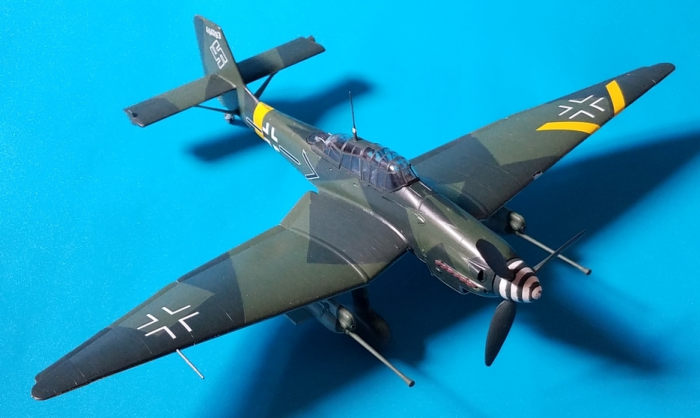 truction
of his 100th tank, Rudel was awarded the Knight´s Cross of the Iron Cross
with Oak Leaves and Swords in October of 1943.
truction
of his 100th tank, Rudel was awarded the Knight´s Cross of the Iron Cross
with Oak Leaves and Swords in October of 1943.
Rudel became Gruppenkommandeur of IIIrd Group of StG 2 on February 22, 1944. On March 20, he crash landed his plane behind the Soviet lines, and Rudel with his rear gunner Erwin Hentschel, tried to go back to their lines by foot. Henstchel died while swimming across the river Dniester. Upon Rudel´s return, and 9 days later, he was awarded the Knight´s Cross of the Iron Cross with Oak Leaves, Swords and Diamonds, and became the 10th member of the German Armed Forces to receive this award. On 1st September 1944, Rudel was promoted to Oberstleutnant, and was appointed as leader of Schlachtgeschwader 2 (formerly StG 2). On December 22, Rudel completed his 2400th mission, and reported his 463rd destroyed tank the next day. On December 29th, he was awarded the Knight´s Cross of the Iron Cross with Golden Oak Leaves, Swords and Diamonds, and was promoted to the rank of Oberst (Colonel).
On 8th Febrary 1945, Rudel´s leg had to be amputated after being injured by ground fire. He flew again on March 25, claiming 26 more tanks before the war´s end. On May 8th, he flew from his airfield on his Ju 87G towards the American Allies lines, where he finally surrendered. Hans Ulrich Rudel died in Rosenheim, Germany, on December 18th, 1982, an unrepentant Nazi until the end.
The Ju 87G was born in 1943 as a modification of the Ju 87D, after trying to destroy Russian tanks dive bombing proved unsuccessful. The G version carried extended wingtips and two 37mm cannons under the wings and was used until the very end of WW2, making its last landing when Hans Ulrich Rudel landed his Ju 87G-2 on an Allied airfield on May 8th 1945. It was the last variant of the iconic Ju 87, which had been first flown in 1935.
| THE KIT |
 The
kit comes with two bags, one with the regular pieces, and the other one with
the clear parts. The parts are moulded in light grey plastic with recessed
panel lines. One thing I checked upon opening the box was the for the mould
seams on the wingtips of the aircraft. Hasegawa chose to retool the Ju 87B,
extend the wingtips and use the B fuselage with a D nose, instead of making
a completely new tool Ju 87G, and that´s why it has some accuracy issues
(something even I, who doesn´t give a flying one about accuracy, notices).
You also get four Ju 87D propellers, the Ju 87B propellers and the regular
dive bomber parts. The clear parts are beautifully done and have a perfectly
defined framing.
The
kit comes with two bags, one with the regular pieces, and the other one with
the clear parts. The parts are moulded in light grey plastic with recessed
panel lines. One thing I checked upon opening the box was the for the mould
seams on the wingtips of the aircraft. Hasegawa chose to retool the Ju 87B,
extend the wingtips and use the B fuselage with a D nose, instead of making
a completely new tool Ju 87G, and that´s why it has some accuracy issues
(something even I, who doesn´t give a flying one about accuracy, notices).
You also get four Ju 87D propellers, the Ju 87B propellers and the regular
dive bomber parts. The clear parts are beautifully done and have a perfectly
defined framing.
Decals are of the new Hasegawa style with white looking whites. The decal sheet also came with four Swastikas, four upper wing and four fuselage Iron Crosses, I don´t know why, but a welcome addition for my spare decal stash. The decal sheet also has the Ju 87G wing walk areas, and the Eastern Front markings.
| CONSTRUCTION |
I began by painting all the cockpit parts with Revell 78 Tank Grey/RLM 66 and the control panel in flat black. When everything was dried, I glued each piece in place, opened the hole for the rear machinegun mount, and glued it in place. I also removed from the fuselage halves the outlined plastic in the instructions so I could fit the canopy later. After that, I glued the cockpit sidewalls to the fuselage halves and painted them. I then test fitted the cockpit floor to the fuselage halves, and it didn´t fit, leaving an ugly gap. After some head scratching, I removed the rear machinegun seat, and found the cockpit floor fitted perfectly. After gluing the cockpit into the fuselage, I glued the rear machinegun seat as close as I could into its original position. With the fuselage complete, I glued the instrument panel to its mount, and then glued that assembly to it. An interesting thing is that the kit doesn´t come with rudder pedals, even though there´re holes on the back of the instrument panel for them (they aren´t listed on the instructions either).
 I
then glued the nose parts together, and painted the radiator flat black. The
nose was glued to the fuselage after it was allowed to dry for some minutes.
I
then glued the nose parts together, and painted the radiator flat black. The
nose was glued to the fuselage after it was allowed to dry for some minutes.
With the fuselage complete, I cut off the wings from their sprues, removed the remaining sprue gates, fixed some self caused damage with CA, and opened the holes on the lower wing for the underwing cannons and the radiators. The radiators were glued in place, but I chose to glue the cannon mounts after the model had been painted.
When I test fitted the wing/fuselage join, I discovered I´d have a nasty step. It didn´t take me long to find out that using a sprue with the top sanded flat would raise the bottom of the wing enough to get a flush join between the wings and the fuselage. I glued the leveling sprue and then I glued the wings to the fuselage, letting that set for a while. With the wings dry, I glued the horizontal stabilisers and their struts to the fuselage.
With the airframe complete, I cleaned the model with alcohol to remove paint and fingerprints, and set off to paint the model.
| COLORS & MARKINGS |
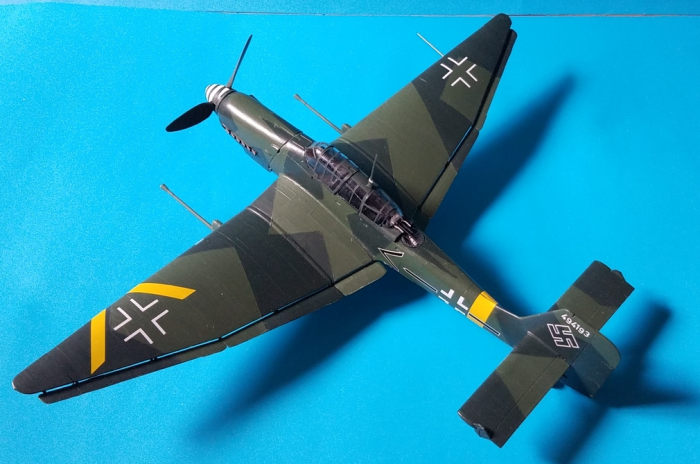
 I
outlined the camouflage with a pencil, and then masked and painted the areas
that were in RLM 71 with Revell 39 Dark Green. I then masked the RLM 71 and
painted the RLM 70 with Revell 40 Black Green . After the upper camouflage
was fully dry, I masked the fuselage and painted the undersides RLM 65 with
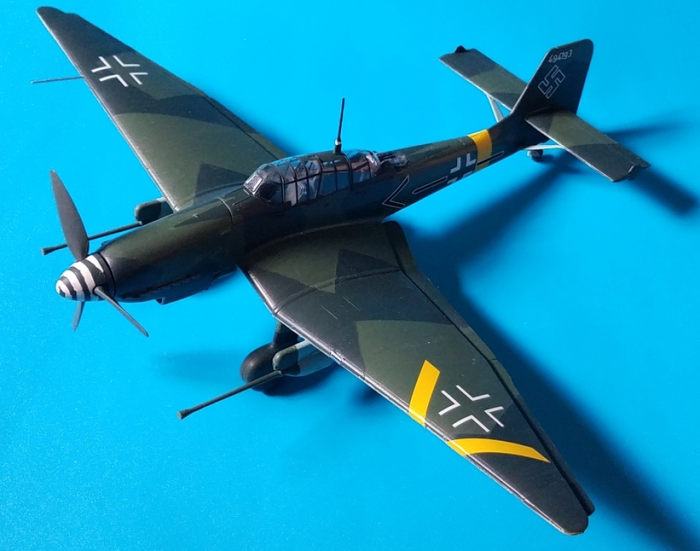
Revell 49 Light Blue. The wingtips were painted yellow. After unmasking the
fuselage, I grabbed the finest sandpaper I had (2500) and began sanding the
ridges left from the masking, removing some paint in the process. Those
areas were repainted as best as I could with a fine brush. I added the
underwing cannon mounts at this point. After that, the model was coated
twice with Revell´s clear varnish.
I
outlined the camouflage with a pencil, and then masked and painted the areas
that were in RLM 71 with Revell 39 Dark Green. I then masked the RLM 71 and
painted the RLM 70 with Revell 40 Black Green . After the upper camouflage
was fully dry, I masked the fuselage and painted the undersides RLM 65 with
Revell 49 Light Blue. The wingtips were painted yellow. After unmasking the
fuselage, I grabbed the finest sandpaper I had (2500) and began sanding the
ridges left from the masking, removing some paint in the process. Those
areas were repainted as best as I could with a fine brush. I added the
underwing cannon mounts at this point. After that, the model was coated
twice with Revell´s clear varnish.
I tried putting the upper wing Iron Crosses in their correct place on the first try, something I was successful with, and then added the other decals without issues. They were brushed over with Vallejo´s decal softener, which was left to dry and then wiped out with water. The model was then coated twice with Revell´s matt varnish.
| FINAL CONSTRUCTION |
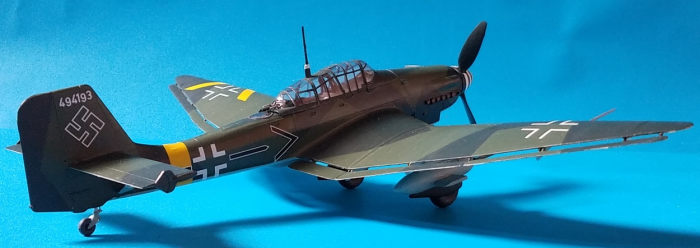
I painted the wheels flat black and the tyres with Revell 78 Tank Grey. The landing gear pants were painted RLM 70 with black oleos and RLM 71, and I also removed the extensions for the Ju 87B sirens. I glued the wheels into the landing gear pants, and then I glued the landing gear to the base of the wing of the aircraft with a mix of CA and regular plastic glue and left to cure. I also glued the tailwheel into its opening.
 I
painted the propeller blades in RLM 70 with steel bases, painted the spinner
white, masked the spiral, and then it was repainted with RLM 70, which left
me with a pretty spinner spiral. I then put the model on its wheels and
pushed the propeller into place.
I
painted the propeller blades in RLM 70 with steel bases, painted the spinner
white, masked the spiral, and then it was repainted with RLM 70, which left
me with a pretty spinner spiral. I then put the model on its wheels and
pushed the propeller into place.
The 37mm cannons and their parts were painted in their sprues in RLM 65, and the barrels were painted in RLM 71. They were then glued on their mounts under the wings.
I masked and painted the clear parts with the fuselage colour first, and then in RLM 70, and glued them one by one into their openings, the last one being the machinegun cover. The antenna was glued, and the model was completed.
| CONCLUSIONS |
The kit itself is not bad and for the price the seller asked, I couldn´t pass on the opportunity to buy it, it also builds into a good replica of the Ju 87G. However, taking into account the inaccuracies (the B wing with badly done extensions), the lack of rudder pedals and the fit issues, I suggest you go for the Italeri Ju 87G, which is the latest tooling of this aircraft. The Italeri kit also comes with four marking options (including Rudel´s Ju 87G-2 White 17 T6+AD) and photoetch parts.
Back to the Previews Index Page
Back to the Previews Index Page