
Hobbycraft/Cutting Edge 1/48 Bf-109Z
|
KIT # |
See review |
|
PRICE: |
$29.99 for the conversion set |
|
DECALS: |
See review |
|
REVIEW: |
John
Lester |
|
NOTES: |
Conversion using set CEC48087 |

|
HISTORY |
I won't get into the history of the 'real' aircraft. Those interested can see Tom Cleaver's write-up elsewhere on this site.
|
THE KIT |
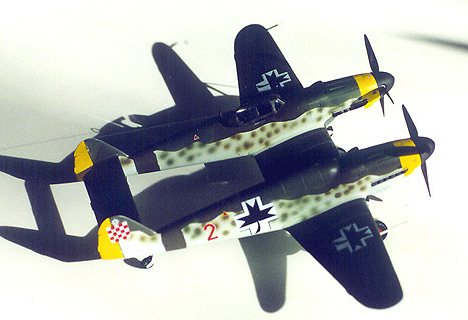 I haven't built an Me-109 since I was twelve, and I
had no plans to - until I saw this conversion kit listed in a flyer from Meteor
Productions (a company with the most abysmally slow website on the face of this
or any other Earth - really, try searching their catalog. Takes an average of a
week and a half to get the server to send you the page. Any page, actually. And
that's assuming the server doesn't bomb when you attempt a search). Having
slightly more money than sense (and precious little of either), I sent of for it
as soon as it was available.
What came in the box that arrived a week or so later was .... well, disappointing. You get three pieces of hard, grey resin: one piece wing, fuel tank to replace the starboard airframe's canopy, and one piece horizontal stabilizer. The resin itself is ok, with very little in the way of casting flaws. However, the quality of the master is not the best I've seen. Several of the engraved panel lines looked as if they were scribed free-hand, as they are crooked or wobble over their length; several more just petered out before meeting another line - or overshot by as much as an 1/8"! The wing radiators have no detail inside, which is surprising, since the sculptor obviously used the Hobbycraft Bf-109 wings, and they have at least some screen detail. The horizontal stab is closer to a flat sheet than it is to anything with an airfoil section as well.
 |
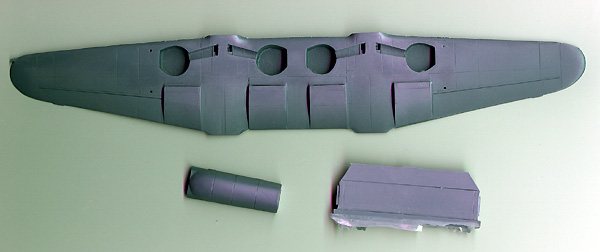 |
Given that I've seen this exact same conversion at model shows (in a different company's box) for upwards of $40, I guess I shouldn't complain too much, but still - $29.95 for this? I expected better, based on the resin I've seen from this company in the past. At least Meteor's instructions are decent. They're quite thorough, actually, covering not only the mods needed to make this aircraft from two Hobbycraft kits, but also a short history of the two prototypes made. A nice three view diagram is included to show what the kit should look like when done.
|
CONSTRUCTION |
I'd been advised to use two Hasegawa -G kits for this project, because they supposedly capture the look of the real Bf-109 better than Hobbycraft's. I've seen both built up, and I can't tell the difference - lets face it, they both look more like Bf-109s than Grumman Widgeons. Given I can get the Hobbycraft kits for as little as $5 US, and the Hasegawa for 4 times that .... you do the math. I chose the 'Axis Allies' boxing for the decals; as long as I'm building a hypothetical aircraft, why not make it a hypothetical aircraft turned over to the Croats or Hungarians after the dissolution of the Zerstoerer formations? Heresy, I know - but I'm not a member of the Authenticity Police, and never will be. (I build sci-fi, you see).
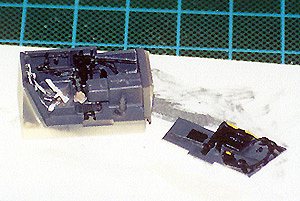 Assembly is really straight forward. The
Hobbycraft kit goes together well, and the only complaint I have about it is the
cockpit is rather spartan. No biggie, as I found a True Details resin cockpit
for under $5 US (for the 109-K, but what do I care? Again, I can't tell the
difference - and neither can you, when it's painted RLM66 and hidden under the
canopy. Admit it, and you're on the road to recovery.) Using photos from various
references (including a review
by the esteemed editor of this site), I assembled and painted the cockpit, and
superglued it into the port side airframe. Fit was rather good, actually, though
the set was designed for the Hasegawa kits. While I was at it, I added various
small details like canopy framing, release and locking levers, etc. from bits of
styrene stock. The recent issue of FSM with the cover article on detailing the
Revell 1/32 Bf-109 was a real help here. Lastly, I carefully filled and sanded
the outboard slots for the horizontal stabilizers.
With the two fuselages assembled, I turned to the resin parts. First, I cut the fuel tank from it's pour stub and attempted to fit it to the starboard fuselage. Major fit problems. The piece fits well enough lengthwise, but overhangs the fuselage sides by a good 1/16" on both sides. It was designed to fit the G-4 kit, so maybe it was my bad using the G-6/10. Or maybe the fit just stinks. In any event, it took several sessions of carefully filing, filling, sanding and doing it all over again until I was satisfied with the piece. Then I had to rescribe all the panel detail that I sanded off.
 Next came the wings. Mine had several ugly
dings on the leading edge where the wing had been broken away from its pour stub
- not by me, I might add. Rather than use putty or superglue here, I used a goo
made by dropping chunks of sprue in a bottle of liquid plastic cement. I glopped
the stuff on (it's hard to apply it precisely), let it dry overnight, and used
sanding sticks to shape the appropriate contours. I like this stuff best for
this kind of work, because it is easy to shape and doesn't pit or flake like
putty, and is far easier to see than superglue.
After this, I found a steel ruler and used it to guide my scriber as I fixed all the misshapen panel lines on top and bottom of the wing. Then I added the wing bulges for a late model G-10 from the Hobbycraft kit (in for a penny, in for a pound), as well as the underwing cannon (minus the barrels, which I knew I'd just break off anyway). I then cleaned up the horizontal stabilizer, which had less problems than the wings.
 Now it was time to fit the fuselages to the
wings. The port side fit almost flawlessly, and I needed just a hint of putty -
because I always need some putty. The starboard side didn't fit quite as
well, but the gap at the wing root was manageable. It was at this point that I
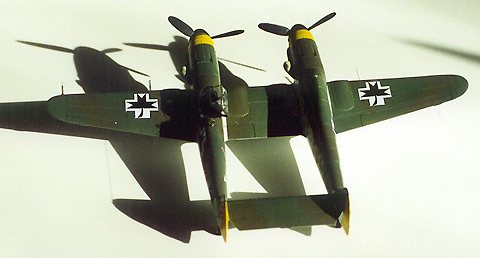
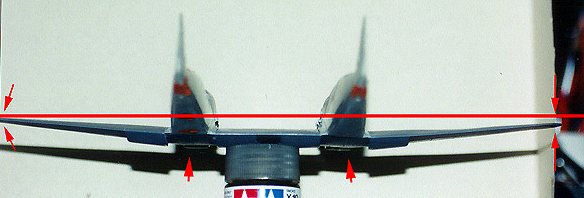
noticed the wing was warped - ARRRRGGGGHH! The two fuselages are not level, and
what's more, the tails were pointing like a cross-eyed setter - all over the
darn place. Too late to dip this in boiling water - and I'm sure I couldn't have
fixed it by that method anyway (nothing to refer to without both fuselages in
place). Instead, I tacked the starboard fuselage to the front of the wing with
white glue, and epoxied the horizontal stab to the port fuselage. The glue was
allowed to set up overnight. Then, I torqued the starboard tail almost a half an
inch (!) over to meet the horizontal stab, using liberal amounts of gel-type
superglue and accelerator to fix it in place. The white glue had just enough
give that the fuselage pivoted on that spot, but stayed fixed to the wing, which
helped alignment. Once THAT had dried, I flowed epoxy into the wing root of the
starboard side and let it set up over night, aided by clamps to keep everything
in place.
The result is still a bit out of alignment, but it's hard to tell if you don't pick the model up and look at it from directly astern.
After this trauma, construction speeded right up. Seams were filled and sanded smooth, canopies dipped in future and tacked to the fuselage with white glue, and all was made ready for painting. I did affix the landing gear struts so the model would not have to rest on freshly painted undersides. The Hobbycraft struts fit perfectly in place - as well they should, seeing as the attachment slots were made to accept them.
|
PAINT & DECALS |
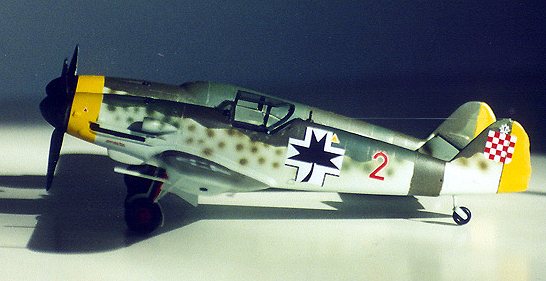 After a light coat of grey primer (and
fixing the remaining surface flaws this revealed), I masked off the yellow nose
bands and sprayed them with Humbrol Yellow enamel - the absolute best covering
yellow I've found. Then I I flipped the model over and painted the wheel wells
Testors' Model Master (TMM) RLM02. Once dry, these were stuffed with tissue, and
all but the top surfaces of the model sprayed with Gunze "Light Blue'
acrylic (the one that was the closest match I could find to RLM 75). When this
had dried, I flipped the model over , masked off the wavy demarcation on the
fuselage sides, and painted the top TMM RLM 80. When that had dried, I masked
off the appropriate areas with paper masks (for a soft edge) and sprayed TMM RLM
81.
 With the paint dry and the masking removed, I
set to spraying the "mottling" on the fuselage sides. It took a lot of
practice, and I'm still not satisfied with the results, but I was finally able
to get something that looks OK. What I did was to thin the TMM enamels down with
about twice as much thinner as normal, and spray them with the compressor set at
10psi. I still got a bit of spattering though.
Disaster struck when I attempted to spray Future over the entire model in preparation for decaling. The stuff puddled, and there were parts of the upper surface where it just would not adhere, even when applied undiluted with a brush. I don't know if there's a problem with the bottle I have, or a new formulation of the stuff, but it streaks, puddles, and generally looks like crap when I spray it. I've tried everything - from spraying unthinned to using a 50:50 mix of isopropyl alcohol and distilled water to thin the stuff. The best results I can get are using Polly S acrylic thinner to cut the Future about 70:30 (Future:thinner).
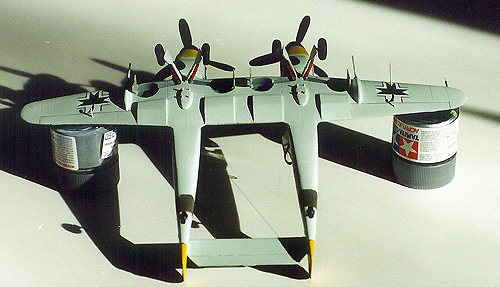 I washed the first coats right off, cleaned
the wings with ammonia-based cleaners, tried and failed again. It took a
combination of cleaning and polishing the wings, coupled with several
applications of brushed-on Future, to get a surface acceptable for decaling.
Interestingly, I did not have these problems on the fuselage, or where the Gunze
and Humbrol paints were sprayed. And I've never had these problems with the TMM
paints before - even from these very same bottles!
At long last, I was ready to put the decals on. I used the Hobbycraft decals exclusively and had no problems (aside from losing a sheet of stencils). They responded well to setting solutions, and went down without bubbles or silvering. The last step before sealing everything with a flat coat was to ink in the control surface lines.
All that was left at this point was to unmask the canopy and pose it open, and add the rest of the bits. Landing gear legs were painted red, based on another of Scott's reviews that indicated G-10s often had gear and or gear doors painted that way to alert the crew to use higher octane fuel. Gear doors were painted and glued in place, followed by underwing antenna and the pitot tube (which I broke off at least four times immediately thereafter). On went the wheels (the set under the starboard side fuel tank being True Details' bulged and flattened) and tail wheels, being careful to fix the latter so that the model sits level on all six landing gear wheels. Finally, underwing cannon made from the appropriate size styrene rods were installed (and later, the radio aerial made from monofilament line).
|
CONCLUSIONS |
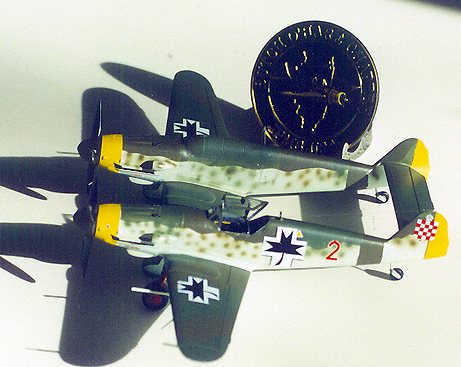 This conversion turned out to be more of a
challenge than I thought it would be when I recklessly ordered the kit. Still
(and despite all my goofs), the finished model is an eye-catcher, and managed to
score a Bronze award at a local IPMS show. If you really want a Bf-109 Z, and
you are prepared to spend a lot of effort on it, not to mention the inflated
price for what you actually get, this set is for you. If I were insane enough to
attempt another 'Z', I'd scratchbuild it though: all the hassle for half the
price! I'd love to do the He111 Zwilling conversion Cutting Edge offer ... but
not until I can see the parts myself, and determine if $50 US is worth what's in
the box.
November 2000
If you would like your product reviewed fairly and fairly quickly, please contact the editor or see other details in the Note to Contributors.