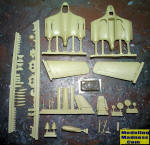
Airmodel 1/72 Me-329
| KIT #: | AM 2070 |
| PRICE: | €35 when new |
| DECALS: | None provided |
| REVIEWER: | Spiros Pendedekas |
| NOTES: | Resin with vac canopy |

| HISTORY |
The Messerschmitt Me
329 was a design project for a heavy fighter and ground-attack aircraft,
developed towards the end of World War II. It was a competitor and possible
successor to the Me 410. Like the Me 265, the Me 329 used an advanced flying
wing design. Other advanced features included the pilot and navigator
sitting in tandem in a broad bubble canopy, and a remote-controlled rear gun
in the tail.
In spite of the futuristic design, the improvement in performance over the
Me 410 was marginal. Development received a low priority and, while a
full-scale glider was tested at Rechlin in the winter of 1944/5, work on the
project was canceled shortly after.
| THE KIT |
Airmodel first issued
this kit sometime during the 90s and reissued it in 2005, updated with new
parts. This later reissue is the subject of this preview. It comes in a
small sized top opening box with an attractive box art of a fictitious
operational Me 329 in RLM 02 over RLM 76 camo.
Upon opening the box, I was greeted with 58 pale green resin parts. The
bigger parts (fuselage halves, wings and cockpit tub) are separately cast,
whereas the “smaller’ ones are cast in groups. Casting is really first
class, with smooth surface texture and nice, subtle engraved detailing
(though, if you wish to do the wooden mock up, you may have to fill or sand
down the engraved panel lines).
 The
fuselage is provided in two halves (top-bottom), whereas the wings and fin
are single pieces. The radiator faces and exhausts are extremely well done
(the radiators are pieces of art), with the same being true for the engine
louvers. However the latter are 24 small and paper-thick pieces that have to
be separated from the stub and glued separately, so good luck there…
Similar situation with the props: excellently cast, but the fact that the
hubs and blades are all separate means that your modeling skills will be put
to some good testing…
Cockpit is very well appointed for the scale, with cockpit tub, instrument
panel, stick, pedals, seats with molded-on seatbelts and rear bulkhead, all
exhibiting great detail. Landing gear is also very precisely appointed, with
the bays having sufficient depth but no internal detailing or some kind of
“ribbing” (which, possibly would have been the case in “reality”). The doors
themselves look very nice, but their scale thickness means you have to be
extremely careful in detaching them from the stub and handling them. The
wheels are weighted and look superb.
A bomb bay is provided, which can be displayed
open, with a good looking bomb to be placed inside. The vac formed canopy is
very well made, tad yellowed, possibly because it is 15 years old, but,
nevertheless, usable. I would definitely not mind at all if a spare was
provided…
Instructions are clearly done in a folded double-sided A3 sheet. First page
contains a nice history in both German and English, with a performance
comparison between the Me 329, Me 410 and Li p.10. The second page contains
a parts list and some useful modeling notes regarding the use of resin
parts.
Construction is divided in only two steps, each containing a lot of info,
but they are clear and not that difficult to follow. Color callouts are
given for the cockpit only.
Two schemes are provided: one RLM 70/71 over 76 for the mock-up (and,
possibly, during the gliding test flight) and one suggestion for a
fictitious operational plane of RLM 02 over 76, with the top panel lines
accentuated with RLM 70 and 71, quite an interesting one! No decals are
provided, but it will not be a big problem finding suitable ones.
At the first step of the instructions you have to assemble the cockpit and
trap it between the fuselage halves, then attach the wings and fin, the
nose, the radiators, the exhausts, the 12 top cooling louvers, assemble and
attach the props and, finally, attach the canopy with a small filet antenna
on top of it. The quite heavy wings are to be butt fitted to the fuselage,
meaning that you should consider some sort of joint reinforcement, like
metal pins.
Onto the second step of the instructions, where you are supposed to attach
all landing gear parts, the 12 underside cooling louvers, the pitot tube,
the rear gun, assemble and attach the bomb and finally fit the bomb bay
doors.
It is obvious that the above two dense steps can be spread into smaller
sub-steps and performed sequentially to the modeler’s convenience.
Points of consideration might include the possibility of tail-sitting (which
must be addressed before attaching the nose) and the also equal possibility
of the resin landing gear legs buckling over time, due to the model’s not
insignificant weight (though it has to be admitted that the legs look
strong).
| CONCLUSIONS |
This looks to be an
extremely well done resin kit of this distinctively looking project, of
which the prototype made it to the flight line, even if the flight performed
was a gliding one. The resin parts themselves are excellently cast, with
details at key areas being very sufficient. Instructions are dense, but
clear and followable. Some parts' color callouts are not given (like the
landing gear), but, frankly, this will not pose any sincere difficulty to
the skilled modelers this kit is aimed at.
Due to the many tiny resin parts that have to be carefully attached, it will
be better if this kit be tackled by experienced modelers with a couple of
resin kits under their belt. Overall, this kit looks excellent and very
promising in the box, especially for the price it was offered, with the main
problem being to find one, since they seem scarce nowadays (as of 2022).
Happy modeling!
Editor's Note: Planet Models also released this kit about the same time and they seem quite similar in layout, though the sprue shapes are different, the Planet kit using wafers for the smaller parts.
January 2022 Copyright ModelingMadness.com.
All rights reserved. No reproduction in part or in whole without express
permission. If you would like your product reviewed fairly and
fairly quickly, please
contact
the editor or see other details in the
Note to
Contributors.