Revell 1/32 Bf-110C-4B
| KIT #: | 4771 |
| PRICE: |
20.00 Euros 'used' |
| DECALS: | Two options |
| REVIEWER: | Spiros Pendedekas |
| NOTES: |
1974 tooling. |
| HISTORY |
The Messerschmitt Bf 110, also called Me 110, was
a twin-engine aircraft produced by Bayerische Flugzeugwerke and Messerschmitt
and used by the Luftwaffe in various roles during WWII. Its development started
in the 1930s endorsed by Hermann Göring for its armament, speed, and range.
Early versions had MG FF 20mm cannons, MG 17 machine guns, and MG 15 machine
guns. Later models had MG 151s and a rear MG 81Z. The intended replacements, Me
210 and Me 410 Hornisse, faced issues, leading Bf 110 to serve until the war's
end in various roles, despite efforts for an improved version.
The type was successful in early campaigns in Poland, Norway, and France, it
lacked manoeuvrability (could partly be offset by better tactics), a weakness
exploited by the RAF during the Battle of Britain where the Bf110s were
escorting German bombers. Some units were converted into night fighters to
defend against British bombers. After the Battle of Britain, it served as an air
superiority fighter and strike aircraft, defending Germany against the USAAF.
However, changing American tactics made them vulnerable, leading to a decline in
1944.
Though not particularly successful as a pure fighter, the Bf 110 was a versatile
aircraft. It became the main night-fighting plane for the Luftwaffe, with many
German aces flying it. Major Heinz-Wolfgang Schnaufer achieved 121 victories in
it. Other air forces like the Hungarian, Italian, and Romanian also operated the
Bf 110.
| THE KIT |
 It’s
quite spectacular that Revell came as early as 1974 with a then state of the art
1/32 Bf110 mold. The kit had been regularly reboxed as a “C” and “D” version
another ten times, with the last reboxing in 2007. The kit must not be confused
with the 2019 edition, which is a reboxing of the newer (2008) Dragon tooling.
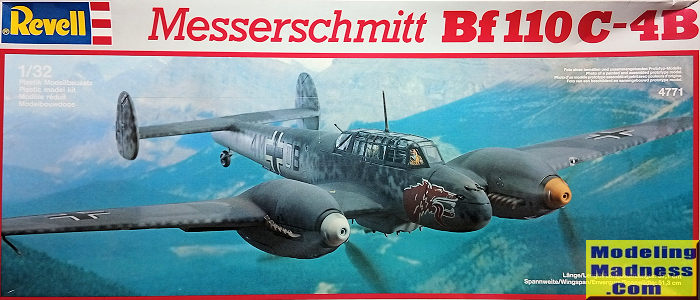
The preview kit is the 1987 “C-4B” reissue, bought second hand in 2017 from an
Athens Hobby shop in excellent condition and comes in a big, good quality, top
opening box, carrying an attractive box art of a completed model in flying
status.
It’s
quite spectacular that Revell came as early as 1974 with a then state of the art
1/32 Bf110 mold. The kit had been regularly reboxed as a “C” and “D” version
another ten times, with the last reboxing in 2007. The kit must not be confused
with the 2019 edition, which is a reboxing of the newer (2008) Dragon tooling.
The preview kit is the 1987 “C-4B” reissue, bought second hand in 2017 from an
Athens Hobby shop in excellent condition and comes in a big, good quality, top
opening box, carrying an attractive box art of a completed model in flying
status.
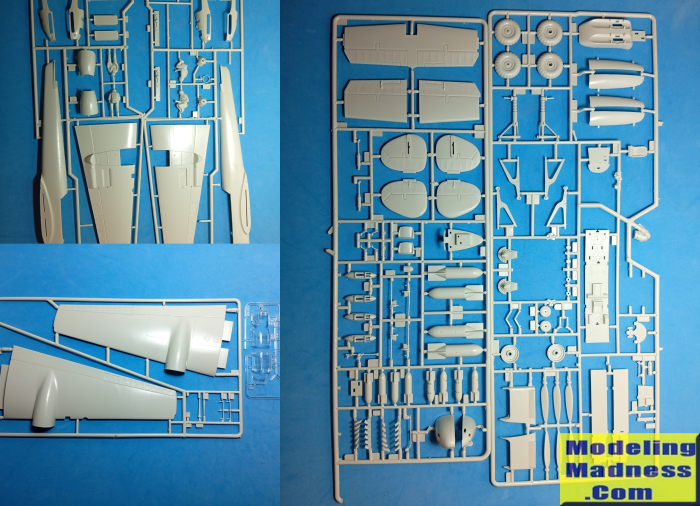
Upon opening the box, I was greeted with 131 pale gray styrene parts, neatly
arranged in one very big (cut in half in order to fit the already big box) and
two smaller sprues. Molding, though old school, is quite sharp and flash is
minimal, easily tackled by some clean up. Sprue gates are thin but a number of
the corresponding stems are too close to the parts, complicating their removal.
Panel lines are, of course, raised, generally looking good and at the right
places. I noticed a few sink and also ejector pin marks, most of them easily
tackled.
Expectedly for a 1974 mold, cockpit detail is average, with decals used for the
instrument panel and side consoles. Two acceptable figures for the pilot and
gunner are included, and you might consider using them to liven up the area and
blank the sparseness. The front gun bay can be posed open, but there’s no
internal detail and the supplied guns are on the simplistic side. The
aerodynamic surfaces are well done and I liked the fabric representation, which
is subtle, with the surfaces themselves molded coarser than the metal ones. I
wouldn't mind having the elevators and rudders separately molded, in order to
pose them more dynamically (but I possibly ask too much from a 1974 tooling).
Two good looking DB-601 engines are supplied, which is a must, as their bottoms
are visible through the main landing gear bays. The VDM props are separate,
looking acceptable in general, but I have read the blades are more anaemic than
in reality. The distinctive exhausts are well molded and, of course, you will be
tempted to drill through their flat ends for more realistic looks. The radiator
and oil cooler intakes and faces are acceptable. The two small intakes
bilaterally of the cowlings are represented as cutouts; I would drill them
through for more realistic looks.
Landing gear is reasonably executed, with some “busyness” (apart from the
visible engines) molded in the bays. Landing gear legs look good with their
distinctive oleo protective boots, but cry for adding some brake lines. Tires
feature the distinctive trench pattern, possibly a bit overdone, but you can
always sand it down a bit. The various antennas are well done. If you build the
Zerstörer version, six good looking bombs and their corresponding racks are
supplied.
Transparencies are very well molded and crystal clear, with the sprue gates not
penetrating the glass area. Instructions are very well done in the usual 90s
Revell style, coming in the form of a 16-page bw booklet, containing a sprues
map, with the construction spread in 43 simple and concise steps and color
callouts provided where needed.
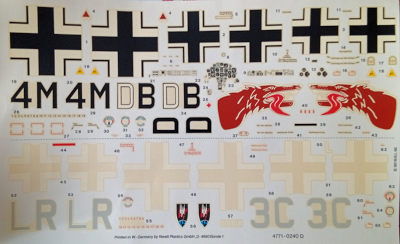 Two schemes
are provided, for #4M+DB Zerstörer machine, as it stood in Deblin-Trenz in July
1942, carrying the typical blotched splinter camo and Oberfeldwebel Reinhard
Kollak’s all black 3C+LR example, assigned to 7./NJG 4 in 1943. Colors are
given in Revell codes and in generic form, so have those conversion charts
handy! Decals, though superbly printed back then, couldn’t help but showing
their almost 40yo age by exhibiting serious yellowness. For the rest they look
usable, so I will tape them beside a window and let the Greek sun take care of
the yellowness. No swastikas are included, so, with the provided sheet you can
have a politically correct but historically incorrect model.
Two schemes
are provided, for #4M+DB Zerstörer machine, as it stood in Deblin-Trenz in July
1942, carrying the typical blotched splinter camo and Oberfeldwebel Reinhard
Kollak’s all black 3C+LR example, assigned to 7./NJG 4 in 1943. Colors are
given in Revell codes and in generic form, so have those conversion charts
handy! Decals, though superbly printed back then, couldn’t help but showing
their almost 40yo age by exhibiting serious yellowness. For the rest they look
usable, so I will tape them beside a window and let the Greek sun take care of
the yellowness. No swastikas are included, so, with the provided sheet you can
have a politically correct but historically incorrect model.
Instructions want you to first tackle the interior and trap it between the
fuselage halves, followed by the nose, where you will have to choose for open or
closed cover. The tail is next assembled and attached, followed by the tail
wheel (I would attach it in the end) and the wings with the radiators under
them.
The engines are next assembled , with the cowlings built around them and the
completed subassemblies fitted to the wings.Expect some fit issues there. If you
go for closed top cowlings, you should attach them at that time, as well. The
landing gear is also supposed to be trapped in as you build the engine cowlings,
but I think you can attach them later on.
The Zerstörer version bomb racks and bombs are next, followed by the props, the
transparencies and a few final bits (like antennas), ending a build which,
though definitely presenting a degree of complexity, looks nevertheless
straightforward.
| CONCLUSIONS |
This is clearly an old mold in all respects and
the fact that Revell stopped its production in 2007 and reboxed the Dragon kit
in 2019 tells a lot. That said, it is not a bad kit at all, offering acceptable
overall level of detail and promising to deliver a decent representation of the
Bf110. Not a shake and bake kit for sure, needing your attention in areas like
the wing to nacelle joints.
Very scarce to find nowadays (and if you do, you may be surprised at the high
collectors prices it is sold at) and clearly superseded by the Dragon kit, this
is still a kit worth tackling.
Happy Modeling!
April 2026 Copyright ModelingMadness.com. All rights reserved. No
reproduction in part or in whole without express permission. If you would like your product reviewed fairly and fairly quickly, please
contact the editor or see other details in the
Note to
Contributors.