
| KIT: | Tamiya 1/12 Ducati 916 |
| KIT #: | 14068 |
| PRICE: | £16.00 |
| DECALS: | One options |
| REVIEWER: | Patrick Barratt |
| NOTES: | Superb intro to motorcycle kits |

| HISTORY |
If I was to say, it’s big! Its Red! It’s very fast! It’s Italian…you would all be thinking, yea yea yea and it’s a Ferrari….Well you are wrong, it’s a Ducati, a Ducati 916 from Tamiya.
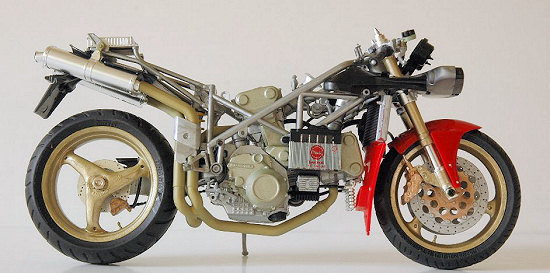 First seen at the Milan show in 1993 it
was a 916cc, 114bhp liquid cooled v. twin, fuel injection, super bike with Ducati’s desmo driven valve gear. This was a complicated design that employed
cams and rockers to open the valves and cams and rockers to close them again,
thus doing away with valve springs and valve spring bounce, a problem with high
revving engines when the valve spring cant shut the valve quick enough for the
speed of the engine. Using stronger or “double” springs just needs more power to
compress them when opening the valve and thus saps power. Because the desmo
system is fully mechanical it is possible to spin the cams of the engine by hand
with no resistance and also means the valves open and shut precisely regardless
of engine speed. The frame is very lightweight tubing and its rigidity is gained
by using the engine as a stressed member. The year after its launch, the British
rider Carl Fogarty won the world super bike title on a factory 916 and a
legendry motorcycle was born.
| THE KIT |
 Ok, so what’s in the box? At first
glance there seems to be enough parts to get this thing to run !! There is a red
spru of body work, a silver spru of engine and wheels, a satin chrome one of
exhaust, a black spru of air boxes, seat etc, and a couple of rubber tyres some
screws and a screw driver as well as some rubber tubing.
All are typically well detail injection moulded little works of Tamiya art.
Already it occurs to me that this could be very easy to put together but very difficult to make it look like a real motorcycle. My mind is already racing ahead thinking, there is a lot of bodywork here and it’s going to need a good finish or the photos will look really sad! It will make the difference between a convincing model of a classic…or a child’s toy motorbike!
Now I spend most of my leisure time rebuilding classic Ducati’s (real ones)……so why do I think this is not going to help me here!
| CONSTRUCTION |
The first thing
that becomes apparent is that unlike Aircraft, all the parts will have to be
painted before construction starts! At this
 point I realise that all
my paints are Matt and geared towards Greys, drabs and Khaki! So its off down
the shops for paint…alternatively, I could just camouflage it….maybe not.
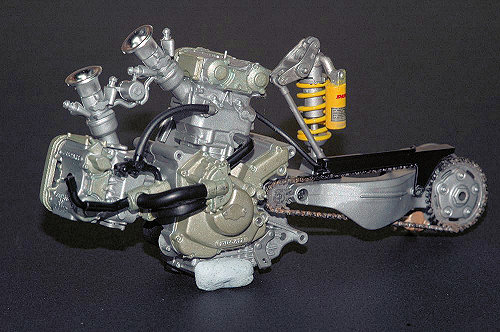
Step1 is the swing arm and rear shock assembly. This goes together very well and is relatively straight forward
Step2 is the engine, again no real problems here although anyone who does not know motorcycle engines might not recognise it as such or appreciate even which way up it should be! Various lengths of rubber tubing are fitted at this point and a very accurate cutting guide is supplied on each instruction page. A tip some will find useful is to insert a length of thin wire/solder inside the rubber tube before fitting it. This will enable you to route it more accurately as the wire adds a rigidity that holds the tubing where you want it.
The next step is to bolt the swing arm to the back of the engine and encase the whole lot in the frame that is split down the middle to allow this. Once this is done you can add the exhaust system and the rear wheel.
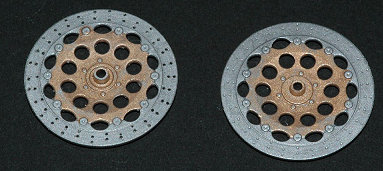 One small improvement you might consider
is drilling the vent holes out in the brake disc’s, I used a pin chuck and a .4mm
drill (0.018”).
The Following sections call out the fitment of various ancillaries such as levers, forks, front wheel and inner cowlings.
Finally the outer cowlings/fairings and tank/seat unit can be fitted thus covering up 90% of you hard work on the engine and frame!! But just like that P.E. instrument panel you fitted in that 1/48 Mustang last week…. No one will see it, but you know its there and that is what counts in this game.
| COLORS & MARKINGS |
Painting
Firstly you must wash the parts in warm soapy water as they are covered in a mould release agent that hates paint.
 For some reason best known to Tamiya
they have chosen to make the tank/seat in two halves and put the joint right
down the top of the fuel tank so make sure you have a really good join here or
it will stick out like a sore thumb when you paint it.
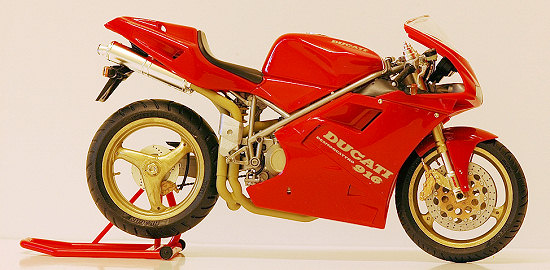
A quick search on the WWW will help identify the colours of the various components. Tamiya paint No’s are called out in the instructions as you go along but they are nearly all mixed colours and it is helpful if you can see what the colour should look like before you mix it. The bodywork is easy being Tamiya Italian (TS8) red all over! the wheels are a sort of pale gold, I used Titanium gold ( X-31) and the frame is a sort of off silver, I used Titanium silver (X-32). You will also need a gold, eggshell Black/semi gloss Black, bare metal Silver and chrome Silver.
Decals
The Decals are really basic here. Ducati logo for the fuel tank and fairing and a few sponsor type decals on some components. So…no problems there then.
| CONCLUSIONS |
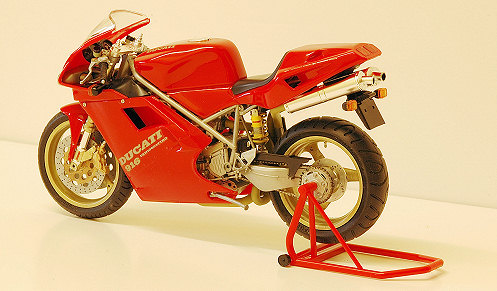 What you have here then for you £16 is a
super kit that builds in to a super bike. Tamiya have excelled themselves in
this field and I urge anyone who has not built one of their motorcycle kits to
have a go because the accuracy, detail and fit of the parts is quite astounding!
Even those with no interest in motorcycles will enjoy this build because there
is plenty of scope to add even more detail if you wished, coils, plug leads fuel
lines etc are all crying out to be fitted should you wish to display this model
without the bodywork…
This kit has no vices and I have no hesitation in recommending this as a first motorcycle build.
June 2007
If you would like your product reviewed fairly and quickly by a site that has over 350,000 visitors a month, please contact me or see other details in the Note to Contributors.