Revell 1/24 Ferrari F310B
| KIT #: | 07214 |
| PRICE: | $25.00 on sale |
| DECALS: | Two options |
| REVIEWER: | Martin McClendon |
| NOTES: | A mixed bag but can result in a nice model |
| HISTORY |
 Michael Schumacher is a
German motorsport legend. Until Lewis Hamilton tied for most wins, “Schumi” held
the record at seven Grand Prix titles in Formula 1, a feat yet to be topped. The
F310B was the result of several changes during the 1997 season, with the earlier
low-nose profile being swapped for a high-nose body after the season had begun.
The car was the first Ferrari to use a ten-cylinder three-liter engine instead
of the previous twelve-cylinder powerplants. Schumacher and Irvine raced well
that year but Schumi missed the Grand Prix title at the very end as Jacques
Villeneuve swept past him to victory (from various internet sources and the
model instructions).
Michael Schumacher is a
German motorsport legend. Until Lewis Hamilton tied for most wins, “Schumi” held
the record at seven Grand Prix titles in Formula 1, a feat yet to be topped. The
F310B was the result of several changes during the 1997 season, with the earlier
low-nose profile being swapped for a high-nose body after the season had begun.
The car was the first Ferrari to use a ten-cylinder three-liter engine instead
of the previous twelve-cylinder powerplants. Schumacher and Irvine raced well
that year but Schumi missed the Grand Prix title at the very end as Jacques
Villeneuve swept past him to victory (from various internet sources and the
model instructions).
| THE KIT |
 The kit was produced in
2000. It seems that many of these Revell Formula 1 kits were only manufactured
for short runs, and not imported to the US, maybe because F1 was not popular
here until just recently. As a result, they are hard to come by, and prices are
often ridiculous.
The kit was produced in
2000. It seems that many of these Revell Formula 1 kits were only manufactured
for short runs, and not imported to the US, maybe because F1 was not popular
here until just recently. As a result, they are hard to come by, and prices are
often ridiculous.
The kit is a mere 55 parts, with two main sprues, one in red and one black. A small clear sprue holds the windscreen and brake light, and the kit also includes vinyl/rubber tires. The decals are Revell’s “Super Decals,” they are very thin and colorful, and in perfect register. The instruction sheet is very basic.
| CONSTRUCTION |
They say variety is the spice of life. Every once in a while, I need a change from my usual favorite subject, post-Vietnam jets in 1/48 scale. For me, that means European sports cars, Le Mans and Formula One. I like them all to be in the same scale, 1/24, so even though Tamiya makes an excellent 1/20 kit of this car, I opted for this smaller Revell of Germany kit.
The kit provides an
engine. There is no option to open the body panels and view it, and it is just
as well. It’s pretty basic, most of it will be invisible, and it serves chiefly
as the anchor point for the rear suspension and driveshafts. I began
construction here, and added a few details made of scrap plastic to the rather
plain transmission casing which I thought might be slightly more visible. I
hollowed out the ends
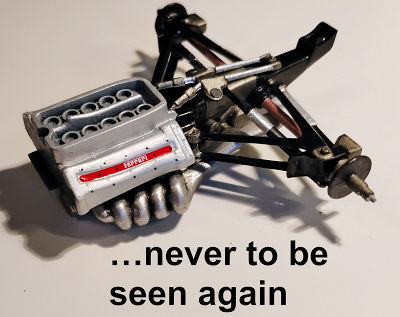 of the exhausts, which will stick out the back of the car.
All components were brush painted with various Tamiya metallic paints: chrome
silver, aluminum, and a mix of gold and metallic grey. Tamiya’s paint system
includes a “paint retarder” solution to help with brush painting. I’ll usually
mix up just enough paint for these small jobs on a palette or in a small
container, and add just a few drops of retarder. The suspension arms were
painted Tamiya’s semi-gloss black. The brake disc assemblies have no calipers
supplied, even though the instructions show them, and the decal sheet provides “Brembo”
decals for them!
of the exhausts, which will stick out the back of the car.
All components were brush painted with various Tamiya metallic paints: chrome
silver, aluminum, and a mix of gold and metallic grey. Tamiya’s paint system
includes a “paint retarder” solution to help with brush painting. I’ll usually
mix up just enough paint for these small jobs on a palette or in a small
container, and add just a few drops of retarder. The suspension arms were
painted Tamiya’s semi-gloss black. The brake disc assemblies have no calipers
supplied, even though the instructions show them, and the decal sheet provides “Brembo”
decals for them!
The cockpit is serviceable, and includes decals for the front carbon fiber bulkhead/dashboard and the various controls on the multi-function steering wheel. The interior was brush-painted Tamiya German Grey. I used the included decals for the seat belts, but they did not fit well and I had a lot of touching up to do in this area with tiny brushes inside the hollow of the seat to try and blend the decal and the molded-in belts. Finally everything was shaded with a black artist’s acrylic wash.
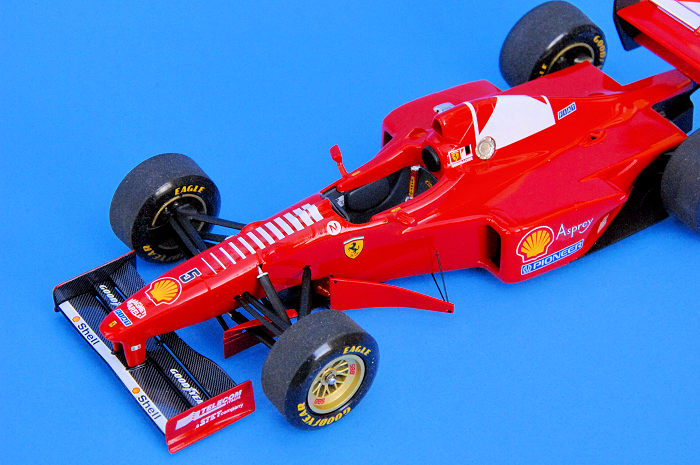
The body is built up from three sandwiched layers. The panels around the rear suspension are separately molded. Long story short: it is difficult to paint everything when there are spindly suspension arms sticking out of the body work. I decided to assemble the body in the reverse order from that described in the plans. The rear suspension panels were glued to the top of the body, not the bottom, so I could pre-paint all this, split it apart, and then squeeze the engine/rear suspension in afterward.
The top two body layers capture the cockpit and front suspension arms, with a seam running right along that area, making it hard to sand and fill. There was no way to add the suspension parts later, so I went ahead and installed the suspension arms and several smaller struts that hold the front air deflectors, then sanded and filled everything. The fuel cap and camera mounting plate are installed on the sides of the air scoop behind the driver at this point. I covered the cap with Bare Metal foil, installed it, and masked it off. The one structural difference between the Eddy Irvine and Michael Schumacher versions is the placement of the camera fairing: at this point you must decide whether to mount this on top of the air scoop or to the side.
The elevated nose of the car required careful filing, carving, and fiddling to get it to line up and to allow the nose cone seam to match up. The two layers are about a millimeter off, and needed to be squeezed and clamped into place while gluing. The cockpit coaming is molded separately along with the rearview mirrors and top of the air scoop—this was also installed before priming.
 Then all the body parts
were primed with Tamiya white fine primer from the rattle can. Multiple sanding
and filling sessions followed. Then I assembled all three layers temporarily,
without the engine, and sprayed the rear sections red, giving it two or three
pretty heavy coats. I used Tamiya lacquer spraypaint TS-3 “Italian Red,” warmed
up in a hot-water bath (it’s cold in Wisconsin). The Tamiya lacquer performed
well, and I’ll definitely be using it again for future car models.
Then all the body parts
were primed with Tamiya white fine primer from the rattle can. Multiple sanding
and filling sessions followed. Then I assembled all three layers temporarily,
without the engine, and sprayed the rear sections red, giving it two or three
pretty heavy coats. I used Tamiya lacquer spraypaint TS-3 “Italian Red,” warmed
up in a hot-water bath (it’s cold in Wisconsin). The Tamiya lacquer performed
well, and I’ll definitely be using it again for future car models.
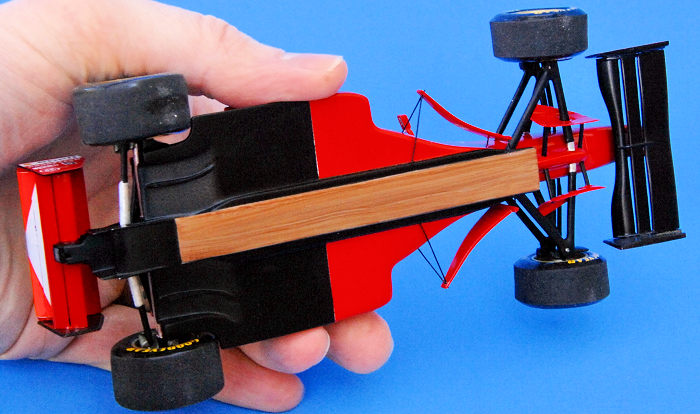
Then the body halves were popped apart again, and I hand painted the wooden skid plate on the bottom of the body with a combination of Tamiya earth tones. Later, I used Liquitex artist acrylic burnt umber and raw umber, drawing them over the surface in a wet woodgraining effect. I masked off and airbrushed the black platform that the body is built on, Tamiya semi-gloss black X-18 was used for all the chassis portions. The engine compartment floor is brush-painted aluminum.
All of these steps took quite a while as I was trying to do a clean job of it. As various layers dried between sandings and paintings, I cleaned up the spoked wheels, primed them and painted them Tamiya gold. All the wing parts were cleaned up, ejector marks filled, and then primed and painted. The one glaring inaccuracy in this kit is the main air skirts. Revell includes skirts that, according to my admittedly unprofessional research, belonged to the F310, not the F310B. I could find no photos of the F310B with these longer, thicker skirts. That’s when it dawned on me: the box top art shows the car positioned so that the front wheel is demurely covering over the side skirt, hiding the fact that it is inaccurate! I used the kit-supplied pieces but carved them into the proper shape and used very thin wire to form the attachments to the body. I drilled holes in the sides of the cockpit tub to eventually mount the skirts.
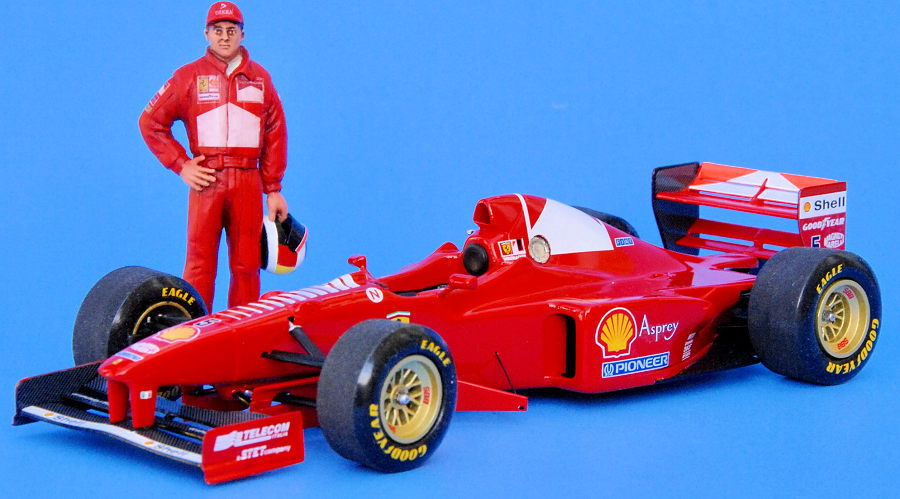
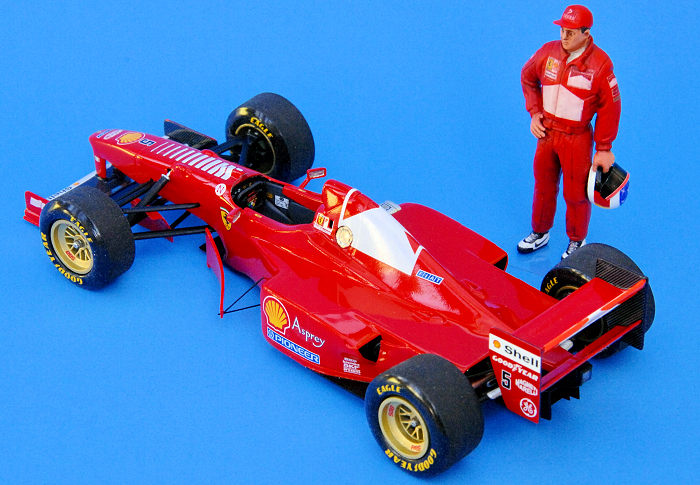
I always prefer to showcase models with a figure to portray scale and add some life. Formula One driver figures are not super common around my neck of the woods; the best ones are made in Europe and the cost to purchase and ship is steep and getting worse. I found an old Hasegawa set on a popular online auction site and ordered it. The set includes standing and driving figures and some kind of team manager. The standing figure has a very baggy driving suit, with one hand stuck in a pocket, and hair that makes him look like the lead singer of an 80’s New Wave band. This would not do. I shaved all his hair off and sculpted a baseball cap instead, and proceeded to carve away the baggy cuffs and oversized shoulders of the suit. The kit’s plastic was extremely brittle, perhaps the most brittle plastic I have ever had the misfortune to find in all the old kits I have bought. Carving, filing, and sanding was slow going.
Since I usually have only an hour a day at most to work, progress was sluggish, and somewhere into the second or third month, I kind of lost my “mojo” on this kit. Maybe it was something to do with the ill-fitting nature of the three body layers, that meant I was in for a lot of sanding and blending. I am not one to abandon a kit halfway through though, I don’t believe in having a “shelf of doom.” So I just stopped working on it for a while until the thought of it seemed fun again.
 Finally came the day I was
ready to glue all three layers together, carefully popping the engine inside the
upper shell first. Then a combination of CA and liquid styrene glues were used
to join the body halves. Upon clamping everything together, disaster struck as a
previously beautiful smooth seam cracked under the pressure. I had to quickly
unclamp and reglue the seam, and after curing this meant yet more sanding and
filling.
Finally came the day I was
ready to glue all three layers together, carefully popping the engine inside the
upper shell first. Then a combination of CA and liquid styrene glues were used
to join the body halves. Upon clamping everything together, disaster struck as a
previously beautiful smooth seam cracked under the pressure. I had to quickly
unclamp and reglue the seam, and after curing this meant yet more sanding and
filling.
As with painting anything from a house to a model car, surface preparation is everything. Masking off the whole rear of the car so the Italian Red would be preserved, I shot several more coats of white primer on the front half that revealed various divots and I spent days adding white putty, sanding with fine grits, and squinting at the bodywork under a strong light until I felt it was ready. Then I peeled off the tape, only to find that some residue had stubbornly clung to the rear deck over the engine. I had used both Tamiya tape and blue painter’s tape—the blue tape was the culprit. I tried using a little alcohol to rub off the glue, but with no luck. Distressed at the possible damage to the overall finish, I went ahead and used 1200-grit Tamiya paper and rubbed away the offending goop. Now I had scratches—but fine scratches, and I used 2000-grit paper to even them out and just hoped that my upcoming body paint would disguise them.
I masked off the engine, rear suspension portions, and the black chassis platform as well as the cockpit (no more blue tape) and laid down three more thick coats of Italian Red on the front portion of the car, as well as dusting the sanded-out back deck. To my relief, the new coats of red blended well with those already applied to the back. I waited a day or two between coats, checking in between for dust and fuzz. My 1200 and 2000-grit sandpaper worked really well to scrub those out, and was easily covered by the next coats of lacquer. Then I set aside the model for at least a week to let the finish cure. The white primer was key to a really bright red finish; in a couple of spots the primer was not as complete, and I could tell because the red in those areas looked darker. Still, if I were to paint another red sports car, I think I would go with a pink primer coat before shooting the red.
To really achieve a slick shine, I then sprayed several passes of Tamiya TS-13 gloss lacquer, building up coats. This too was then left to gas out and cure for a week or two before attempting anything else.
Meantime I continued working on the wheels and tires. I found to my dismay that one tire was short shot, and deformed. Nothing to do about it with such an old and apparently rare kit. I did sand off the mold seams on all four tires to give them a slightly used look, and installed them on the gold rims. That’s when I discovered Revell had molded an extra ridge on the inner surface of the tires that makes them fit awkwardly on the rims. I suspect they are trying to replicate the actual shape of the tires by creating a “crowned” look, but it is not altogether convincing, and seems more like a molding glitch. But I also found it would be difficult to try and cut or scrape out, and as I was already feeling unmotivated, decided to leave it. I then applied the Goodyear decals. These did not want to follow the curves of the tire faces. I daubed Pledge floor wax product onto the curling decals, patiently brushing them down for a minute or so until the Pledge cured and began to get sticky. This worked really well and I will absolutely be using Pledge in the future to tackle any stubborn decals.
With the figure ready for paint, I researched and created sponsor patch decals to place on his driving suit and the unique blue starburst design on Schumi’s helmet. He was primed with Tamiya white primer before getting several coats of Tamiya flat red with the airbrush. Then his face and hands were painted and detailed. Several coats of Pledge were applied with a brush before the homemade decals were applied. Another coat of Pledge sealed them and I applied oil washes of various dark shades to the suit and to his skin tones. This was left to cure for a week, and then I used Krylon dulling spray to remove the shine. The helmet visor was cut from scrap clear plastic sheet (Aldi salad containers are my favorite), bent to shape, and dipped twice in Tamiya “Smoke” to tint it before gluing to the helmet.
| COLORS & MARKINGS |
 I was finally nearing the
checkered flag at this point. With the lacquer coat cured, the front suspension
arms were carefully painted with semi-gloss black and the front wheels were
snapped into place.
I was finally nearing the
checkered flag at this point. With the lacquer coat cured, the front suspension
arms were carefully painted with semi-gloss black and the front wheels were
snapped into place.
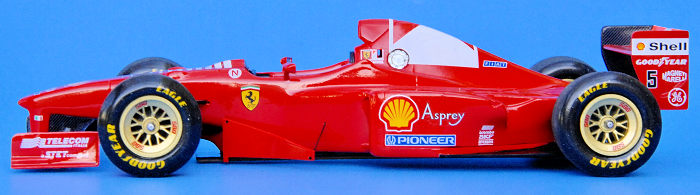
Then it was time for decals. These went on almost without issue. Revell provides large carbon-fiber weave decals for the front and rear wings. The wraparound sponsor decal for the rear wing broke apart—I should have known better than to try and bend a thirty-year-old decal all the way around the edge of the wing, but I was able to rescue it with some quick surgery, Pledge, and touch-up painting. (I bought some old-style Testors enamel day-glo orange for touching up the rear edge of the top wing. The smell of that paint flashed me back thirty-five years!) After letting the decals dry for a few days I sprayed the entire car with a 50-50 blend of Pledge and alcohol to seal them. I didn’t want to risk using the Tamiya lacquer, which might have damaged the decals, according to some online sources. My Pledge mixture was a bit too thin, and at first it beaded up over the red lacquer. I nervously sprayed over these areas again to even out the coat while still wet, and after drying the Pledge did even out quite well. The end result is plenty shiny enough for me. A few last specks of dust and fuzz had to be removed with 2000-grit paper, and I brush painted Pledge on those spots, which blended perfectly with the undercoat.
I now removed all masking tape from the cockpit, engine, rear suspension and black body panels and spent some time cleaning up glitches. Final assembly now began, using CA glue and five-minute epoxies to attach the wings, side skirts, and wheels. The wheels were designed to be free-spinning but don’t bother trying, the attachment points are too flimsy. Wheel nuts were painted aluminum and attached on the axle ends. The deformed rear wheel was installed with the defect facing downward. The bane of all car modelers is when a car will not sit evenly on all four wheels, and my Ferrari did not escape this fate. I could see that my engine installation was slightly off, twisting the body. I was able to adjust the front suspension links to help make up for it, though it is still not perfect. Last of all the brake light was attached at the back of the car, and a scrap of clear plastic was fashioned for the tiny windscreen instead of the kit part, which was supposed to be attached prior to closing up the body. The thin plastic sheet is far closer to scale appearance.
| CONCLUSIONS |
Well there you have it: luckily for you, I have spared you no detail too mundane or trivial in describing my journey with this kit. I built it so you don’t have to! I am very pleased with the first car model I have finished since about 1997. Although fit issues make for difficult assembly, the end result does a nice job of portraying an iconic racing car. Now back to all those 1/48 jets waiting in the stash!
| REFERENCES |
The internet.
Martin
McClendon 2 April
2026 Copyright ModelingMadness.com. All rights reserved. No
reproduction in part or in whole without express permission from the editor. If you would like your product reviewed fairly and fairly quickly, please contact the editor or see other details in the
Note to
Contributors.