
| KIT: | Daco/Skyline Models 1/144 Boeing 737-300 |
| KIT #: | 144-03a |
| PRICE: | $25.00 MSRP |
| DECALS: | only windows and stencils supplied |
| REVIEWER: | Ben Brown |
| NOTES: | Aviagraphics 4019 Piedmont Airlines decals used |

| HISTORY |
Boeing’s 737 family is the best-selling airliner in history. First flown in 1967, there are so many 737s currently in service that according to Boeing, there are about 1250 in the air at any given moment, with one taking off every five seconds! They have carried about 12 billion passengers, flown over 75 billion miles, and over 296,000,000 hours.
The 737 family can be divided into three groups, Original, Classic, and Next Generation. Different versions of the 737-100 and slightly longer -200 make up the Originals. This series can be identified by their long Pratt & Whitney JT8D engines.
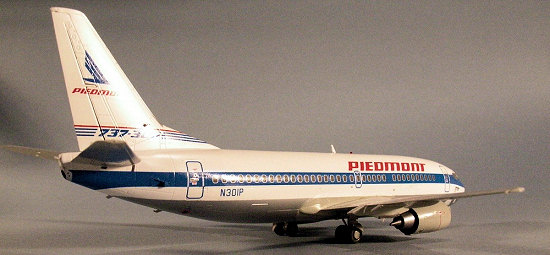 The Classics
were the first of a newer, quieter, more fuel-efficient 737. These jets had
large CFM-56 turbofan engines that were 20% more fuel efficient than the older
JT8Ds. The first of the series, the -300, was several feet longer than the
-200, and benefited from many aerodynamic improvements developed for the 757/767
program. The Classics wings have a longer wingspan and wider chord outboard of
the engines, as well as an increased horizontal stabilizer span. A fillet on
the vertical stabilizer provides better control in an engine out situation. The
series included the -400, which was a stretched -300, and the -500, which was
shorter than the -300.
The Next Generation 737s are hard to tell apart from the Classic, unless one looks at the engine intakes, which were more rounded than those on the Classics, or the tail, which is taller on the new jets. The NGs have a longer wing span and slightly taller landing gear, to provide ground clearance for the engines. NGs also can be fitted with winglets, which I was told pay for themselves in fuel savings in less than a year. These winglets are also now being fitted to Classic 737s. NGs have CFM56-7 engines, which are more efficient than the older CFM56s. The basic type is the -700, which is 9 inches longer than the -300. There is also the -600, which is the shorter version, the -800, which is the stretched -700, and the -900, which is an even further-stretched -800.
Piedmont Airlines made its first flight in February, 1948, flying a DC-3 from Wilmington, NC to Cincinnati, OH, with stops in Southern Pines, Charlotte, and Asheville, NC, Tri-Cities, TN, and Lexington, KY. Over the years, Piedmont went on to grow into the 6th largest airline in the US, with over 200 planes, and serving cities from the Atlantic to the Pacific. The airline set the standard for performance and customer service, and was consistently ranked in the top three US airlines as having the fewest passenger complaints. The company operated a variety of aircraft over the years, including the DC-3, Martin 404, Fokker 27, YS-11, Fokker F28, 727, 737, and 767. Sadly, Piedmont’s profitability and reputation for good service made it a good target for a takeover, and in 1989, the company (but not its profitable business model or high quality of service) was assimilated by USAir. Piedmont’s name is now proudly carried by the former Henson Airlines, one of the original Piedmont’s commuter airlines.
| THE KIT |
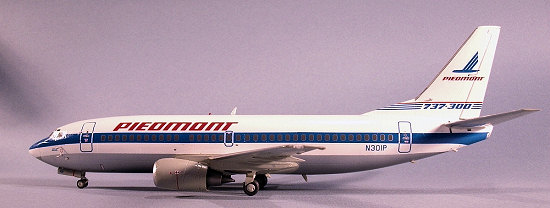 Molded in
light grey plastic, DACO’s 737-300 consists of about 100 parts, including clear
lights and a clear cockpit section in case the modeler likes clear windows on
his or her airliner. The inside of the fuselage is marked to simplify removing
the cockpit area. My kit had a slight mold mismatch on the aft fuselage halves,
where I would guess the break for the longer fuselage of the -400 would be.
Nothing a couple of swipes with some sandpaper can’t fix. The engines have full
intake ducting, and delicate fan and turbine detail. The landing gear looks
good, but the nose gear strut looks a little thick and is not as well detailed
as the Revell 737-800’s strut. The main landing gear well has good detail for
this scale, with the standby hydraulic pump and reservoir provided as a single
separate part. There are a lot of almost microscopic antennae, pitot tubes,
vents, and probes for the airframe. DACO thoughtfully provides extras, since
at least one of these parts will probably become a sacrifice to the Carpet
Monster.
No liveries are provided, but the aftermarket provides a huge list of liveries for this type. DACO does include an extensive detail sheet that includes stencils, windows, corogard for the wings, and aluminum-colored strips for the leading edges.
| CONSTRUCTION |
Construction begins with the installation of the nose gear well. There are
mounting points molded into both fuselage halves, so the well pops right into
place. I glued a couple of fishing sinkers in the radome to keep the nose gear
on the ground. I then glued the fuselage halves together. I had to go slow and
muscle a couple of joints into place, but generally, the fit was very good.
Once the fuselage was finished, I added the main gear well. This part required
a little filing on the edges to fit into the mounts molded into the fuselage,
but it eventually went where it was supposed to go. The wheel well was then
covered by another part that has the holes for the wheels. This part also fit
fairly well, but it still required some filler here and there. The rudder is
supplied as a separate part, and requires some sanding and trimming to get it in
place. It was the only real annoyance in the kit. I used a little styrene
strip and super glue to fill the spot where the top of the rudder meets the
trailing edge of the fin, but I was never completely satisfied with this part of
the kit. It would have been nice if the rudder had been molded as par t of the
tail, but I’m guessing DACO did it this way to keep the trailing edge as thin as
possible.
The lower wing halves required trimming to get them to fit into the upper halves, but once in place, only required a little filler. The upper and lower wing halves both have part of the slots for positioning the flap track fairings, but they don’t lineup on the right wing. Moving the lower wing inboard a little to line up the slots caused gaps and fit problems when then wing is attached to the fuselage, so I just removed part of the mounting tabs from the fairings. The tabs on the wings that slot into the fuselage have an interesting interlocking mechanism, as do the horizontal stabilizers.
The engine nacelles were very well-detailed, but needed some filler on all of the seams. I decided to just go ahead and attach the engines, since they needed some filler where they met the wings. I painted the fan faces dark metallic grey, and used various shades of Alclad for the intake lips and exhaust parts. I was hoping to leave the exhaust sections off of the engines until final assembly, but the way the engines go together, this wouldn’t work. I had to go to Plan B and paint the hot sections and mask them later when I painted the model.
The horizontal stabilizers fit snugly against the fuselage after some trimming. I left them off until final assembly, since they would be grey and the surrounding area would be white.
I used Squadron white putty to fill the seam down the center of the fuselage, as well as a few other seams here and there on the wings and engines. While I was sanding the seams, I took a few swipes at the static discharge strips on the sides of the radome. To my eye, these stand a little too proud on the model. I had to heat the tail in hot water and straighten it a little. I think that was due to Operator Error during construction and not a problem with the kit.
| COLORS & MARKINGS |
I think I
spent more time applying the decals to this model than I did building it. After
painting the base colors, most of the real detail comes from the decals. I
primed the model with Tamiya’s white primer, and polished it with an old paper
towel after the paint had dried for a day. I then masked the natural metal area
on the belly and hit it with a coat of Alclad Aluminum. The wings, horizontal
stabilizers, wing fairing, nose gear doors, and lower part of the radome were
painted Gunze Light Gull Grey mixed with a little gloss white. This isn’t quite
the same color as Boeing Grey, but it was close enough for me. I like using an
acrylic when I 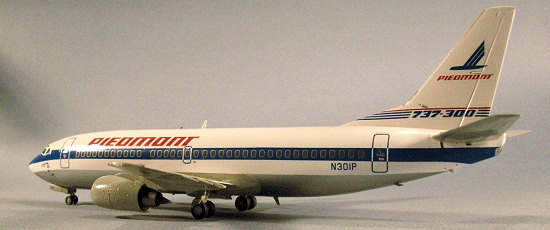 paint over Alclad so if anything bleeds under the mask, I can
remove it with a toothpick or cotton swab soaked in Windex. Enamels and
lacquers will “bite” into the underlying paint, making cleanup of any mistakes
hard to do. With the exception of the bare metal areas on the engines and the
rubber on the tires, all other “color” on the model was done using decals.
Aviagraphics Piedmont Airlines decals were intended for Airfix’s 737-200 and Welsh’s vacuformed 737-300 kits, but they work just fine on this kit. The only modifications I had to make were to increase the height of three of the four cabin doors and add some narrow strips of blue and red decal to extend the stripes on the “737-300” logos on the tail. There was also a small blank spot on top of the nose and another under the tail where the two fuselage stripes came together that were easily fixed with thin strips of blue cut from left over decal. I used some bits of blue decal to “paint” the little wedge-shaped part that helps direct air into the APU intake’s NACA duct just forward of the right horizontal stabilizer. I just placed the decals on the part, then “melted” them with Micro Sol.
The detail decals included in the
kit saved me the task of masking the corogard areas, and wing and tail leading
edges. Once they are applied, it looks like I spent hours masking and painting
the wings. The decal sheet doesn’t include cargo door outlines (not a problem
since they are already scribed into the fuselage) or the prominent grey
lavoratory service door under the right front cabin door. A similar detail
sheet made by Aviagraphics does provide these, and I happened to have a partial
sheet lying around, which saved me from about five minutes of masking. I also
managed to avoid painting the openings in the APU and air conditioning pack NACA
ducts by using little strips of black decal. All of the decals went down
without a hitch, except for the two for the natural
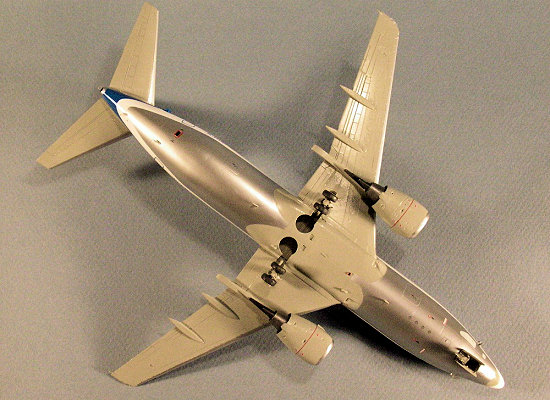 metal wing leading edges
inboard of the engines. These refused to lay down on the model, and I ended up
with a couple of creases that I couldn’t get rid of, even with an Xacto and
setting solution. DACO provides enough microscopic stencils to keep you busy
for several evenings. I used most of the major stencils, but left some of the
smaller ones off because I was beginning to get cross-eyed trying to apply
them. Besides, most of the guys in our IPMS chapter are older than I am and
wouldn’t be able to see them anyway!
I sprayed some Dark Gull Grey on a section of decal film then cut strips of it to put inside the engine intakes. This was a lot easier than trying to mask and paint the intake ducts. Many photos of 737-300s’ wings show off-white lines on the flaps that I think are nylon tape strips meant to keep the moveable parts from rubbing when the flaps are retracted. These strips are still partly exposed when the flaps are up, so I cut thin strips of white decal film and applied them to the flaps.
Once the decals were dry, I sealed the model with Polly Scale clear gloss, then gave parts of the wings and belly a thin wash to bring out some of the detail.
| FINAL CONSTRUCTION |
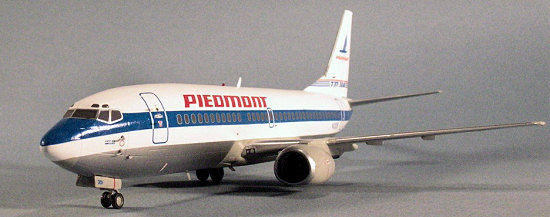 Final
assembly included adding all of the little fiddly bits, such as the engines,
landing gear, antennae, probes, and such. I had trouble with the main gear
doors, which were overly thick and didn’t fit very well. I resorted to cutting
the tops off to shorten them, so they would clear the outboard tires. It’s
interesting that the same kit that includes the microscopic Total Air
Temperature and airspeed probes doesn’t have landing gear doors that are closer
to scale thickness. The extra probes came in handy, since I managed to launch a
couple into an unknown part of the workroom. Once installed, the probes look
too large and stand too proud from the fuselage, but that’s just my own
not-quite-so-humble opinion. Looking back, I think I would have been better off
filling the holes in the fuselage and finding some 1/144 photo-etched probes
somewhere. A couple of bits of clear plastic are provided for the beacons,
which I painted Tamiya clear red, and I was done.
| CONCLUSIONS |
So,
how does this kit compare to the Minicraft offering? DACO’s is more detailed,
and the shape is spot-on. In my opinion, Minicraft just can’t seem to get the
classic Boeing nose right on any of its airliners. It’s not too noticeable,
until you set one of their 737s down next to a DACO or Revell 737 kit. The nose
is longer, more pointed, and lacks the subtle curve in its profile that is
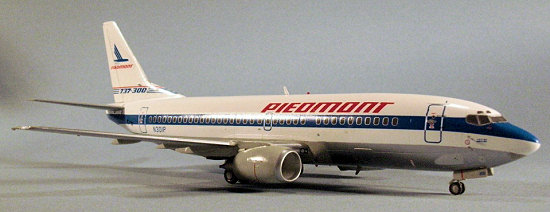 nicely-captured in the DACO and Revell kits. Minicraft’s 737-300 doesn’t have
any main gear wells or intake ducting, and it’s missing the prominent APU intake
NACA duct on the right side of the fuselage. On the plus side, it’s cheaper,
comes in a variety of liveries, and fits together better. Someone who wants the
most accurate, well-detailed Classic 737 available will spring for the DACO kit
and be very happy with the finished model. This person will probably already
have a set of aftermarket livery decals in mind for the kit, regardless of
whether or not some were already provided. The casual buyer looking for a
“weekend slammer” kit, or the kid who flew to Grandma’s on a 737 last weekend,
might be put off by the price and the lack of livery decals in the DACO kit and
will go for the “close enough to a 737” Minicraft kit.
DACO’s Classic 737 series has been hailed as some of the most accurate and best-detailed airliner kits available. They’re not Tamiya-quality in fit, more like a Hasegawa kit from ten or fifteen years ago, but that’s still not a bad thing. They are fun builds for modelers with a little experience, and hopefully DACO will sell enough of these beauties to justify producing an accurate 737-200 kit some day soon. Highly recommended!
Kit and decals courtesy of my wallet.
July 2007
| REFERENCES |
Airliners.net http://www.airliners.net/
Jet Piedmont http://www.jetpiedmont.com/
The Boeing 737 Technical Site http://www.b737.org.uk/index.htm
Airliner Café http://www.airlinercafe.com/index.php
Sources:
Airline Hobby Supply http://www.airline-hobby.com/
Joy Decals http://www.joydecals.com/
If you would like your product reviewed fairly and quickly by a site that has nearly 400,000 visitors a month, please contact me or see other details in the Note to Contributors.