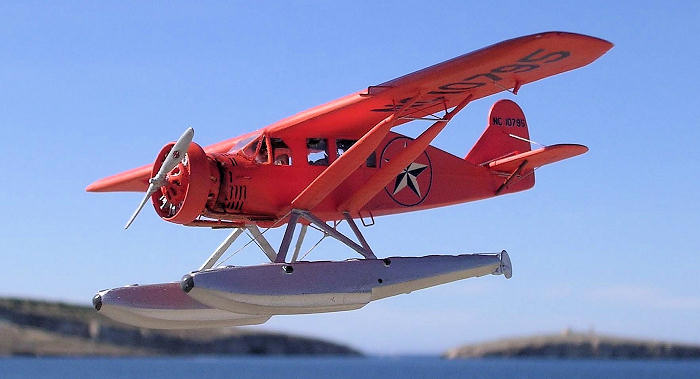
Khee-Kah 1/72 Bellanca CH-400 Skyrocket
| KIT #: | ? |
| PRICE: | $? |
| DECALS: | None provided with kit. |
| REVIEWER: | Carmel J Attard |
| NOTES: | Vacuform and resin parts. |

| HISTORY |
The interesting
origin of the Bellanca aircraft takes us back to March 19th 1886
where in the village of Sciacia in Sicily was born Peppino aka Giuseppe Mario
Bellanca. He received his secondary education at the Instituto Technico di
Milano where he earned his education certificate to teach Mathematics. At 24 he
earned a degree in maths and engineering from the Politechnico di
 Milano. It was
the period that followed that Giuseppe along with two partners built his first
plane. This was destroyed in the first flight. His second plane never flew
because the partners could not afford an engine for it. In 1911 he and his
family moved to the
The Bellanca CH-400
Skyrocket evolved from the CH-300 Pacemaker. The Skyrocket was originally
intended to be more a ‘sporting’ plane for the wealthy customers who demanded
speed as well as comfort even during the Great Depression. Its superior
performance also attracted the attention of commercial operators and Skyrockets
soon found their way into some of the more demanding airline routes and into
| THE KIT |
 Bush planes fall into
a class of aircraft of their own. Some of the early types, of the 1920s and 30s
era are among the emerging range of kits issued by Khee-Kha Art Products of
 seating pieces, and
instrument panel. Other smaller items like strut for floats, control surfaces
links, have to be scratch built possibly from the surplus backing styrene which
is soft and ideal to work with. The instruction insists that only liquid cement
is recommended and that in the event of over trimming of parts these can easily
be corrected with same scrap styrene and little liquid cement.
| CONSTRUCTION |
Parts were first
highlighted with a pencil and the vacform parts separated with a sharp knife
breaking along edges of parts. Trailing and leading edges of wings are straight
and a straightedge was used to guide cuts. Parts and scrap pieces were then
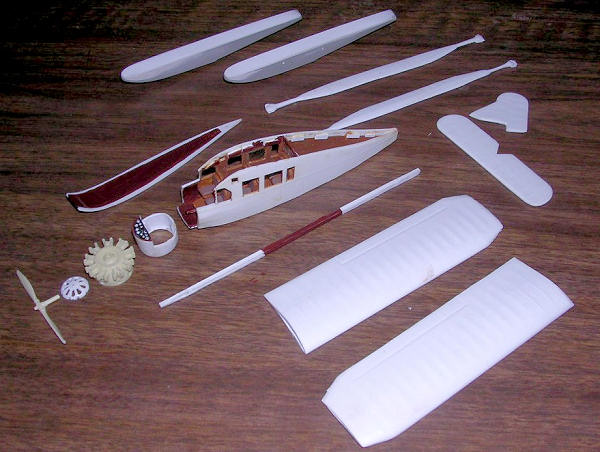 stored in separate containers. Fuselage sides were cut, these were made from 4
parts and their edges were cleaned on a sanding board. Wing trailing edges and
tail parts and airfoil struts needed extra attention. All edges were trimmed
close to level of backing sheet’s surface with a hobby knife followed up with a
coarse sandpaper before final smooth sanding of all mating surfaces on medium
grit sandpaper.
The instruction recommends a stepped guide piece, which I found very useful to assist in marking spacing of reinforcing strips. Window openings and wing spar cutouts were drilled and cut to shape. The kit supplies sufficient clear acetate but I preferred to apply Kristal Kleer at a later stage for the window panels. The roof of the cabin is curved and to assist this shape to be retained I added short reinforcement strip pieces with spacing in between using the guide. The front louvered accessory section made of three separate panels were then cut and glued together. This was tested for fit to the rest of the fuselage. There is a roof skylight, which I left closed on my CH-400. Once satisfied with fit and alignment of parts I proceeded with detailing the interior.
Seats and instrument
provided were fixed and fitted in place followed by careful painting. Instrument
panel was beveled at 45 degrees around its top edge and was glued to the 3-piece
accessory section. The interior colours I used were tans and browns with black
instrument panel. A section drawing and a picture in the instructions showed the
seating arrangement with respect to the windows. This was referred to during
fixing of the cabin compartment. The accessory section sub assembly was joined
to the fuselage using short reinforcing strips. Scoops and vents were installed
according to scale plans. Clear windshield that comes with the kit was carefully
cut with a pair of scissors and fitted using white glue; any excess cleaned
using a dump cloth. The
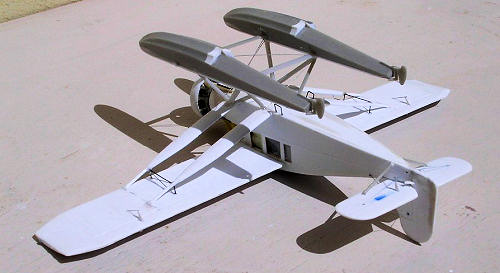 cantilever wings were now slid onto the wing spar. The
wing underside just cleared the top edges of the doors. The spar was of square
section made out of scrap plastic in two laminated constructed strips.
Using the plans reference I installed the short cantilever struts at
forward strut locations. This added strength to the wing fuselage joint. The
engine speed ring was now sanded at its edge and cut as per instructions and the
engine inserted inside.
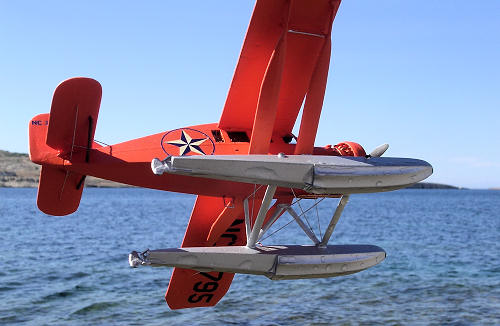
As I opted to do the
floatplane version of the CH-400 I followed advise from Lars Opland himself of
Khee Kha Art Products on how to go about producing a suitable set of floats a
type of float that differed from the Edo design. I used a set from the Academy
Beaver kit and modified the 58-4580 twin floats into a Xa-5400 suitable for the
Skyrocket. This involved adding a 0.040inch thick slab to stern of each float
and extend step aft. (Several exchanges of e-mails with Lars gave me the
impression that there is a vast classification of Float design and types and an
expert advice proved to be very helpful)
The 0.040-inch is a styrene strip that goes full length of deck. This was
then trimmed flush with sides after gluing. The bow and stern of float was filed
down to original deck, gently rounded to full thickness centered just forward of
step. Struts were then made from Contrail strips. The struts at 1/72 scale were
25mm apart and aft mount is 6.5mm behind step. The ‘N’ shaped strut arrangement
was mounted on float close to edges. Reference was made to photos of these
floats.
With the floats fixed to the aircraft my attention then went to fitting all the control surfaces links and wires as well as bracing wires that strengthen the floats assembly. These I made from 0.01mm steel wire cut to required lengths and glued in lace.
| COLORS & MARKINGS |
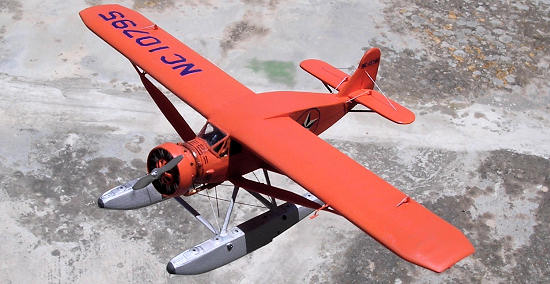
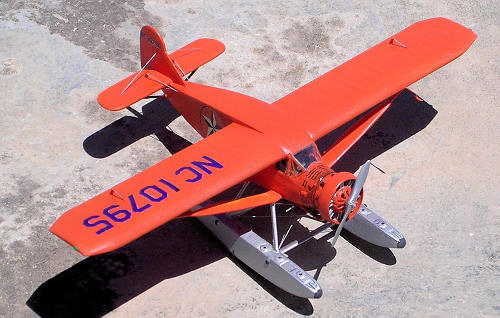 Being attracted
by the bright international orange overall finish of the CH-400 I opted to
do the CH-400 in Whisky Jack special decal, issue AK 7203. The Bellanca
Skyrocket was well known as a bush plane in far away cold
The decals are printed on a solid carrier film and are un-coated so care will be needed when cutting out individual designs. It is also recommended on the decal instructions to apply a clear coat of Future over the decal before work begins. The decals went on very smoothly on the model. Kristal Kleer was in the end applied to the window apertures.
| CONCLUSIONS |
It is
not often to come across a review of a kit by a cottage industry that goes to
some detail. All that the construction entails is mentioned and I am well in the
process of building its predecessor the CH-300 Pacemaker as the final result of
this build turned quite pleasing. It was a different category of models that I
am normally accustomed to build. I highly recommend this kit to all those
floatplane owners/modelers who frequent the lakes up north far away in
| REFERENCES |
 All reference
material issued by Khee-Kha Art Products, and special thanks to Lars Opland for
sending it for reference.
October 2009
If you would like your product reviewed fairly and quickly, please contact me or see other details in the Note to Contributors.