| KIT: | |
| KIT #: | 04712 |
| PRICE: | £12.00 |
| DECALS: | Three options |
| REVIEWER: | Patrick Barratt |
| NOTES: |

| HISTORY |
The Tiger Moth
trainer prototype was derived from theGipey Moth DH 60. The main change to the
DH Moth series was necessitated by an effort to improve access to the front
cockpit since the training requirement specified that the front seat occupant
had to be able to escape easily, even wearing a parachute Access to the front
cockpit of the Moth predecessors was restricted by the proximity of the
aircraft's fuel tank directly above the front cockpit and the rear support
struts for the upper wing. The solution adopted was to shift the upper wing
forward but sweep the wings back to maintain the centre of lift. Other changes
included a strengthened structure, fold-down doors on both sides of the cockpit
and a revised exhaust. It was powered by a de- havilland gipsy III 120 hp engine
and first flew on October 1931
From the outset, the Tiger Moth proved to be an ideal trainer, simple and cheap to own and maintain,
The RAF ordered 35 dual-control Tigermoths which were designated the DH60T. A subsequent order was placed for 50 aircraft powered by the de havilland Gipsy I engine (130hp) which was designated the DH 82A tigermothII. The Tiger Moth entered service at the RAF Central Flying School in February 1932 By the start of the Second World War, the RAF had 500 of the aircraft and large numbers of civilian Tiger Moths were impressed to meet the demand for trainers.
During a UK production run of over 7,000 Tiger Moths, a total of 4,005 Tiger Moth IIs were built during the war specifically for the RAF,
Canada manufactured 1,523 of the DH 82C, which had a 145 hp D.H. Gypsy Major 1C engine and other modifications including a tail wheel replacing the original tail skid, a stronger undercarriage with wheels set farther forward and and enclosed cockpit with a sliding canopy necessitated by the northern climate.
| THE KIT |
The kit comes in the Standard Revell end-opening box and consists of
approximately 100 parts although not all would be used, as several variations
are possible. The Manufacturer presumes you will build a military version and
instructions are supplied for a DH82A, UK version and a fully enclosed cockpit
DH82C Canadian version. In addition the Canadian version has the option of skis.
Also supplied is a set of floats but no mention of these is made in the
instructions but it does look like all the parts are there but I
 can’t be sure.
You are also, thoughtfully supplied with a couple of pilots and a mechanic (with
an impossible task) One minor criticism would have to be the thickness of the
wind shields which look like 3” armoured glass…but as they are so basic it would
not be out of the question to make a new pair of your own a little more to
scale.
Also supplied is a spool of cotton thread for the rigging that if used would be way out of scale I suspect.
As 90% of surviving civilian Tiger Moths are ex military it is really up to you how you choose to finish your version.
Tiger Moths were not very big and while it may seem obvious to some, don’t expect a large kit, even at 1/32 it is slightly smaller than a 1/48 Swordfish.
It should also be pointed out at this stage that this is a 30 year old kit and was always intended to be a fun model and not a museum standard display exhibit! As such, it has a few short comings with some detail, elevator horns, cockpit doors, wind shield frames and so on, being rather on the heavy/thick side, these are problems that could be easily addressed by an experienced modeller I will leave that decision to you, should you find these supplied parts out of keeping with the rest of the kit.
| CONSTRUCTION |
Construction is
straight forward and the sequence of 60 steps called out in the instructions
seems fairly comprehensive and the order of construction seems reasonable. I
think the detail level is quite adequate but I have seen others criticize this
aspect of the  kit but only in previews and I was unable to find a review on line
so I take this criticism with a pinch of Salt. Certainly with two large open
cockpits on view and liftable engine covers, there is ample opportunity to show
off you scratch build skills with some super detailing should you feel the need.
Cockpit doors can be posed open or closed, as can be the engine cowlings.
Where this kit excels is in its rigging. The instructions are very comprehensive and show you how to rig a by plane in a simple but effective way.
The wings come in
eight parts, two lower and two upper both in two parts each.
Construction is called out so that you assemble the two lower half’s of the
upper wing to the fuselage and the to upper parts of the lower wings to the
fuselage. What you have then is the four halves of the wings fitted and at this
point you can do the rigging. You will need a small drill to open a few holes (I
used a .3mm drill as I was using .275mm nylon fishing line). The rigging lines
can be fed through the holes in the wing halves and glued on the inside before
fitting the other half of each wing, thus making all the attachment points
invisible. I certainly recommend anyone who is not confident with rigging to
give this method a go and this could be the ideal kit to practice on.
The fit of all the parts is good and the surface detail about right I would say. The preview I read said that the engine cowlings looked as if they would not fit but with patience and some dry assembly, I had no problems.
| COLORS & MARKINGS |
 Decals
for three military options are supplied: 1943 RAF No5 Glider training school,
1940 No6 Elementary flying school RCAF, 1947 Netherlands army Air force.
They seem of reasonable quality although I should add I did not use them.
This is a great
opportunity for those of you who like different paint schemes and get bored
doing the STD camo paint jobs. There are literally hundreds of Moths still
flying around the world in civilian hands and consequently the sky is the limit
when it comes to finding a suitable set of colours. If you’re in the UK, a quick
trip down to your local airfield will almost certainly find you a Moth to photo
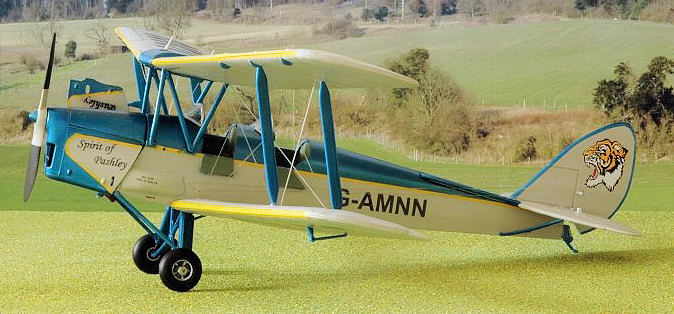
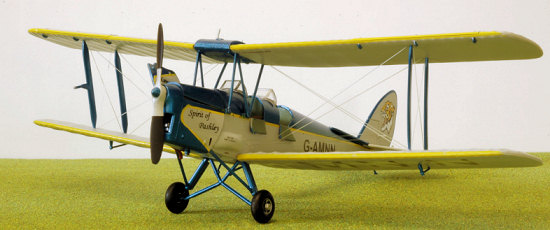
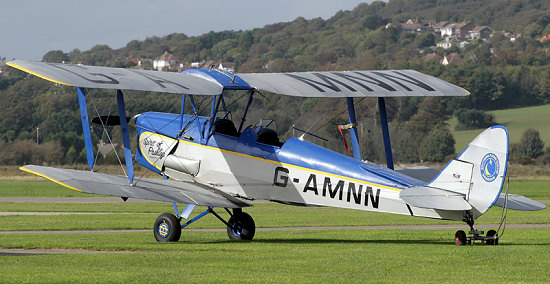
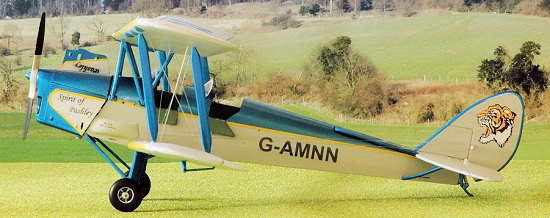
for reference. I chose G-AMNN (loosely) that lives at Shoreham on the UK south
coast partly because it’s local and mainly because it seemed like a simple
enough colour scheme to replicate on to the kit. The logo “Spirit of Pashley
refers to Cecil Pashley having instructed at the f orefront
of Shoreham Airports aviation activities form 1911 to retirement in 1964,
amassing over 20,000 hours instructing pilots of both world wars. The multitude
of original paint schemes means this part really can be as easy or difficult as
you wish to make it. (Coincidentally, Shoreham airport is the UK’s oldest
surviving civil airport and still has a magnificent Art-Deco 1930s main
building/departure lounge/control tower.
I used Tamiya spray cans here and some Tamiya masking tape, as there are no feathered edges to worry about. AS16 USAF Grey, TS 54 Blue and TS 47 Yellow
I printed off my own registration decals using BMF clear decal paper and an STD ink jet printer. The Tiger’s head on the tail seemed to fit in here and came from the spares box, an Italian Tiger meet SEPECAT Jaguar if I remember correctly.
| CONCLUSIONS |
I didn’t really know what to expect with this kit, the previews were unfavourable, the Revell name and cheap price tag did not bode well in its favour. The fact that it is a re-hash of the old Matchbox kit did not help either.
 I have to say I
was very pleasantly surprised! The fit of the parts is as good as I have seen,
The surface detail/fabric wings looks the part and the opportunity to super
detail is there should you so choose.
I like to build from the box for reviews so that inexperienced or born again modellers can see what they are getting in the package without extra expense but any detailing here would be scratch and thus free! The only mod I did was to add a couple of seat cushions, made from flattened rolls of 10mm Tamiya masking tape and dipped in Tamiya dark brown, to the basic metal pan seats.
I suppose that in summing up I would have to say, this is the first time I have built a kit and felt that I would like to build another just the same straight away because I know I could do better next time and this is one of those kits that says “ come on then, show me what you can do”, I suspect you will reach your own limitations before you reach the limitations of this kit ……….. I did, and is that not what many of us are looking for in a model?
| REFERENCES |
http://www.glue-it.co.uk/aircraft/de%20havilland/dh82a/index.html
http://en.wikipedia.org/wiki/De_Havilland_Tiger_Moth
PS If you couldn’t find the £10,000 for a flight in the subject of my last review, (EE Lightning F6) you could always have a go in one of these for £99
And it maybe almost as much fun!
Chocks away!
August 2007
Copyright ModelingMadness.com. All rights reserved. No reproduction without express permission.
If you would like your product reviewed fairly and fairly quickly, please contact the editor or see other details in the Note to Contributors.