Hasegawa/Airmodel 1/72 F9F-8T Cougar
|
KIT #: |
? |
|
PRICE: |
11 euros for each kit |
|
DECALS: |
None supplied with the conversion |
|
REVIEWER: |
Carmel J.
Attard |
|
NOTES: |
Airmodel F9F-8T conversion kit No.49 |

 Developed from the single seat
F-9F8 the last squadron of which, VMCJ-3, converted to Crusaders in 1960, the
first F9F-8T flew in
August 4, 1956
and the 399th and last fighter-trainer of the type was delivered to
the Navy on
February 2nd 1960.
In addition to training the F9F-8T can be used as a fighter. It carries two 20mm
cannons mounted in the nose out of the 4 carried by the single seater.
This was the only member of the F9F8 family that had two seats and served
as a trainer. The lengthened fuselage allowed for the second cockpit. The F9F-8T
was fully retired from service in February 1974
after being replaced by the TA-4 Skyhawk.
 The 1/72 scale model of the single
seat F9F8, a Hasegawa model, although it lacks some detail normally expected out
of Hasegawa I still used this kit for the triple conversion for an F9F-8T issued
by Airmodel. This vac form conversion also contains camera nose extensions to
make the early reconnaissance F9F-6P and F9F-8P. The A4 size instruction sheet
contains two side views suggesting Cougar liveries associated with two different
types namely F9F-8T in Blue Angels aerobatic team livery and an F9F-8P of VFP-61
USS Shangri-La 1958. There is also a partial plan view and also a side view and
partial plan for an F9F-6 and F-7, which have narrower wing chord than later
variant. However all the drawings and conversion details are not to a scale of
1/72 and therefore gives only an indication of the arrangement. I resorted to
scale plans from Aviation News Vol. 17 No. 15, issue January 1979.
 This is not a complicated kit
conversion and the vac-kit is still available direct from
www.airmodel.de
from where I got mine. In fact I found that this could also be an opportunity
for anyone to make a start on vac form kit building. This is the way forward
that one can build something authentic and out of the ordinary.
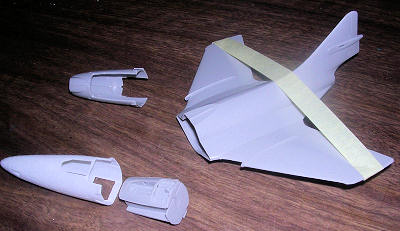
The kit forward fuselage is first
parted with an exacto saw blade as shown in the instructions scrap view, which
is a vertical line ahead of the air intake. The main 2-seat vac form canopy
transparency for the F9F-8T is then first trimmed from excess acetate backing
using a pair of scissors.
The vac
form forward fuselage parts is also cut and sanded and glued together. The nose
wheel well aperture and air brake area were cut with a sharp trimming blade. The
Hasegawa kit parts namely the wheel well and lower front fuselage; the forward
cockpit bathtub and instrument coaming detail is added and inserted into the
one-piece forward fuselage for the 2-seat version. The back seat area was
scratch built using plastic card pieces and a spare seat added. Two control
columns were fixed in place. A rear cockpit windshield was added. This was made
from a piece of acetate bent to shape and fitted at front of second seat. In a
small compartment inside the nose I encased lead weight pieces so that the kit
will counter balance on nose wheel, ensuring a non tail-sitter. The interior was
painted in light grey while instruments were in shades of black and grey. I also
added some interior detail utilising parts from the Airwaves accessories AC72116
for the Cougar.
 With the forward fuselage of the
injected kit removed the two rear halves were glued together. The two sub
assemblies were then fitted together forming a complete fuselage. The tail pipe
was then assembled in the rear of the fuselage, including the arrestor hook.
Pilot figures were painted in accordance to Hasegawa instructions. Ejection seat
handles were added to top of each seat. The new cockpit canopy was carefully
trimmed with a sharp knife until the best sit fit was achieved. I also noticed
that the Airmodel vac canopy was a bit proud at the rear and so I sanded this
area as much as allowable giving it a better appearance when glued in place with
Kristal kleer. Areas requiring a little filler at the joining of the fuselage to
nose section were attended to and sanded smooth. Two guide rails for the
rearwards sliding canopy were added in form of two narrow strips cut from a
narrow piece of plastic card.
 Going through Steve Ginter book No
68, which deals with the Cougar twin seat version, was creating a difficulty to
select one colourful scheme to finish my model, as there are so many to choose
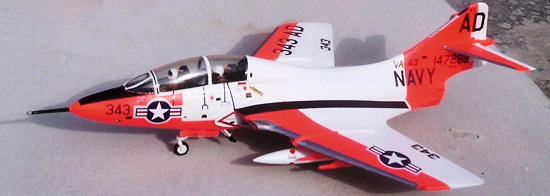
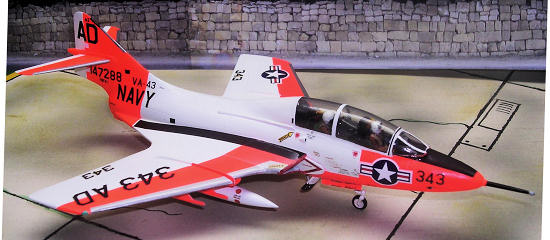
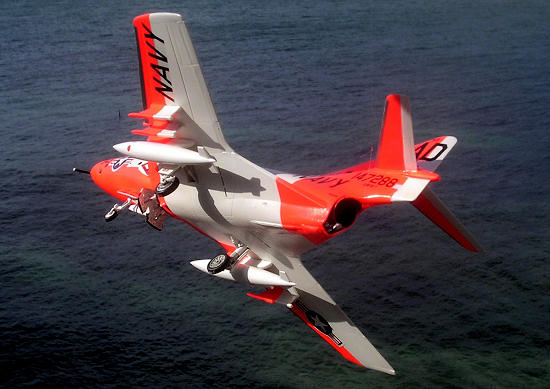
from. My choice in the end fell on F9F-8T Bu No. 147288 of Attack Squadron VA-43
“Challengers”. The squadron provided replacement pilot training for both the
Tiger and the Skyhawk. VA-43 only trained 8 Tiger pilots before retiring the
F11F-1s. The Squadron then took a new mission, which was to take over instrument
training mission VA-44. On 1st June 1973 VA-43 became VF-43. I used
Model Master paint mainly semi gloss white and Fluorescent red FS 28195.
Lettering decals came from Aero Master decal sheet 72-011. Insignia came
from Super Scale decal sheet with star and bars.
I added white outline to star and bars by first fixing decal on white
decal sheet and cut periphery allowing a white outline. I finally gave the model
a coat of Johnsons Klear.
Another trainer aircraft added to
my collection. This was a kit build recommended to those who want to try their
hand at a model conversion giving pleasing results.
Steve Ginter book No
68.
Carmel J. Attard
December 2011
If you would like your product reviewed fairly and fairly quickly, please contact the editor or see other details in the Note to
Contributors.
Back to the Main Page
Back to the Review
Index Page


 Developed from the single seat
F-9F8 the last squadron of which, VMCJ-3, converted to Crusaders in 1960, the
first F9F-8T flew in
  The 1/72 scale model of the single
seat F9F8, a Hasegawa model, although it lacks some detail normally expected out
of Hasegawa I still used this kit for the triple conversion for an F9F-8T issued
by Airmodel. This vac form conversion also contains camera nose extensions to
make the early reconnaissance F9F-6P and F9F-8P. The A4 size instruction sheet
contains two side views suggesting Cougar liveries associated with two different
types namely F9F-8T in Blue Angels aerobatic team livery and an F9F-8P of VFP-61
USS Shangri-La 1958. There is also a partial plan view and also a side view and
partial plan for an F9F-6 and F-7, which have narrower wing chord than later
variant. However all the drawings and conversion details are not to a scale of
1/72 and therefore gives only an indication of the arrangement. I resorted to
scale plans from Aviation News Vol. 17 No. 15, issue January 1979.
 With the forward fuselage of the
injected kit removed the two rear halves were glued together. The two sub
assemblies were then fitted together forming a complete fuselage. The tail pipe
was then assembled in the rear of the fuselage, including the arrestor hook.
Pilot figures were painted in accordance to Hasegawa instructions. Ejection seat
handles were added to top of each seat. The new cockpit canopy was carefully
trimmed with a sharp knife until the best sit fit was achieved. I also noticed
that the Airmodel vac canopy was a bit proud at the rear and so I sanded this
area as much as allowable giving it a better appearance when glued in place with
Kristal kleer. Areas requiring a little filler at the joining of the fuselage to
nose section were attended to and sanded smooth. Two guide rails for the
rearwards sliding canopy were added in form of two narrow strips cut from a
narrow piece of plastic card.