| KIT #: | 005 |
| PRICE: | £6.00 |
| DECALS: | options |
| REVIEWER: | Carmel J. Attard |
| NOTES: | Vacuform kit |
| HISTORY |
The
Pilatus P2 was designed for operation from high altitude Alpine airfields
and is of exceptional rugged construction. The Pilatus P2 first entered
service as a multi-role trainer 54 years ago. The design utilized many
parts from scrapped Bf109
 fighters that were then in service with the Swiss
AF. These included the complete undercarriage. There were two production
series, each comprising of 26 aircraft which were built as P2-05 and P2-06.
The kit was built to represent a P2-06 version. This was one of the
surviving examples, which fulfilled miscellaneous roles. The primary
training role was later passed on to the Pilatus P3-05, which although
entered service ten years after the P2 is now of age as well. For a period
of time both the P2 and the P3 flew alongside each other.
fighters that were then in service with the Swiss
AF. These included the complete undercarriage. There were two production
series, each comprising of 26 aircraft which were built as P2-05 and P2-06.
The kit was built to represent a P2-06 version. This was one of the
surviving examples, which fulfilled miscellaneous roles. The primary
training role was later passed on to the Pilatus P3-05, which although
entered service ten years after the P2 is now of age as well. For a period
of time both the P2 and the P3 flew alongside each other.
Pilatus P2-06 also served as armament trainers carrying a light machine-gun and equipped with racks for bombs or rockets projectiles. The P2 is powered by one 465hp Argus As 410A-2 engine, inverted 12 cylinder type, incidentally it is the same power plant fitted to the Arado 96 and Avia C-2 hence the close resemblance to the forward fuselage area of the Pilatus P2 to these two German and Czech trainer aircraft.
| THE KIT |
The 1/72 scale model of the Pilatus P2 is a vacuform kit made by Hallamvac and is the only one of its type released in kit form. For those modellers whose early attempts with vacform kits may have been a disappointment then this is the chance to complete a vacform kit with good results. It is a rather simple scale model to assemble.
| CONSTRUCTION |
The
Pilatus P2 parts are beautifully vacform moulded with reasonable surface
detail, which is as good as a high quality injection-moulded kit. As with
every vacform kit great care is needed when marking the parts with a sharp
pointed pencil. This is then scored with an Xacto knife and finally snapped
from the retaining backing sheet o f plastic. The white vacform plastic, out
of which the kit is made, is thick enough to withstand the subsequent
handling during rubbing down of the kit components. A white plastic sheet
contains most of the major components as the fuselage halves, main wing
parts, (lower and upper wing halves) and tailplane parts and engine cowling
front. There is also a very clear cockpit canopy made of acetate sheet.
Other intricate parts such as the propeller, wheels, wheel legs, and wheel
well doors are all made up of white metal. Fine detail to wheel hubs,
propeller, webbed spinner and undercarriage doors are worth noting. Other
small, parts that come with the kit are the two seats, instrument panels
(two in number) and a cockpit floor which is produced in vacform plastic.
In spite of the small size of these items, I could cut them and shape them
to conform to the correct appearance with no difficulty. Accurate 1/72
scale plans are provided with the kit, but an exploded view of all these
components depicted in near assembly configuration could have further
simplified sequence of a rather easy construction (see figure)
f plastic. The white vacform plastic, out
of which the kit is made, is thick enough to withstand the subsequent
handling during rubbing down of the kit components. A white plastic sheet
contains most of the major components as the fuselage halves, main wing
parts, (lower and upper wing halves) and tailplane parts and engine cowling
front. There is also a very clear cockpit canopy made of acetate sheet.
Other intricate parts such as the propeller, wheels, wheel legs, and wheel
well doors are all made up of white metal. Fine detail to wheel hubs,
propeller, webbed spinner and undercarriage doors are worth noting. Other
small, parts that come with the kit are the two seats, instrument panels
(two in number) and a cockpit floor which is produced in vacform plastic.
In spite of the small size of these items, I could cut them and shape them
to conform to the correct appearance with no difficulty. Accurate 1/72
scale plans are provided with the kit, but an exploded view of all these
components depicted in near assembly configuration could have further
simplified sequence of a rather easy construction (see figure)
One
small drawback is that there are no photos or drawings supplied with the
kit and it is understood that feature of type of review will make good
whenever such information is lacking. A year ago I was visiting Duxford, UK
and was able to photograph a couple of examples. Some other aspects
concerning the scale model is that the undercarriage wheel wells need to be
cut out in order to expose the wheel well located under each wing which
also  yearns
for some additional detail. My idea was to follow the construction lines
that appear on the outside skin of the wings and add shallow webs that
correspond on the inside. These are made out of stretch sprue cut to small
lengths.
yearns
for some additional detail. My idea was to follow the construction lines
that appear on the outside skin of the wings and add shallow webs that
correspond on the inside. These are made out of stretch sprue cut to small
lengths.
Another shortcoming is that no decals are supplied with the kit. And one has to improvise from those spare ones found in other kits such as the Italeri Me-109 or use ESCI decal sheet for Swiss roundels. The engine cowling mentioned earlier is an important delicate part and care had to be taken to open the front orifice of the air intake. The cowling was then blanked from the inside in order to avoid any see through effect. The white metal parts needed the barest minimum of filing at the edges or joint lines of the small components. Other fine detail that needed to be added by the modeller were: an antenna aerial which is fixed on the leading edge of the port wing; two tiny hollow exhaust tubes under the front nose area just ahead of the wing leading edge; and ‘U’ shaped foot step to port of fuselage. There is also a tiny air intake on the front nose and a small fairing also on the forward fuselage. Six small actuator parts are then added to the flaps to conform to the drawing.
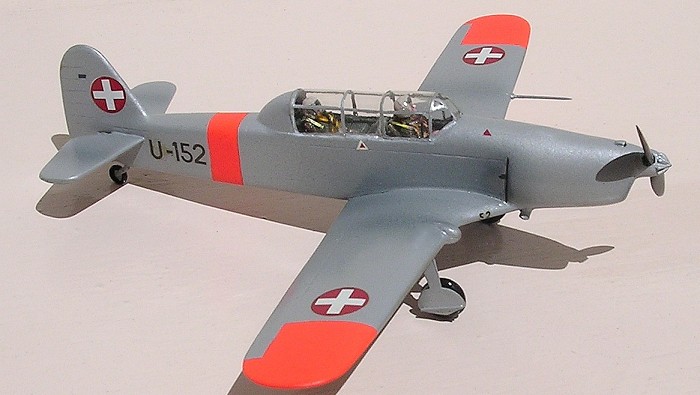
| COLORS & MARKINGS |
 The
kit was given a light grey undercoat once the cockpit canopy was masked
with Maskol first. Any scratches or other deformities that needed putty
were remedied. Basically only an area around the main wing roots needed
some putty work. The kit was then given a coat of white matt paint in each
area requiring Day-Glo patches, i.e. aft fuselage, and main wing tips. When
the white areas dried thoroughly Day-Glo paint was then airbrushed. The
width of these areas were then measured and carefully masked so that the
model is given a final coat of paint mix consisting of 10% light grey with
90% Humbrol silver. When this dried and set completely all the masking on
the Day-Glo areas were removed. I must admit that this is a step in the
modeling sequence that gives so much satisfaction and shows the sudden
progress in the process of model making and I have no doubt that many modellers share the same views. The Model was finally given an overall thin
coat of semi gloss varnish. Thin airbrush spray of 50% engine grey and 50%
varnish were added to any areas prone to stain with exhaust and weathering.
The
kit was given a light grey undercoat once the cockpit canopy was masked
with Maskol first. Any scratches or other deformities that needed putty
were remedied. Basically only an area around the main wing roots needed
some putty work. The kit was then given a coat of white matt paint in each
area requiring Day-Glo patches, i.e. aft fuselage, and main wing tips. When
the white areas dried thoroughly Day-Glo paint was then airbrushed. The
width of these areas were then measured and carefully masked so that the
model is given a final coat of paint mix consisting of 10% light grey with
90% Humbrol silver. When this dried and set completely all the masking on
the Day-Glo areas were removed. I must admit that this is a step in the
modeling sequence that gives so much satisfaction and shows the sudden
progress in the process of model making and I have no doubt that many modellers share the same views. The Model was finally given an overall thin
coat of semi gloss varnish. Thin airbrush spray of 50% engine grey and 50%
varnish were added to any areas prone to stain with exhaust and weathering.
This was yet another vacform kit addition to my collection of a popular trainer aircraft yet not so common in kit form.
July 2005
Copyright ModelingMadness.com
If you would like your product reviewed fairly and fairly quickly, please contact the editor or see other details in the Note to Contributors.