| KIT #: | 16250 |
| PRICE: | $25.00 when new |
| DECALS: | One option |
| REVIEWER: | Christopher Campbell |
| NOTES: | Probably the best of their initial offerings. |

| HISTORY |
One can easily analogize the Avro CF-100 to the Northop F-89 Scorpion in both form and function. Both were twin-jet-powered interceptors designed for all weather operations. Both were designed in the early days of the Cold War, work on the Canuck starting two years after the Scorpion in 1950. Likewise, it would enter service two years later in 1952. Both would use a mix of gun and rocket armament in service, though unlike the Scorpion the CF-100 would not carry guided missiles. Both served in front line roles for around a decade, though the CF-100 would find a second lease on life as a recon and electronics warfare aircraft until finally being put out to pasture in 1981, twelves years after the last F-89 was retired from Air Guard service.
While tested with Rolls Royce Avon jet engines, later prototypes and service aircraft would be powered by Avro Orenda powerplants. This made the Canuck a truly Canadian design and to date, the only mass produced Canadian designed and built fighter. With over 7,500 lbs of thrust each in its production form, the Orenda combined with the aircraftís broad straight wings gave it a short takeoff run and good rate of climb at over 8,700 ft. per minute.
Service ceiling was 45,000 ft with a range of 2,000 miles. Top speed was just over 550 miles per hour. All in all, this was a promising interceptor with a long range and potential loiter time for vast expanses of the Canadian North that it would be tasked to defend.
With a ventral gun pack of eight .50 caliber Browning M3 machineguns with 200 rounds per gun, the CF-100 packed a punch. Rocket pods could be fitted to the wingtips, each with 29 2.75Ē Mighty Mouse rockets, the same rockets also carried by the F-89D and H models. Long range wingtip fuel tanks could also be fitted and were often carried. Underwing bomb racks were tested, and the aircraft was evaluated in a strike role (including in the U.S.A.F. competition that would ultimately lead to the acquisition of the Canberra), though in service, it would be almost exclusively an interceptor.
The initial prototypes as well as the first production variant, the Mk.3, would feature a gracefully tapered nose, unlike the more bulbous types of its Mk.4 and Mk.5 successors that would amount to the bulk of production. This change was due to the addition of the more powerful Hughes APG-40 radar also carried by the F-89 from the D version on as well as the F-94C Starfire.
 One
-hundred-thirty-six Mk.3ís would be produced followed by over 300 of the Mk.IV
version, which could in some ways be called the definitive version. The Mk.5
would superced it, up engine with improved Orenda engines with greater thurst.
Its wingspan would increase by 88Ē allowing it a higher service ceiling
exceeding 50,000 feet. However, it would dispense with the gun armament, relying
only on the twin rocket pods on the wingtips with a total of 58 unguided
rockets, a somewhat questionable decision.
Over three-hundred of this final variant would be built, however, including fifty-three that would serve with the Belgian Air Force from 1957-1964. Belgium would be the only foreign operator of the type. In Canadian service it would retire from frontline service in 1963 as CF-101 Voodoos and CF-104 Starfighters replaced them (rather than the brilliant and striking CF-105 Arrow, though that is quite another story for another time). A few would go on to serve in the electric warfare role, some as late as 1981.
One unique feature of the Canuck worth mentioning are its anti-icing slingers fitted to the front of the engines to prevent ice accumulation on the intakes and possible damage to the compressor blades. Looking like miniature propellers, the CF-100 was, to my knowledge, the only aircraft ever to sport these. Given the frigid climate in which they would operate, this was likely good forethought.
Another interesting side note is that in another parallel to the F-89, a swept wing variant was proposed, the CF-103. Similarly, Northrop had proposed a swept wing F-89 variant. While the F-89 proposal never progressed beyond drawings, the CF-103 actually made it to the mockup stage. However, with the promising CF-105 on the horizon, nothing ever came of it.
Six-hundred-ninety-two CF-100ís of all variants would be produced. It proved to be an excellent aircraft in service, well liked by its crews for its good handling and reliability. It was no speed demon, though unquestionably fulfilled its design role, and then some, serving for nearly thirty years. Numerous aircraft are preserved in Canada, one in Belgium, one in the U.K., and three in the United States. I had the pleasure of seeing the one at the Museum of the United States Air Force in 2005
| THE KIT |
Hobbycraft began their somewhat odd run in the kit manufacturer world with what were unquestionably knockoff kits derived from copying kits from other manufacters. These were mostly Monogram such as the F-82 Twin Mustang in 1/72, and 1/48 Ju.87G and F4U-4 Corsair, among others. These were oddly analogous in quality to the Kitech offerings two decades, many of which would ironically be the knockoffs of former Hobbycraft molds.
Their kits were molded in South Korea by Academy, but the company was based out of Canada. Accordingly, many Canadian subjects would subsequently be offered and most notably, aside from the long out of production box scale kits form Aurora, the only injection molded kits of the Avro CF-100 Canuck and CF-105 Arrow. This created a bit of a stir at the time, especially among Cold War obsessed modelers such as myself.
They would go on to offer numerous kits of aircraft never before kitted as injected models in 1/48 and a number of unique 1/72 offerings as well as 1/144. What exactly happened to the company is a bit murky. It has been alleged that there was a dispute with Academy over the ownership of some of their molds, especially some of their better ones such as the Boeing P-26 Peashooter. Indeed, quite number of kits that were originally released by them seem to be in the hands of Academy now and have been released numerous times. This was, even more oddly, before they ceased production of existing kits or offering new ones.
The plug seems to have abruptly been pulled on the company around 2010, after they had released their 1/32 Allison-engined Mustang series and 1/48 F9F Panthers. More kits were announced, notably a 1/32 Jumo-Powered Messerschmitt Bf.109B/C/D series, which they had previously kitted earlier in 1/48. Yet these never appeared and existing kits dried up practically overnight. While Academy seems to have some molds and it is rumored that Italerie had others, many kits have never reappeared, most notably the Avro jets.
 Released in
1989 as a CF-100 Mk.5, in 1990 the kit was revised with earlier type wings and
released as CF.100 Mk.4. Scaled down versions of the same molds were used to
create 1/72 kits of both aircraft as well. The kit is reasonably well detailed
and comparable to the 1/48 Monogram jets of the day. It nicely features engraved
rather than recessed detail, though somewhat on the heavy side.
The canopy is clear and fits well, though is made to be displayed closed unless and enterprising modeler wishes to perform some minor surgery and scratchbuilding. The cockpit is not quite as detailed or accurate as a corresponding Monogram kit of the period, but passable with the canopy closed, for the most part. As with most modern kits, it is made to be built gear-down only. However, posing mine with the landing gear doors closed presented no problems.
The landing gear bays are sparse in detail. This is the area in which most Hobbycraft kits, good or bad, are the weakest. In most cases, these are rendered mostly as closed off pits of the correct shape, but lacking anything in was of detail.
Decals are provided for R.C.A.F. aircraft. Later releases of these tend to have decent decals, while earlier offerings are often out of register and/or very thick. However, the ones that I used for this build were the kit decals and worked out well, though a considerable amount of Solvaset and patience was used.
The only part in this kit that I would fault in particular was the pitot tube. It was the only part of the kit that I would call poorly done, plain and simple. What you get looks rather like jousting lance for what would be around a 1/55 scale knight and nothing like a pitot, at least no pitot that I have ever seen.
The instructions are well printed enough, though typical of Hobbycraft instructions of this period and accordingly are a bit vague at times in their illustrations and one very noticeable error. Still, anyone who can follow basic instructions and has a little modeling experience should have no problems.
Mine was a first-generation kit and at the time I was aware of no aftermarket decals, so I had to go with what I had. The sheet looks a bit questionable, as the film looked to be on the thick side. Some of these that I had seen were printed out of register, though mine was not. Based my experience with the kit decals, I will not lambast them as some have. My general experience with Hobbycraft decals has been that they often turn out to be better than they look in these early kits, though I will stop short of endorsing them.
One notable omission is the lack of the quite visible and distinctive ice slingers. I failed to notice this until it was too late to correct practically. However, I did come up with an idea to replicate these in future builds.
Overall, it is a bit of mixed bag, but unquestionably a kit with good bones as such that can be built up very nicely by any modeler with a little experience. With some aftermarket resin and/or photoetch, or scratchbuilding, it has a fair bit of potential. I have seen numerous beautiful builds online, though the ones that I have built have been the only ones that I have seen in person.
| CONSTRUCTION |
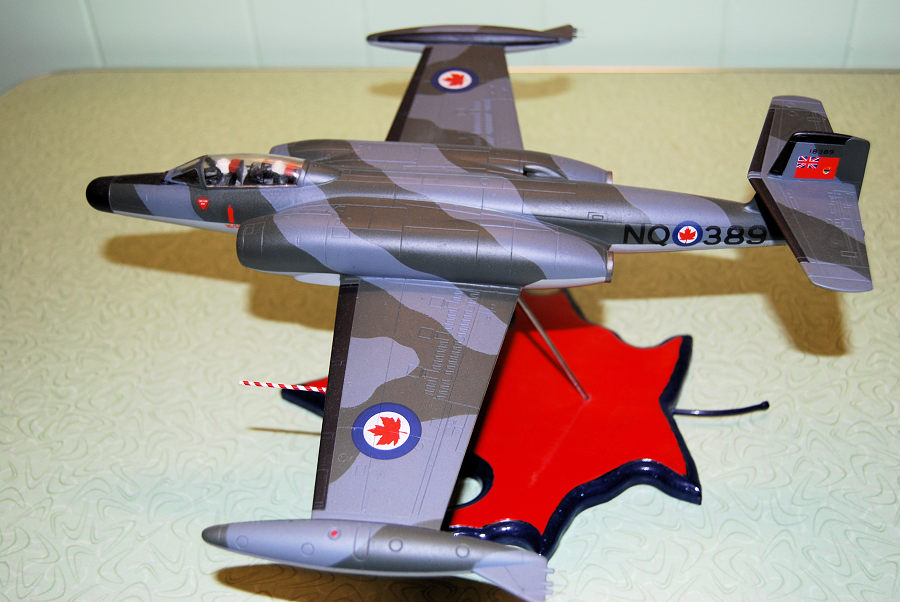
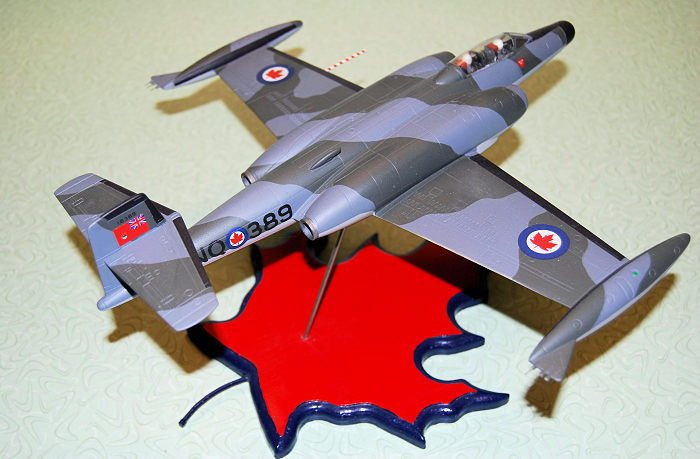
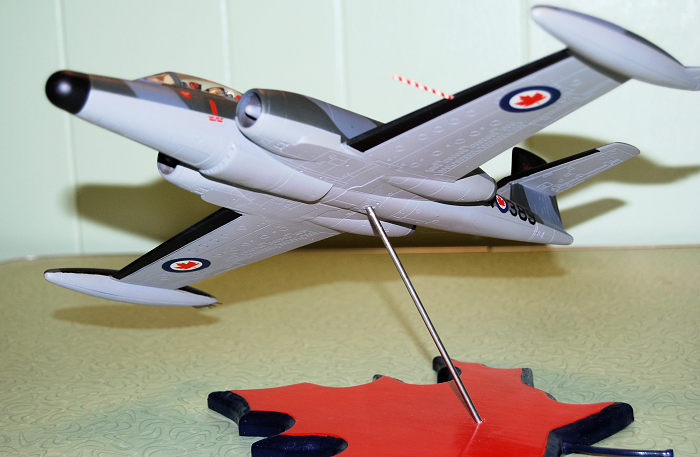
One look at the kit in the box told me that it would be a reasonably easy and straight forward build. I liked the lines of the aircraft in flight, so from the onset I planned to build it with the gear up. My only concern was how well the landing gear covers would fit. Additionally, I would need a stand, which was an interesting story in its own right.
My recently then retired father had just gotten a new Delta scroll saw when I decided to build this model in 2003. I asked him if he would cut a wood base for stand in the most appropriate shape of a maple leaf. He happily obliged and by the next evening when I came over to work in my own workshop after work, I found that he had made a beautiful base painted bright red and trimmed in blue with a large finishing nail inserted and curved for the leaf stem and painted blue. I had barely started on the model but was inspired to finish it as soon as I could, as I really wanted to see it in flight above this striking base. Thanks, Dad.
I started the build with the cockpit, as usual, painting everything in Model Master Flat Black. The instrument panels were drybrushed with Testorís silver and various details there and in the cockpit picked out in red, yellow, or green. Seats were painted in Testorís Flat Grey and Flat Black where appropriate, with the headrests painted in Flat Red. The pilot figures were painted in relatively standard Olive Drab for their flight suits with boots and gloves in Flat Black, straps in Medium Green and helmets in Flat White. Testorís rubber was used for the oxygen masks while the visors were given a green tint buy using Testorís Beret Green thinned with mineral spirits brushed over gloss black. Some drybrushing was done to accentuate detail.
The cockpit was assembled and glued in place in the fuselage, though the pilot figures were left out until later. Also left out for now was the internally mounted emergency windscreen for the weapons system officer, a.ka. Guy in Back Seat. The attachment of this is not exceptionally well defined. However, getting a proper alignment proved to be no problem.
The air intakes are drop in pieces as well as the as
the exhausts and preclude the nasty see through effect still found in some kits
of this period. The intakes feature decently rendered turbine wheels and had not
noticeable defects or moldd marks where it would show. The exhausts are somewhat
odd looking, made almost like plumbing elbows. However, they provide a very
positive alignment, so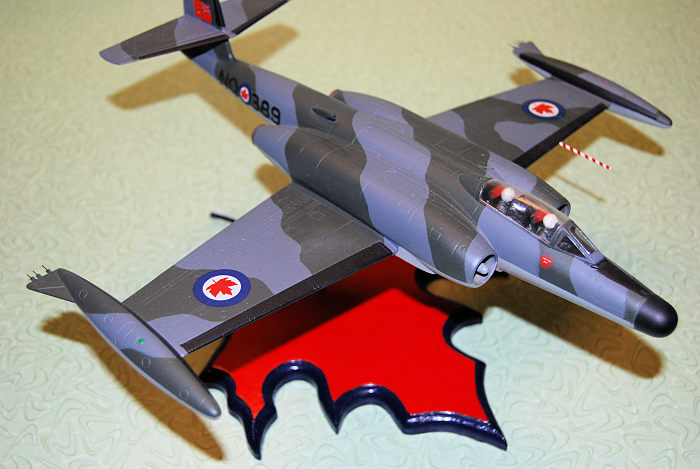 no complaints. Both were sprayed with Model Master Dark Anodonic Grey (I really
miss this paint. It was my go-to for so many things. Now down to just one and
half bottles. Sadness.) and glued in place with CA glue.
The main landing gear bay is a separate assembly to be installed before closing the fuselage. I was not 100% certain that closing up the gear bays was going to work as planned and, in any case, I would need this part in order to properly seat the doors. This was glued in place with a hefty bit of thick CA glue. Then the fuselage was closed up with the same glue and went together nicely. No filling was needed, and the seams were easily dealt with by sanding with 320 & 400 grit sandpaper followed by 0000 steel wool.
The aft fuselage and tail are a separate assembly and these were also glued up and sanded in the same manner, again with no significant issue. While the instructions would have you attach them at this point, I elected to set this aside for the moment, preferring to attach it once the wings were completed.
The wings were glued up and required only minimal sanding. The wingtip tanks were also assembled, and again, the fit was quite good. The only problem was the plastic rods on the after part of the tanks (I presume that these are representations fuel dumps or static eliminators). These are fragile and almost impossible to get through the build without breaking. I hit upon a plan to deal with that , though.
The tanks were glued to the wings and have positive alignments. There was some minor filling needed and this was done with Squadron White Putty smoothed with nail polish remover on a Q-tip. This was sealed with thin CA glue and buffed out with 0000 steel wool.
I now tested the fit of the landing gear covers and found it quite good. These were glued in place with CA glue and I was quite pleased that my project would go as planned. The forward section of the gun pack was glued in place as well as the nose cap and needed only minor sanding in both cases.
At this point I attached the aft fuselage and tail assembly, having test fitted it earlier. Again, this went on well and any filling needed was done with CA glue and sanded down in the same manner. Lastly, the airscoop on the upper aft fuselage was glued in place. **NOTE** the instructions show that this should be glued on facing backwards, as though it is an exhaust. It should face forwards, so keep this in mind. Now it was time to paint.
| COLORS & MARKINGS |
The instructions show good views of the aircraft and the camouflage pattern as well as the correct paint colors. The cockpit, intakes and exhausts were stuffed with damp paper towel bits. I began by spraying the nose, glare shield area, wing and tail plane leading edges, and tip tanks with Model Master Flat Black.
Once this was dry, I masked off the noise cap and glare panel with low tack painterís tape. The deicer boots on the wing and tailplane leading edges were also masked and this proved quite easy, as the panel lines are well defined and it is a simple matter to wrap them accordingly and trim the tame with an X-acto knife. The antiglare panels on the wing tip tanks were also masked off without difficultly.
The underside was then sprayed with Model Master Medium Sea Grey. When dry, this was masked off as well. The upper surfaces then got a coat of Model Master R.A.F. Dark Green. While this was drying I set about cutting my masks for the camo patter from wide, low tack blue 3M Painters tape. These were applied, followed by the final color Model Master Dark Sea Grey.
When all of the masking was removed, I was quite pleased to find that I had one of the cleanest camo paint jobs that I had done to date. Almost no touchup was needed. Before applying the decals, I would deal with the fuel dumps/static eliminators and the pitot.
The former was solved by drilling out the opening for all three in each tank with an appropriately sized fin bit in a pinvise. I happened to have some dark grey anodized metal rod that was just the right size. This was clipped to the appropriate length with a pair of diagonal cutting pliers, the ends sanded smooth, then glued in place with CA glue. The result was very nice, about as close to perfect as I could have hoped for.
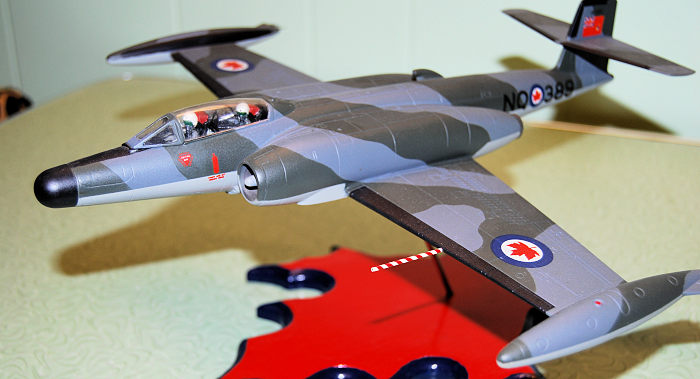 The pitot
was made from very thin brass tube. After cutting it to length, it was sprayed
in Testorís Flat Red. While this was drying, I drilled out an appropriately
sized hole in the correct place with a pinvise. A thin strip of painterís tape
was then cut with an X-acto and painstakingly wrapped around the red painted rod
after which it was sprayed in Model Master Flat White resulting in a nice barber
pole effect. Once dry, it was glued in place with CA glue.
The whole thing was then given a coat of Model Master rattle can Gloss and set aside to dry. I then began trimming the decals from the sheet, hoping that they would work, as I had no alternatives if they did not. Happily, they did.
These were applied using Solvaset, an despite looking a bit thick, though possibly fragile, they settled down nicely, conforming to every line and quite surprisingly, with no silvering to speak of. The only place that I had an issue with silvering was with the red oxygen bottle marking on the port side of the nose below the cockpit, and this was minor. After they were well cured the entire model was given a coat of Model Master Dullcoat/Flat and set aside once more to dry.
| CONSTRUCTION CONTINUES |
This was the first kit that I had built up for an inflight stand that had never been intended for one. In retrospect, I should have addressed this in advance. However, this went off with no problems, being accomplished my drilling out a mounting hole with a bit of increasing diameter until I had an appropriately sized opening. A piece of polished stainless-steel rod would be used for this and was cut to what seemed like an aesthetically pleasing length.
I had some concerns about the base possibly needing weight to compensate for the large model. However, the broad footprint of the wooden maple leaf that my father had cut proved to be enough to compensate for this rather large model. I drilled out the base with a mounting hole for the rod at an angle that I liked and had a perfect fit for a perfect base.
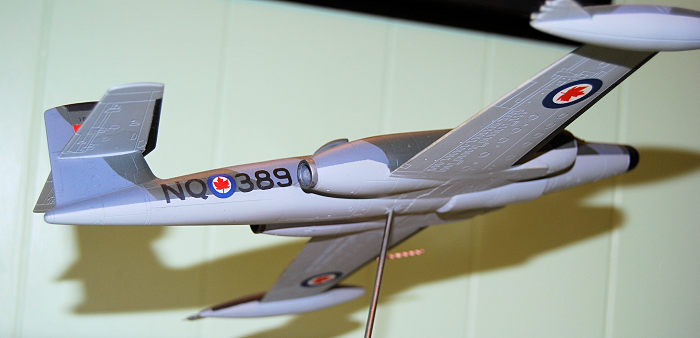 Running
lights were painted in Testorís red and green. The canopy framing was hand
painted in the appropriate colors and set aside to dry while the pilot figures
were glued in place with a drop of thick CA glue. Then the internal windscreen
was glued in place with a small amount of CA glue. Once dry, the canopy was
glued in place as well, this time with good, old fashioned Elmerís Glue All.
Sadly, it was at this point that I suddenly noticed that the anti-icing slingers had not been included in the kit. I tried to think of a solution, but quickly realized that there would be no way to attach anything that could represent this with any reasonable hope of success at this point. This was the only thing that I will truly fault with this kit. They are, after all, a very noticeable and unique component of the CF-100.
I have an old, bagged Aurora CF-100 in my kit stash that I plan to build as an inflight, late prototype in that gorgeous glossy black finish. Also, I hope to build a 1/48 Mk.5 Canuck at some point, if I can acquire one. Since neither feature these parts, my tentative solution will be to drill through the intakes and the spinner hubs with a pin vise. Then I should be able to insert an appropriately cut bit of metal rod and glue it in place to simulate this component. Sealing of the hole in the side walls of the intake should then prove reasonably easy. Since the Aurora kit is on my short list to build, I will write a subsequent review and note how this turns out.
| CONCLUSIONS |
While it is a very early Hobbycraft kit, this was a remarkably trouble-free build. I had no trouble at all with any part of this kit and I was pleasantly surprised with the decals. I have always liked the Canuck and tend to think of it as the Canadian cousin of the F-89. In that I have something of a fixation with the Scorpion and the Cold War in general, that I would have a fondness for the CF-100 goes without saying.
These kits are getting hard to find and accordingly pricey when you do. Still, I would recommend to anyone who wants a decent representation of a CF-100. Is it perfect? Nope. Yet, neither is it the dog that some would like to characterize it as. I built mine more or less straight from the box and took a 2nd place with it at the only show where I have entered it. More rewarding, I enjoyed watching numerous individuals looking at it with surprise and saying things like ďCool Clunk! Never say that built before. So, I will openly endorse this kit, saying without reservation that it is no dog. It can unquestionably be improved upon but builds up easily and with few issues for any modeler with a modicum of experience. Now if someone would just locate the molds and release this now seemingly lost kit once again.
| REFERENCES |
CF-100 Canuck Canadian Profile, Aircraft No.3 by Jim Lyzun, SMS Publishing, 1985
Combat Aircraft by Bill Gunston, Salamander Books, 1977
https://en.wikipedia.org/wiki/Avro_Canada_CF-100_Canuck
https://www.youtube.com/watch?v=VTSRRmcOaT8
Christopher Campbell
1 June 2023
Copyright ModelingMadness.com. All rights reserved. No reproduction in part or in whole without express permission from the editor.
If you would like your product reviewed fairly and fairly quickly, please contact the editor or see other details in the Note to Contributors.