Alley Cat 1/48 Vampire F.3
| KIT #: | ? |
| PRICE: | £45.00 (about $70.00) |
| DECALS: | Four options |
| REVIEWER: | Tom Cleaver |
| NOTES: |
Resin kit with photoetch and white metal |

| HISTORY |
 To reduce
thrust loss for the single engine ‑ later known as the Goblin ‑ the design
centered around an egg‑shaped aluminum‑ surfaced fuselage (which had a wooden
basic structure) with the rear control surfaces on twin booms to either side of
the fuselage; this allowed for a short exhaust pipe which reduced thrust loss.
While the design looks strange today, at least two
contemporary German jet fighter projects used a similar layout.

| THE KIT |
 The Vampire was first produced as a 1/48 kit some six
years ago by Classic Airframes, with the first release being sadly inaccurate,
though later releases were corrected in shape and outline details.
This new resin kit by Alley Cat Multi-Media Kits, a
brand of A2Zee Models, is one of three Vampire kits recently produced, with the
Vampire F.Mk1, and the T.11 trainer to follow in coming months.
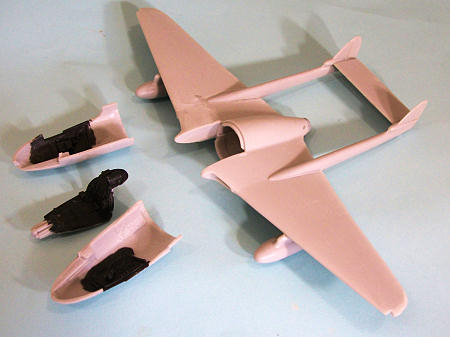
As with many resin kits, there is a low parts count and an excellent casting with beautiful surface detail. All flying surfaces are thin with sharp trailing edges. First rate decals are provided for four different aircraft flown by 73 Squadron RAF and 601, 604 and 614 Squadrons, RauxAF in the early 1950s. All are in the “high speed silver” finish, with traditional RAF and RauxAF squadron markings. The two piece canopy is a beautiful bit of clear resin casting, as are the wingtip navigation lights. The landing gear legs are cleanly cast in white metal.
| CONSTRUCTION |
 There is a bit of flash to clean up and parts need to be
taken off their casting blocks, but this should present no problem for anyone
who has ever built a resin kit before.
The kit design is very “modeler friendly” and assembly
is so easy that a test-fitting session turned into the construction session as
the kit whispered “build me....”
The cockpit parts were painted black and I used Airscale
Decals for the instrument panel.
The Bakelite resin seat was painted with Tamiya Hull Red
to simulate Bakelite, with Red Brown for the leather seat back.
After the photoetch Sutton harness was fitted, the seat
was installed and the cockpit glued into one forward fuselage half.
The metal weight provided for the nose had to be cut
down and filed to fit the nose compartment.
The forward fuselage was then glued together and the
other two weights were slid into position under the cockpit floor.
The tail booms, rudders and horizontal stablizer were
glued to the main fuselage-wing casting, with the tail cone cleaned out and
thinned to allow the resin exhaust pipe to slide into position.
 The forward fuselage was then glued in position.
I used C-A glue to fill the centerline seam of this
part, and the joint of the forward fuselage to the main casting.
Test-fitting the canopy revealed that the canopy does
not mate perfectly to the windscreen.
If you are going to pose the canopy open, this does not
present a problem since the poor fit won’t be obvious.
I ended up sanding down the forward edge of the canopy
to get the “blown” appearance; this was sanded out with micro-mesh and then
polished, and the canopy was then dipped in Future.
With this, the canopy fit perfectly to the windscreen,
thus preserving the lines of the airframe.
I would note here that a close up photo I ran across
shows that there is no metal frame for the leading edge of the canopy, which is
molded plexiglass and slides into a recess in the bow of the windscreen.
I then glued the drop tanks in position and attached the
white metal elevator mass balances and glued the gear legs in position so the
model could sit up for painting.
| COLORS & MARKINGS |
 I applied a nice thin coat of Tamiya “Flat Aluminum,”
thinned 50-50 and misted on, then gave the model a coat of Xtracrylix Satin
varnish, which gave a final finish that closely approximates the finish of the
“high speed silver” lacquer with which the original aircraft were painted.
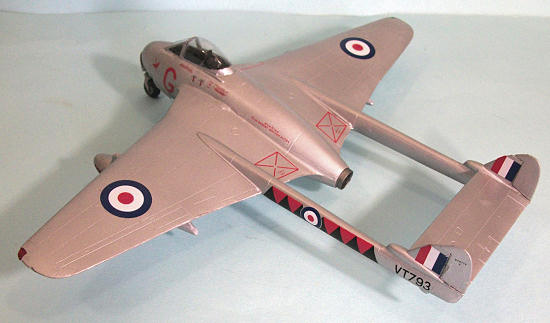
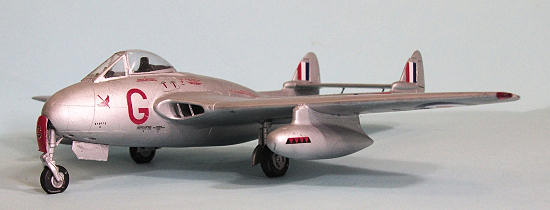
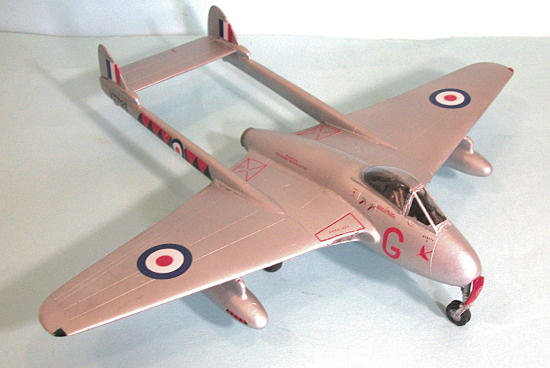
I did VT793 of 601 Squadron, the box art illustration.
The very nice Alley Cat decals went down under a coat of
Micro-Sol without a problem.
| CONCLUSIONS |

Thanks to A2Zee
Models for the review kit.
Order yours at
If you would like your product reviewed fairly and fairly quickly, please contact the editor or see other details in the Note to Contributors.