| KIT #: | 4801 (Brigade conversion) |
| PRICE: | $ 39.95 (Brigade), $51.95 (Hasegawa) |
| DECALS: | Three options with Brigade kit |
| REVIEWER: | Patrick Earing |
| NOTES: |

| HISTORY |
After the Second World War, with widespread sales of the Spitfire to
newly liberated countries, Vickers Supermarine believed that there was a
potential market for a two-seat trainer version of the aircraft.
Designated type 502 by the company, a mk VIII from ex
RAF stocks was rebuilt as a prototype two-seat training aircraft as a private
venture in 1946.
The original cockpit was moved forward 13 ½ inches and a second
cockpit, slightly raised, was added immediately behind.
Each cockpit was fitted with jettisonable sliding hoods,
duplicate instruments and controls.
The size of the forward fuselage fuel tank was reduced
to provide room for the changes required by the cockpits and was offset by the
addition of two additional fuel tanks in the wings replacing
 the 20-mm
cannons.
The aircraft retained both of the outer Browning rifle caliber machine
guns as well as all underwing attachment points.
Designated Spitfire T.8, the prototype spent the next
five years as a demonstration aircraft to a number of air forces including a
demonstration at Baldonnel for the IAC in June of 1950.
Due to insufficient numbers of Spitfire mk VIIIs being
available, Supermarine instead acquired twenty Spitfire Mk IXs for further
two-seat conversions.
Designated company Type 509 these Spitfire conversions
became the Spitfire Tr.9, and saw ten delivered to India, three to Holland, one
to Egypt and six to the IAC.
The Air Corp’s involvement with the type commenced in 1950 when an
urgent requirement was identified for an advanced training aircraft to replace
the Miles Magister II’s which had been withdrawn from service due to scarcity of
spare parts.
Following an evaluation of a number of aircraft types by the Air
Corps to fulfill this requirement, the Department of Defense ordered six
Spitfire Tr.9’s with specialist tools and ground equipment for a total cost of
£71,502.
These aircraft were to be delivered to the Air Corps in 1951.
The first two Tr.9s (Nos. 158 and
159) were delivered to Baldonnel by Air Corps pilots on
 By
1960, four of the remaining five Tr.9s were withdrawn from use.
The last operational flight by a Spitfire in service
with the AIC occurred on
Beginning in 1963 the remaining Tr.9 airframes
were sold by the Department of Defense. Three of these aircraft were purchased
exclusively for the filming of the movie
| THE KIT |
The Brigade conversion consists
of a pair of low pressure injection molded fuselage halves, a lower front center
wing bottom panel, rudder and tail assembly, instrument panel and seat, clear
injection molded canopy, large fold out instruction sheet and decals for
multiple versions from two different users; Ireland and the Netherlands.
Attachment points are large as is typical with limited
run kits and there is also a considerable amount of flash.
Internal detail is soft and panel lines are fair but
consistent and overall fit is excellent.
The Hasegawa kit has been reviewed here by Scott Van Aken and can be studied in detail at this link.
| CONSTRUCTION |
I never intended to build a
model of this variant of the Spitfire.
In fact, I actually find the two-seater, well, odd.
That tacked on second canopy just isn’t how a Spitfire
is supposed to look… and this has been rooted deep in my airplane-mania as my
very first airplane magazine WAY back in 1974 featured one of the flying two
seaters used for the filming of (I believe) the movie Battle of
 Britain.
I thought they looked ‘wrong’ then and I still feel this
way today.
However, despite my ‘feelings’ about the subject I like to build
challenging models; odd balls outside the mainstream, and lately have I have
taken up building kits by themes to further that end, and for 2012 I have been
focused on aircraft of the Irish Air Corps where the Spitfire T.9 was a staple
for many years.
Even though I knew that the T.9
was used by the IAC, I was not really interested, for all of the reasons listed
above in building one-until… A review of the Brigade conversion set appeared in
Modeling Madness earlier this year (you can find Mr. Reynolds excellent build
review
here.
Huh… a conversion existed, and a quick search on line showed that
it was still available from Hannants in the
Shortly all the boxes arrived and
I opened things up to take stock.
Having recently been on a Spitfire bender (I got within
two (mk XII and Mk 21) of having all the Griffon powered Spits on the shelf) I
had a bit of experience with Aeroclub conversions and the like, and I was very
impressed with what came from Brigade.
Clearly the parts are ‘injection’ molded in a similar
fashion to those from Aeroclub-thick (okay, monstrous!) gates, and white metal
detail parts; however, the panel lines are exquisite, petit and a good match for
those found on the Hasegawa kit.
Oh, and the parts fit very well indeed.
Also included in the box, which I hadn’t bothered to
check when I ordered the conversion were a set of decals to do an IAC Tr.9 in
either the green or silver scheme-WOW!
 I was
wondering how I was going to cobble together enough decals to pull this off, and
there they were in the box.
Brilliant!
The only thing that might put off a builder doing their
first conversion is the fact that Brigade does not provide all of the parts
necessary to flesh out the rear cockpit-not really a problem for me as my
Spitfire ‘bits’ box is currently overflowing.
I began construction by attaching
the two engine cowling halves to their prospective fuselage halves.
In an unusual (I think…) move, Brigade does not mold the
fuselage halves full length.
This arrangement makes for a potentially tricky
attachment; which, in my case proved true as I broke the nose off once during
construction.
If I were to do another of these conversions I would use some
scrap plastic and support these joints from behind-the first time!
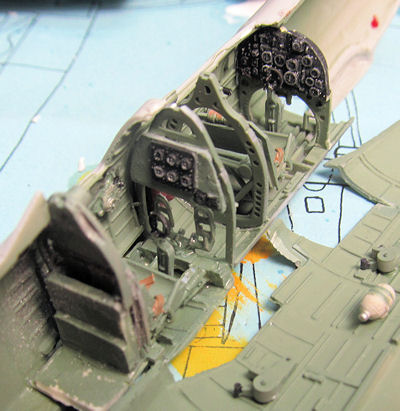
Next I sprayed all of the interior parts with Model
Master RAF interior green enamel and started looking for the extra bits I needed
for the rear cockpit.
Once things had dried I gave everything a dry brush with
various dark shades of pastels to add depth and weathering.
Although I did not do an exhaustive
search, I could not find any images focusing on the
inside of a Tr.9 cockpit, so I just followed the Hasegawa painting instructions
and added details where needed.
I found a pair of Ultra Cast (I think…) resin seats and
painted them up nicely, detailed the two provided instrument panels and joined
the fuselage together.
Next I put the wings together.
I made panels to cover the cannon blisters and removed
the cannon openings in the leading edge of the wings.
The fit at the wing roots and lower panel were less than
stellar, and I have to admit to not thinking things through
 too much-I
just added more CA glue and sanded.
If I was to do another I might try a spreader inside to
force the roots out some.
Another area that did not fit well was the lower front
panel that must be cut away from the Hasegawa wing and replaced with a part from
Brigade.
Lots of filler and sanding need here.
At this time I also cut open the slots for the Hasegawa
tail planes and added the vertical tail and supplied rudder.
All of this body work was followed by lots of primer,
sanding and rescribing-uhhhgggg!
Eventually I got to a point where
things were good enough and I moved on to the paint shop with the Tr.9.
Along that path I also prepped and painted all of the
small bits such as landing gear, wheels and exhaust stubs.
The exhaust came from Quick Boost and the three spoke
wheels from Ultra Cast.
With the plane ready to paint and everything else
finished up I had no choice but to decide on whether to have open canopies or
closed.
The Brigade canopy is injection molded, but very thick and not so clear.
As such I opted to open things up front and rear,
necessitating the creation of a new vacu formed
rear canopy.
I carefully cut the front windscreen away from the larger rear
portion of the rear canopy and set to making a master to pull a mold from.
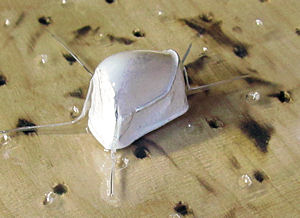
Using the original canopy section I mixed and filled it with plaster of paris and allowed it to dry. Because of the bubble shape of the plastic I had to carefully spread and pry to get my new master out. I have found that it is best if I seal my plaster masters with primer, but for this pull I tried just a dip in Future. After a few days drying I set of my vacufom ‘machine’ and set about making a new canopy. I start with 15 thousandths clear K & S sheets and jig it up in a frame and heat it up with a propane torch. Once sagging I quickly set it down on the machine and quickly heat around the edges to help the vacuum pull this tricky shape. To get an acceptable copy took two tries, but the end results are fantastic; crystal clear and scale thickness.
| COLORS & MARKINGS |
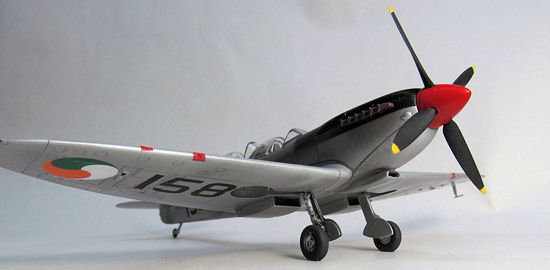
Looking over images of the
IAC spitfires it occurred to me that the T.9 looked kind of silly with its black
anti-glare panel painted down over the cowling to the exhaust and a rather
unorthodox walkway all on top of slightly ratty looking coat of silver paint-a
no brainer, really as I have nothing on my shelves that look anything like it.
I began the painting pro cess
by painting the whole airframe with Floquil Engine Black.
At this time I masked off the necessary black areas and
painted the whole thing with Floquil Bright Silver.
Just as this coat hit tack, I unmasked the black
sections and over sprayed the entire model with Testors Glosscoat in a rattle
can.
The reason to go so quickly to the gloss coat is that it ‘moves’ the
silver and with the black underneath, it instantly weathers and highlights the
panel lines.
This is an amazingly quick method to weather silver airframes, as
I seldom need much of a wash to bring out details and the metallic lies down as
if the paint has spent years in the sun.
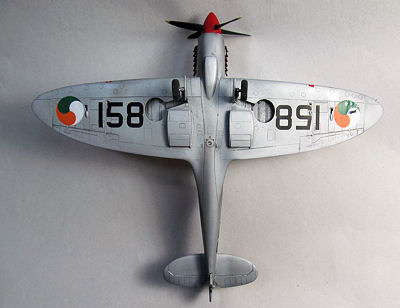
After a few days drying time I decaled the model with
the kit provided markings.
Although of unknown origin, the decals responded well to
MicroSol and laid down nicely-but not without a scare as they all originally
began to curl up rather than set down.
After a day or two to dry, a final coat of semi-gloss
was sprayed over everything and it was time unmask and begin final assembly.
After the small bits were attached, I lightly added exhaust stains with pastels. Finally, a small MV lens was added for the lower formation light and the canopies were attached in an open position with CA glue. My Irish T.9 was ready for the shelf.
| CONCLUSIONS |
 Overall my
impressions of the Brigand conversion are good.
Fit was bad, but really no worse than some of the
Aeroclub conversions I have done in the past.
The canopy is truly bad-it is just so thick, but I was
able to make a more than acceptable replacement.
The decals worked great, and most of all the model looks
just like the images of the real thing!
Highly recommended to all but novice modelers because of
the fit issues and incomplete cockpit.
| REFERENCES |
Maxwell,
Joe and Patrick Cummins.
The Irish Air Corps: An Illustrated Guide.
Max Decals Publications, Ltd., Ireland.
2009.
Google
Hasegawa and Brigade kits courtesy of my own pocketbook.
January 2013
If you would like your product reviewed fairly and fairly quickly, please contact the editor or see other details in the Note to Contributors.