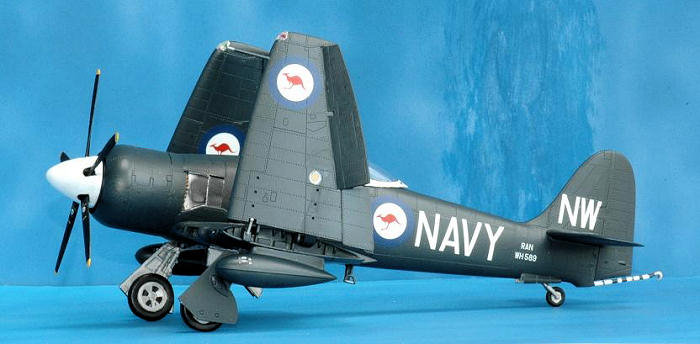
Trumpeter 1/48 Hawker Sea Fury FB. 11
| KIT #: | 02844 |
| PRICE: | $54.95 MSRP |
| DECALS: | Probably |
| REVIEWER: | Andy Garcia |
| NOTES: | CE Resin CEC48346 Sea Fury Super Detailed Cockpit and CEC48360 Sea Fury Exterior |

| HISTORY |
See http://modelingmadness.com/reviews/korean/cleaversfury.htm
| THE KIT |
I built several Hobbycraft 1/48th scale Sea Fury’s in the 1980’s. I was very pleased to see them released but a bit disappointed with the soft detail and errors. But the price and scale were right so I built a few and bought a lot. I stopped after building three versions because the lack of detail compared with other kits made me feel my time was better spent with some other kit releases so the additional Sea Furies went into the “kit stash” for a future build. In 2002 Cutting Edge resin sets CEC48346 Sea Fury Super Detailed Cockpit and CEC48360 Sea Fury Exterior were released and improved most of the Hobbycraft shortcomings. I looked at them for a new build cycle and just put the resin into the stash kit boxes for another day. So far that day has not yet arrived but after this build and comparison to the Trumpeter kit I am not so disappointed in the Hobbycraft kit for its overall look and value.
We now have a somewhat better plastic kit for the
Sea Fury in 1/48th scale from Trumpeter. Unfortunately, Trumpeter once again, as
they did with their 1/48th P-40B
have fallen short in their implementation of the cockpit and other details of
its Sea Fury. While
 overall the model looks nice, I was expecting something much
better. It is definitely too expensive for what you get. In comparison, look at
the Fisher Mold and Pattern’s 1/32 Sea Fury. The price and quality are in
balance, especially for a 1/32nd
scale kit. I am still looking for a 1/48th
scale Sea Fury with comparable quality kit – that’s all!
There are no etched metal or other components I could determine that would warrant its current MSRP. If the MSRP was in the $25.00 range I would be building a dozen of these Trumpeter kits out of a desire to model the many colorful schemes available. Since the current MSRP price in the USA is $ 54.95 and the accuracy is not what it should be at that price point, I think I will stop with two Trumpeter Sea Fury’s until they go on sale at a price I can justify (my suggestion is $ 25.00).
Suffice it to say the Trumpeter Sea Fury can benefit from some (maybe a bit more than some) resin aftermarket. I used some of the parts from the Cutting Edge sets to improve upon the kit faults.
Working from the nose back the Trumpeter Sea Fury nose appeared too short and blunt when compared to the Cutting Edge (CE) resin set. I realized the CE set had an extra segment to work with the engine front on the Hobbycraft kit and once they were aligned they were comparable. I chose to use the Trumpeter kit spinner, part A21 + A18 for ease of assembly. The prop spinner and prop could be slightly improved but they did not rise to the “must be replaced” category so I used the Trumpeter parts. For an OOB build the prop blades were acceptable.
 The
kit landing gear compares well with nice moulded detail. The alternative white
metal CE parts are beautifully cast. Trumpeter did a nice job on their injection
molded landing gear parts. Although the CE parts are slightly better I chose to
use the kit parts with a thought of saving the CE white metal parts for another
“better” build. This proved to create some additional issues, When I mated the
Trumpeter landing gear with the CE Resin wheel well there was a great difference
in landing gear leg peg size and it required a great deal of drilling and the
addition of extra metal connector pins and epoxy to attach the landing gear and
tires. I used the kit landing gear because they do not look bad and I thought it
was easier to use them in order to attach the landing gear cover panels, kit
parts C15 + C16.
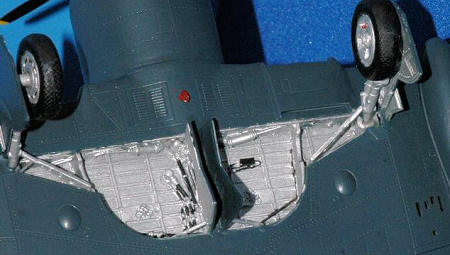 The Trumpeter wheel well is too simplified. There
is a small difference in the distance between landing gear when comparing the
kit landing gear position in the wheel wells with the CE resin wheel wells.
The
CE wheel well has the correct distance. The Trumpeter kit tires (or tyres if you
prefer) have a radial tread which is lost when you clean the sprue connections
on the tire and I have yet to see this radial pattern on any historical Sea Fury
photos. All the resin tire/wheel alternatives use the diamond tread.
Also, the Trumpeter tires are much
smaller than the CE and True Details resin tires and have flat wheel hub detail
when compared to the resin bits and photos of the actual aircraft. I used the CE
resin wheels and this too required a bit of effort due to different sized
connections between the kit landing gear axle and CE resin wheels connecting
points. I solved the problem with some careful drilling of the resin CE wheels
and the use of metal guitar wire pins to maintain a strong attachment. Epoxy
glue was used to attach the wheels. I also added, using a piece of fine wire to
represent the tire tube stem using the pre-drilled hole on the CE resin wheel
rim for placement, the tire tube stem.
The Trumpeter cockpit is inaccurate. It was too flat and is very similar to the flattened look of the Trumpeter P-40B cockpit. If you don’t open up the canopy it’s not a big deal. If you like to open up the pit and detail it the Trumpeter cockpit needs to be tossed. I am afraid even some nice Eduard color etched will not save this kit cockpit because it is sized to fit the inaccurate cockpit. The Trumpeter cockpit is far too simple for a kit in the $ 55.00 price range. I look forward to a Squadron True Details, Pavla, White Ensign or Aires resin cockpit ASAP to fix this. Even some nice Eduard color etched may not help with this one. It would be nice though to have a Zoom set with color seat belts if you are trying to build an accurate Sea Fury. The CE cockpit is an order of magnitude better than the Trumpeter cockpit in all respects but it is now OOP and hard to find.
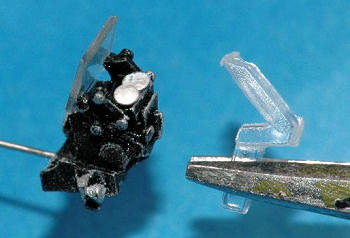 The Trumpeter gun sight is terrible. It looks like
a 1960’s 1/72nd scale gun sight.
Compared to the CE resin Gunsight – see the picture yourself and you be the
judge. For me - it is totally unacceptable in a new 1/48th
scale kit. When compared to a nice resin replacement it leaves no doubt
Trumpeter sadly disappoints in this area lacking in detail and accuracy with
their Mk. 4B gyro gunsight.
There were two sizes of wing tanks for the Sea Fury. A smaller 45 gallon size and the larger 90 gallon ferry size (see page 18 Squadron Publications Sea Fury In Action #1117). Most photos show the smaller tank in use. The 90 gallon size comes with the Trumpeter kit. I used the CE resin set 45 gallon tanks. The only concern is you must carefully file the pylons to fit the new wing surface since the Trumpeter wings are much better in shape than the old Hobbycraft wings the CE set were designed to enhance.
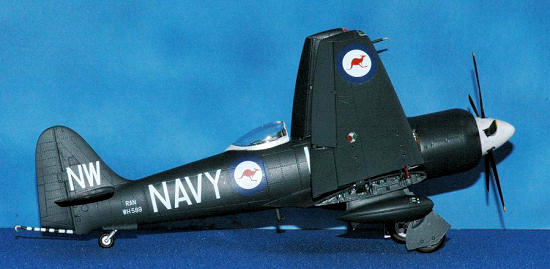
I
am pleased Trumpeter added a wing fold capability to their release. You can
still model the kit with unfolded wings but I wanted to add this to my build and
did so. There was no provision for the wing folding mechanism in the CE sets
since this was not an obvious feature of the Hobbycraft kit. After looking at
many wing folds on the web I surmised some scratch building or etched
 and resin
aftermarket would add to the final result of a Trumpeter kit with folded wings
in a nice way. OOB it may be OK for some modelers looking for a 1/48th scale Sea
Fury but I look forward to some better resin bits and etched metal because the
shortcomings of the exposed wing fold joints are noticeable.
I found a book, Pilot’s Notes for Sea Fury 10 & 11 Crecy Publications to bring great insight to the building of a Sea Fury. For example on page 25, “34. External Lighting (i) Identification Lights. The red and green downward identification lights are mounted on the starboard wing and the amber light under the port wing.” “(ii) Navigation Lights. Four navigation lights are fitted. One at each wingtip and two in the tail, one on each side of the fuselage.” “(iii) Attitude lights. Two attitude lights, one on the port undercarriage leg and one on the tail wheel door port fairing, indicate when the arrestor hook is lowered if the undercarriage is down. These lights serve as an indication to the batsman when night landings are being carried out.”
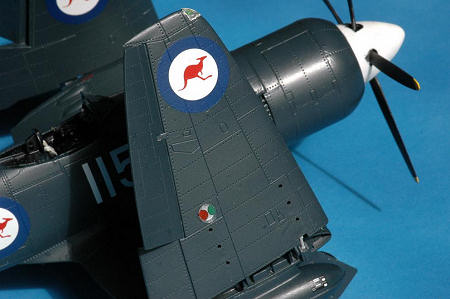
The underwing lights are an important detail area if you model the kit with folded wings. They are not your generic paint silver and insert lights situation – they are highly visible. As the Pilot notes points out they are unique color lights that look much better with some work than the OOB approach would give.
| CONSTRUCTION |
The Trumpeter kit is a quick and easy build. Most of my time was spent cutting, sanding, filing and test fitting the various CE resin parts that were not mastered for this plastic kit. I had to remove the four kit cockpit support extensions that are on the inside of the fuselage as well as sand off all the internal side wall detail in order to use the CE resin cockpit.
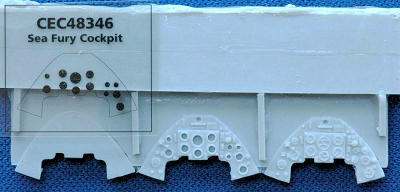 Assembly of the CE resin cockpit went according to plan except for a
disappointing interlude trying to use the alternate cockpit instrument panel
display offered by CE. There is a choice in the CE cockpit of using a “simple
instrument panel” or the “sophisticated instrument panel”. I chose initially
plan “B”, the “sophisticated instrument panel”, and found out the sophisticated
isn’t always the best even though the instructions lead you to believe “For the
most authentic and dramatic look” all you have to do is sand back the
sophisticated instrument panel backing then attach the Eduard like acetate dial
face. I painted the rear of the dial acetate white and sanded, and sanded, and
very gingerly attached the two and found out…after all this effort, the dials
were next to impossible to see or make out. I added some Squadron white card
stock to the rear in a sandwiched implementation with no apparent improvement.
So, I went for plan “A” , the simple instrument panel and attached some Mike
Grant dial faces on top of the raised detail. It looked much better although it
was a challenge to apply the decal instruments after punching them out using a
Waldron punch and die set. They were so thin and the white somewhat translucent
that some failed to work. I then used a few old Monogram instrument dials from
an old instrument faces decal sheet they sold (as an effort to enter into the
decal business) some years ago and finished up the instrument face part of the
build with a very nice cockpit.
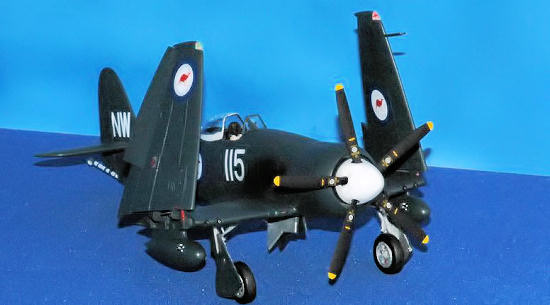 I used the cockpit kit part A23 as a rough template
and applied a Dremel motor tool with a drum sander to rough out the required
shape. Once the fuselage would close I used minor hand sanding wet & dry to
finalize the shape. I attached the Trumpeter kit part A4, which is the area
behind the headrest to the Trumpeter fuselage part A2. I closed the fuselage
with tape and applied Tenax glue only to the contact area of fuselage part A2
with the area behind the headrest part A4. This assured a level rear area when
it came time to attach both fuselage parts and to position the CE resin cockpit
tub. Once it had dried overnight I used some cyano glue to attach the CE resin
cockpit into place using the resin headrest connected to the Trumpeter part A4
as a guide.
Performing this surgery still did
not correct
the additional problem
that the area of the fuselage under the canopy when closed has been cut down
making it totally inaccurate.
I carved and attached the missing
headrest support that goes behind the armor plate. It is missing in the
Trumpeter kit. The Hobbycraft kit did have this part.
The Falcon/Squadron vac canopy for the Hobbycraft kit fits the Trumpeter kit perfectly. Although I prefer vac-form canopies for their scale effect I wanted to see how the Trumpeter canopy looked before passing on it. Use of the kit canopy requires removing the center mold seam with the reverse side of a hobby knife blade and a Squadron Tri-stick sanding stick was the final tool needed before a few dips in Future floor polish improved the canopy appearance. Trumpeter provides a two part canopy which I prefer and is an improvement over other kits but it is hard to place in the open position. This requires some work on a “permanent fix”, either gluing it or attaching some sort of inside pegs to keep it from falling off when in the open position.
 The CE resin wheel wells are a vast improvement
over the kit plastic.
If you use the kit part, A25 for
the wheel well you will be adding wire and various bits to improve its
appearance. It even needs a bulkhead section since a gaping hole awaits use of
the kit part. The CE resin part looks great and compares well with photos of
actual aircraft. I highly recommend not using the kit wheels.
I decided to fold the wings and this step is easy to do. When folded, the ailerons both go “down” about 5 degrees. Since the ailerons on the kit are separate, this was easy to do. The only shortcoming is the lack of detail inside the wing fold sections. Hopefully WEM or Quickboost may help improve the wing fold section.
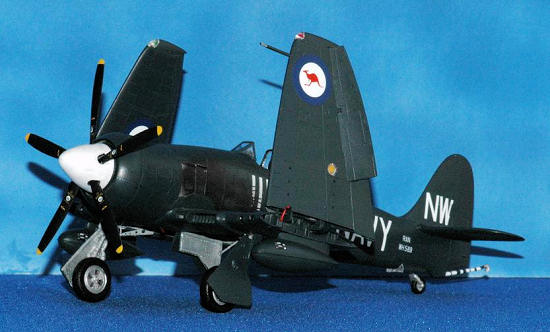 I
used some Bare Metal aluminum foil for the area behind the exhaust then stained
it with a mixture of Tamiya smoke and brown. This area was usually painted on
new aircraft but the paint quickly peeled off under the heat from the engine
exhausts leaving an exposed natural metal area with exhaust stains.
In one photograph I thought the Hispano Mk. 5, 20mm cannon guns looked staggered. I dismissed this thought with the assumption it was just the way the photo was taken, i.e. its perspective that gave the illusion of staggered guns. Then, on page 9 of the Squadron In Action reference there was the confirmation: “The cannons were slightly staggered with the outboard gun being slightly further forward than the inboard guns.” Also the drawing on page 21 of the wing fold accurately shows the slightly offset position of the guns. A new look at the many pictures available on the Internet including some museum aircraft confirmed the guns are in fact staggered and it is noticeable on the full scale aircraft. Trumpeter overlooked this detail. While the Trumpeter kit does provide separate gun barrels in a recessed cavity they are not slide moulded and must be drilled out to look better.
| COLORS & MARKINGS |
Painting:
I used Aeromaster enamel paints for the overall sea blue color. For the canopy trim and spinner I used Gunze flat white. Testors metallic enamels were used for all metal surfaces.
Decals:
Aeromaster decals were used from # 48-703 Sea Fury Part II. They worked well and performed as expected. I used a small amount of Future floor wax as a solvent and to fix any problems from inadequate adhesive in order to attach the decals. The decals were thin and well printed. The stencils were excellent but none were in white which would have been nice for the navy blue fuselage color version I chose to model. There were a few stencils in red and some in yellow which because of the color contrast were used and enhanced the model. Some white stencils would have been better.
| FINAL CONSTRUCTION |
An overall coat of Testors Dullcote mixed with a bit of Testors gloss gave a “scale effect” gloss finish of a weathered naval aircraft. I then unmasked the canopy and removed the various masking tape pieces still attached to the cockpit area and wheel wells and worked on touch up painting.
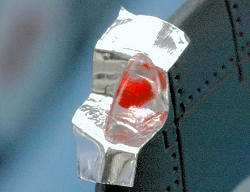 The
Trumpeter kit has clear plastic wing tip lights which are more accurate than the
solid sections on the Hobbycraft kit. I drilled a small pilot hole for the red
and opposing green light bulbs found inside the clear wing tip lights on the
actual aircraft. I used some Cadbury chocolate wrapper foil which is quite thin
and has one very shiny side as the backing for the light to increase the
reflection and appearance.
I used epoxy glue to attach the lights. In the folded wing posture this makes a big difference since the wing position lights are very visible. This was a positive improvement over other Sea Fury kits. If I were to do this again I would attach them early on and mask the lights since use of the squadron tri-stick to buff the lights and a final coat of future floor wax makes the lights look great but is a complex task after the fact. Fairing in the lights and polishing the clear surfaces is best done before painting!
There are under wing lights that require some details as well. Kit part D2 is just a clear round circle. No painting instructions or other details are given in the instruction. The Hobbycraft kit totally overlooked this part. It should show a combined red and green light display similar to the Aeromaster decal stencil # “FF” and an amber light behind part number D6 which if you fold the wings and don’t fix this area you will regret how it looks with just the clear cover. These lights, parts D2 are not the generic paint one side silver and insert!
There are also two small navigation lights under the horizontal stabilizers. A pair of small clear lights representing this feature on the Trumpeter clear parts sprue would have been a nice touch – but there are none. The rear lights appear as small bumps on the fuselage so you can paint them red and green matching the wing position lights and top them off with a drop of clear or go the extra mile and use a drop of clear epoxy. Hasegawa has been getting these right in their recent releases!
 Some Sea Fury’s have a small whip antenna on the top of the fuselage spine or
tip of the vertical stabilizer. I did not see this in any of the reference
photos of the aircraft I built so I left them off. It does appear on one of the
privately owned aircraft that can be seen at air shows.
Also, there is usually some form of seat headrest support behind the armor plate in the event of a roll over to keep the seat back and armor plate from buckling. I could not get a good reference feel for this area and used a best guess estimate of what it should or could have appeared like. The Hobbycraft kit seems to have had this area better done than the Trumpeter kit which has omitted this feature. I found some thick styrene sheet and drilled two holes after dry fitting and shaping the part. It was glued to the rear of the armor plate and painted flat black.
Trumpeter part # C9 appears to be an engine drain pipe in the kit instructions due to its shape and position. It is not a drain pipe. It should be a hooked device called the catapult bridle hook which is used as the attachment point for the catapult take-off bridle cable. It should be painted red.
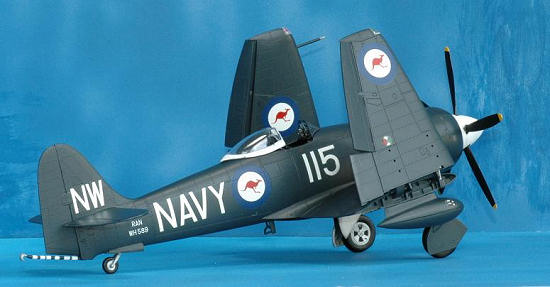
This build was all about getting a nice representation of an Australian Sea Fury dressed out in the unusual Nay Blue with white prop scheme that appears in all of the Sea Fury references I own. Ever since good decals for this version came out I have looked forward to using the decals for this version.
Reference photos for this specific airframe were found in War Paint Series Number 16 on page 15 and a color profile on page22. The photo was of great help because it showed the aircraft with folded wings similar to the version I modeled and answered a big question I had regarding the holes for the rocket stubs. The question I had was if you don’t mount the rockets do you need to putty or fill in the holes? The answer based on the photo was – No!
 Additional photos for this airframe (WH589) were
found in Squadron Publications No. 1117 Sea Fury with a photo on page 32 and a
color profile on the rear cover and in Warbird Tech Volume 37 Sea Fury on page
81.
The Aeromaster decal instruction
sheet states “Hawker Sea Fury FB.11 WH589, 724 Squadron Royal Australian Navy
(RAN), 1953. Overall Oxford Blue with white spinner and rear canopy frame.
Information tells us that this was a one of a kind scheme for air shows.”
I do not agree with the last statement from the decal sheet. It was not a special scheme for air shows but actually a color scheme for the final use of the Sea Fury as a trainer for the Squadron based at Nowra in Australia. Based on the photos and the reference books I used it seems this aircraft was an overall Dark Sea Blue aircraft from No. 724 Squadron which was an Operational Training School. The Squadron text states “The Australians were the only country to adopt this color scheme. The aircraft carries the red “Wallaby” insignia and the spinner and code were in white.” The photo on page 15 of War Paint Series Number 16 provided more modeling insight showing the aircraft to be overall dark blue with possibly zinc chrome green on the exposed surface of the wing folds. Since it is a black and white photo and most Sea Furies appear with the underside color used as the inside color of the wing folds I used dark blue for this area.
| CONCLUSIONS |
Tom Cleaver in a recent Modeling Madness kit review noted “As I was finishing the model, I was contacted by my friend Dave Carter, the chief designer at White Ensign Models. WEM is planning a correction set for this kit. I referred Dave to “Mister Sea Fury” (Paul Fisher) who is providing him with accurate information. White Ensign should make a good set that will correct the prop, the wheel well, the landing gear, and the cockpit. If you are a “serious Sea Fury Fan,” then I suggest if you have this kit in the stash you put all the parts in the box, tape it closed and put it back in storage to await the release of the WEM set.” I agree with Tom unless you can’t wait!
My list of hopeful resin
correction parts to overcome kit deficiencies are:
1) Resin Cockpit drop fit sized with detail at least equal to the OOP Cutting
Edge cockpit.
2) Resin Gunsight (for the Mk. 4B gyro gunsight) - replaces kit part # D5
3) Rear Wheel - replaces part # C19
4) Main Wheel tires (Tyres!) with correct diamond hatched tread pattern and hub
detail
5) Small sized drop tanks to replace kit "ferry" oversized drop tanks; parts #
C3 + C6
6) Main Wheel gear well replacement for part # A25
7) Resin wing fold section - a small resin overlay on the existing Trumpeter
part # B16 wing fold left/right sided sections to replace the simplified kit
components.
8) Resin one piece rocket stubs without
rockets
9) Resin rockets that could be mounted on the stubs with thinner fins.
10) Resin engine either full or a partial that would use opened cowl parts # A13
+ A14 panels to expose the side of the engine as seen in many photos since the
front and spinner sections limit that view.
11) Resin wing gun bays with internal parts
12) Lights for under wing lamps (resin lamps that go inside parts D2 and D6)
13) Bomb pylons for the external racks which are outboard of the under wing fuel tanks. See pg. 18 of the Squadron In Action # 1117 for a drawing of the “streamlined bomb rack”.
14) Resin bridle hook that replaces kit part “C9”. This could be made from a multiple layer etched metal part as well but may not have the 3D hook contours as well shaped as a resin part.
 Others have noted a replacement prop spinner and props ( “too long and too
pointed”), landing gear (“the kit landing gear is detailed nicely but too
short”) legs, and a fix for the area behind the headrest would be welcomed.
As I was finishing my model and this build review Eduard released two etched sets for the Trumpeter Sea Fury. The two sets are # 48602 Sea Fury FB.II exterior and FE423 Sea Fury FB.II interior S.A. Color Zoom. The #48602 provides many components addressing the deficiencies I noted in my resin wish list.
Eduard’s FE423 Sea Fury FB.II interior looks great and addresses the need for a nice seat belt and instrument panel replacement. I would consider using this set with the CE resin set I used to improve upon the difficulties or disappointments I found with the instrument panel portion.
Given the CE set is hard to find and very expensive I could envision a new simplified aftermarket resin set that is lower priced than some of the current offerings which provides a platform for improving the terrible Trumpeter cockpit with a better sized cockpit tub, seat and side wall detail. It would leverage the excellent work found in the Eduard color zoom set by expecting those parts to be used to complement the resin components. I believe the end result would give an overall lower cost and provide a dramatic improvement of the Trumpeter kit. The Eduard etched sets encourages me to build the second Sea Fury. Now, if only Trumpeter would understand the Eduard Weekend Edition product concept and do that with their Sea Fury – that would be what this modeler is really looking for now that Eduard has done their superb Color Zoom magic and some decent resin parts are soon to be released!
 You
may be wondering why I have not commented on the mad riveter enhancement
Trumpeter seems to add to its kits. I don’t like to see an enhancement like
rivets added to a kit if they do not appear on the actual aircraft. From every
Sea Fury photo I have seen none show the rivet detail like the Trumpeter kit
plastic. Although you can use some fillers and sanding to eliminate them I just
chose to ignore them on this build and shrug my shoulders why any time and
effort is spent on this wrong detail and the correct aircraft surface is not
accurately reflected. Let’s get back to building and enjoying our hobby rather
than sweating the small stuff! After seeing a few of these built it does not
look like they disappear under a coat of paint. After all is said and done a
nice model will be your reward if you put some time and effort into this model.
Just in case you were wondering about miles per gallon – fuel consumption was from 161 gallons per hour to 261 gallons per hour at max RPM for the Sea Fury.
| REFERENCES |
Warpaint Series No. 16 Hawker Sea Fury by W.A. Harrison Hall Park Books
Warbird Tech Series Volume 37 Hawker Sea Fury Specialty Press 2002
Squadron Publications Hawker Sea Fury In Action Number 1117
Pilot’s Notes for Sea Fury 10 & 11 Crecy Publications (detailed cockpit photographs)
December 2008
If you would like your product reviewed fairly and quickly, please contact the editor or see other details in the Note to Contributors.
Back to the Review Index Page 2025