
|
KIT: |
Tamiya 1/48 Mig-15bis |
|
KIT # |
61043 |
|
PRICE: |
$25.00 |
|
DECALS: |
See review |
|
REVIEW & |
|
|
NOTES: |
|

|
HISTORY |
"MiG Alley" was the place that any self-respecting fighter jock wanted to be during the Korean War. This was the nickname given to the area along the Yalu River that forms the border between China and North Korea and was the site of some of the most ferocious air battles between the North Korean and United Nations air forces. Since most of the MiG’s were based at Chinese airfields, they had to cross the Yalu to engage UN forces. Therefore, a common fighter mission during the Korean War was the "BARCAP" or barrier combat air patrol in which UN forces deployed large numbers of fighters to "MiG Alley" in order to prevent the MiG’s from penetrating into Korea.
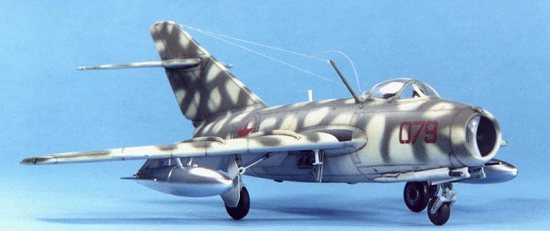 The first jet vs. jet
combat (with a kill) occurred on 8 November 1950, when LT Russell Brown flying
an F80C downed a MiG-15 that had penetrated across the Yalu. However, despite
this initial success the F80C was in reality no match for the surprising MiG-15
which was over 100 mph faster and could easily avoid combat with the fighter
escorts and prey on the more vulnerable bombers. The F84 did not fare much
better against the MiG’s, and not until the F86 "Sabre" appeared on
the scene was there a potent opponent to the MiG threat. However, the MiG-15bis
was far superior to the early F86A’s, and a worthy opponent did not appear
until the F86E in September 1951.
|
THE KIT |
The kit is Tamiya’s 1:48 MiG-15bis. The name Tamiya says it all with regards to quality, there are no better kits out there today (IMHO). This kit features approximately 80 injected molded plastic parts, a large ballast weight, and decal options for four aircraft (generic Chinese, Russian, & Korean aircraft). The instruction sheet is a ten-page foldout diagram assembly with marked color painting guidelines. There are a number of options presented to the modeler, ranging from flaps up/down, drop tanks, and the ability to display a nicely done jet engine.
|
CONSTRUCTION |
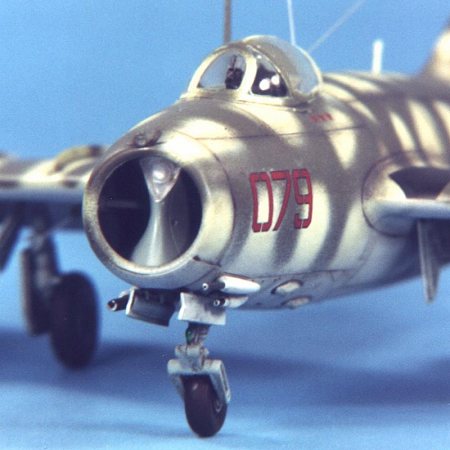 I started with my usual
warm, dish soap water wash of the plastic components, followed with a cold water
rinse. Pat dry with a paper towel and let dry overnight. I then pre-painted all
the parts as indicated in the instructions. For the interior color I used Polly
Scale RLM65 Light Blue. After detail painting a light burnt umber wash was
applied, and details were highlighted with a dry brushing of silver. Assembly of
the cockpit/forward fuselage presented no challenges and went together
beautifully.
As is usually the case, fuselage inserts rarely fit right without a little sanding and the forward gun platform insert required dry fitting and a little shaving off the sides to fit together properly with no sanding. If you do this it will definitely pay dividends down the road, as you will not have to sand and destroy adjacent detail.
Next up were the wings and after opening up the inside holes for the drop tanks, assembly presented no problems. However, I did not mount them to the fuselage yet. At this point I skipped over the drop tanks and landing gear sub-assemblies, as these would be added after painting. Since I decided that I did not want to display the engine, I quickly assembled the engine components without painting, only painting the exhaust ring Testor Metalizer Burnt Metal. If you are planning to not display the engine, be very careful in mounting the engine assembly into the fuselage as the fit is quite tight and alignment with the aft fuselage section is critical. After joining the forward and aft sections of the fuselage together I spent a little time lightly sanding the join area to improve the fit trying not to destroy the adjacent engraved detail. As expected the fit is not perfect, but with a little careful work an acceptable result can be achieved. The dive brakes were then pressed into place with only a little white glue as they would be removed after painting and displayed in the open position. Lastly I installed the wings and horizontal stabilizers in place. A little dry fitting and light sanding was all that was needed on all the joins and Gunze Sangyo Mr. Surfacer was used sparingly to help finish the seams.
I had heard a few complaints about the cockpit glass and framing not fitting well, but I experienced no problems and no filler was required. I used jewelers watch cement, which provides an excellent bond without crazing and dries perfectly clear. After masking off the cockpit and stuffing wet tissue into the intake and exhausts, it was off to the paint shop.
|
PAINT & DECALS |
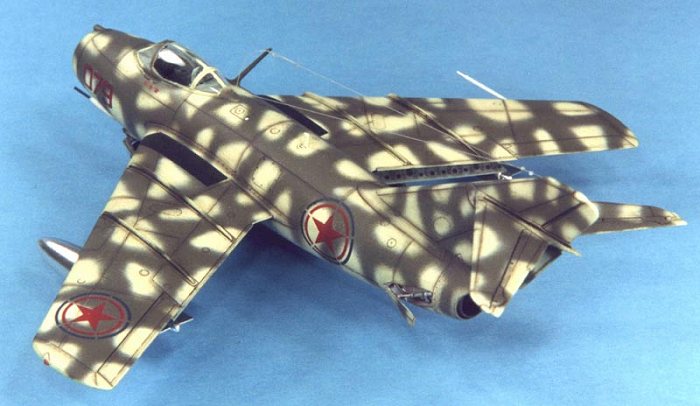
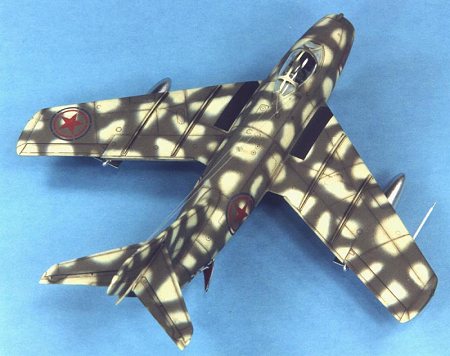 All of the paint schemes
provided are natural metal except for one camouflage scheme of dark green lines
over sky with a light grey undersides. I thought this scheme would look the best
and I looked forward to the challenge of airbrushing the dark green wavy lines.
What a mistake! The lines in scale are approximately 1-2 mm in width (which I do
not have the skill to do)! I am able to do 2-3 mm lines so I went with that and
it looked terrible (IMHO). I then gradually widened the lines until I got the
finished pattern that I liked. I used Polly Scale IJN Sky Grey for the
undersides, British Sky (Type S) for the topsides, and Gunze Sangyo RLM Dark
Green 71 (H64) for the wavy lines.
After letting the paint dry overnight, I airbrushed a light coat of Future to prepare the surface for decaling. The decals supplied with the kit are terrible. This surprised me since they are Scalemaster instead of the usual crummy Tamiya decals (which is the ONLY thing I do not like about Tamiya kits!). I placed the Chinese stars into water and they disintegrated into millions of tiny bits. Oh well, time for "Plan B". I brushed a light coat of Microscale Liquid Decal Film (a lifesaver!) over the North Korean decals and was able to salvage the job (albeit with an incorrect pattern!). After drying overnight, I wiped the decals off with a moist cloth with Pollys Plastic Prep to remove any residue and after drying I shot a light coat of Future over the decals to seal them.
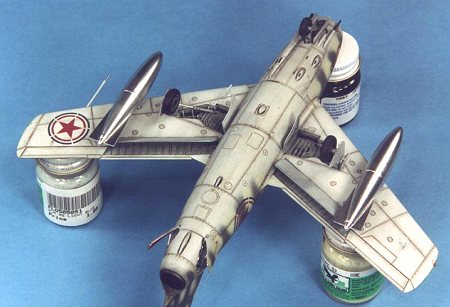 Next, a burnt umber oil
wash was applied to the panel lines and after clean up a light coat of Polly S
Flat Finish was shot to provide a surface for pastels. I then used pastels, and
pastel pencils to lightly highlight the panel lines and detail on the wings/tail
surfaces and fuselage. I use Derwent pastels and pencils and they are quite easy
to use, just lightly draw on the surface to be highlighted and blend with
artists blending stump. A very nice, subtle effect can be achieved with these
pencils that is much easier for me than dry brushing or pre-shading. Next I
applied a heavy burnt umber oil wash to the wheels and sealed everything with a
light coat of Future.
|
FINAL CONSTRUCTION |
After painting and weathering, I assembled the landing gear, the dive brakes, pitot, and antenna masts. Finally, several coats of Polly S Flat Finish was shot to achieve a flat finish common to aircraft operated in harsh conditions and then the metal drop tanks were installed in place with superglue.
|
CONCLUSIONS |
Tamiya models are my absolute favorite to build, as they usually have no major problems to contend with. This kit was no exception, and not a single spot of filler was needed. The only negative to report were the decals and these should be replaced with the many aftermarket decals available. This kit makes a beginner modeler look like an expert and is highly recommended.
|
REFERENCES |
Squadron/Signal Publications, MiG-15 in Action #116
Squadron/Signal Publications, Air War Over Korea
Squadron/Signal Publications, MiG Alley, Air to Air Combat Over Korea
Osprey Publishing, Korean War Aces, Osprey Aircraft of the Aces #4
If you would like your product reviewed fairly and quickly by a site that has over 1,100 visits a day, please contact me or see other details in the Note to Contributors.