Tamiya 1/48 Mustang IV
|
KIT # |
? |
|
PRICE: |
$ |
|
DECALS: |
See review |
|
REVIEWER: |
Randy Lutz |
|
NOTES: |
|
HISTORY |
 Finding a Mustang scheme, which has
appeal, is one of the easiest choices you will ever make in modeling, as
the subject has beautiful lines and lends itself to an infinite number of
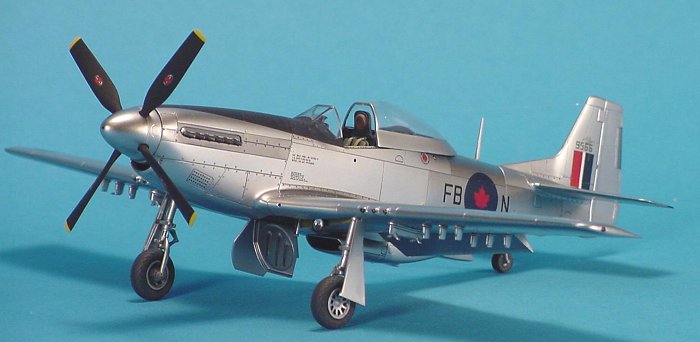
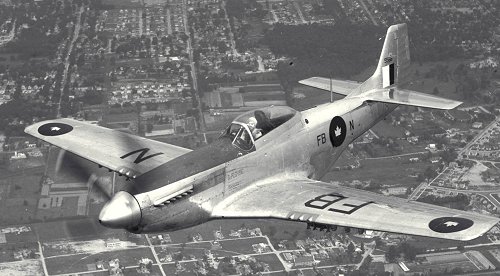
marking options. I had long wished to model the Mustang assigned to the
Experimental and Proving Establishment based at Uplands because of the
simplicity of the markings and the seldom seen red/blue post-war national
insignia. To further add to the appeal, the fuselage has selected areas,
which have been highly polished and the Mustang still sports the WWII
AN/APS-13 tail warning radar. All these factors combined to make this a
must-have in the display case.
Finding a Mustang scheme, which has
appeal, is one of the easiest choices you will ever make in modeling, as
the subject has beautiful lines and lends itself to an infinite number of
marking options. I had long wished to model the Mustang assigned to the
Experimental and Proving Establishment based at Uplands because of the
simplicity of the markings and the seldom seen red/blue post-war national
insignia. To further add to the appeal, the fuselage has selected areas,
which have been highly polished and the Mustang still sports the WWII
AN/APS-13 tail warning radar. All these factors combined to make this a
must-have in the display case.
The subject of this article was one of the first batches of Mustangs obtained from USAF stocks in October of 1950. The serial number was 44-63827 and in USAF parlance, was known as a P-51D-20-NA.
|
THE KIT |
There has
been much discussion about which is the best 1/48 P-51D on the market,
Hasegawa or Tamiya. In the opinion of this humble scribe, it would have
to be the Tamiya kit as it has superb fit, dropped flaps and a more than
adequate cockpit. That being said, the Tamiya P-51D, which offers the
best value for your money is the Korean War F-51D version. In this
release you are provided with two styles of canopy; both the Dallas hood
and regular, as well as two choices of Hamilton Standard prop blades,
cuffed and uncuffed and both the blunt and pointed spinner options.
Rounding out the optional parts
 is a nice sampling of underwing ordnance
consisting of 5" HVARs, bombs, and 75 gallon drop tanks and both shrouded
and unshrouded exhaust manifolds.
is a nice sampling of underwing ordnance
consisting of 5" HVARs, bombs, and 75 gallon drop tanks and both shrouded
and unshrouded exhaust manifolds.
There are a total of 78 parts moulded in Tamiya’s familiar dark grey plastic and 5 clear pieces. The surface detail is as we have come to expect from Tamiya, that is crisp and well defined and the parts breakdown and engineering of the kit assures trouble-free assembly. A nice touch is the separate wheel hubs, which facilitate drilling out the openings between the spokes. If I had to have a complaint with the kit, it would be manner in which Tamiya has elected to mould the sliding canopy. Namely, a clear hood, which must be fastened to a lower canopy frame. Not an insurmountable problem, but definitely not as well thought out as Hasegawa’s approach. Tamiya has re-tooled the canopy in the most recent release, but I don’t see it as a big improvement over the original. Decal options are provided for 3 Korean War Mustangs, all of which are American.
This kit is an excellent candidate for an out-of-the-box model, and this is how I built my model, save for a few minor enhancements. The first step involved the cockpit. Initially I considered installing an aftermarket cockpit set, but could not choose from the True Details or Aires sets I had. So I chose the easy route and did not use any of them.
|
CONSTRUCTION |
After the
initial parts clean-up, I airbrushed the interior of the fuselage halves,
the floor, the rudder pedals and control column with Xtracolor X117
Interior Green FS34151. As this model was to represent one of the ex-USAF
Air National Guard Mustangs, which had their interiors re-painted in
black after the war, the cockpit painting steps would be a little
different than usual for a P-51. This was then followed by an over spray
of Testors Black Chrome, which once dry, was lightly sanded to remove
trace amounts of black, leaving small areas of green showing. Next,
the interior parts given a dry-brushing of progressively lighter shades
of grey. According to a good photo in the Squadron Walk Around on the
P-51D, it is evident that the fuel tanks were rubberized. Respecting
this, the fuselage mounted fuel tank, which sits behind the pilot’s seat
was airbrushed with Testors Rubber. This is the paint in the small square
bottles and does a fine job of replicating that look of rubber. It is
very dark, verging on black, but with just a hint of brown. This paint
was followed by various dry-brushings in greys and browns. The radio
gear, instrument panel and seat armour plate were also finished in
Testors Black Chrome and dry-brushed in progressively lighter shades of
grey.
the cockpit painting steps would be a little
different than usual for a P-51. This was then followed by an over spray
of Testors Black Chrome, which once dry, was lightly sanded to remove
trace amounts of black, leaving small areas of green showing. Next,
the interior parts given a dry-brushing of progressively lighter shades
of grey. According to a good photo in the Squadron Walk Around on the
P-51D, it is evident that the fuel tanks were rubberized. Respecting
this, the fuselage mounted fuel tank, which sits behind the pilot’s seat
was airbrushed with Testors Rubber. This is the paint in the small square
bottles and does a fine job of replicating that look of rubber. It is
very dark, verging on black, but with just a hint of brown. This paint
was followed by various dry-brushings in greys and browns. The radio
gear, instrument panel and seat armour plate were also finished in
Testors Black Chrome and dry-brushed in progressively lighter shades of
grey.
Tamiya provides a decal for the instrument panel, which I used. However, I adopted a slightly different approach than Tamiya suggests. Using a Waldron punch set, I removed each individual instrument from the decal sheet and installed them one at a time. Once they were dry, I placed a small drop of Future floor wax on each dial face to add a bit more sheen. I have found that this method will produce results on par with the photo-negative/photo-etch panel method. The gun sight as supplied by Tamiya is nicely done and really only needs careful painting to bring it to life. I did however add 2 small disks of aluminum foil to represent the objective lenses.
 The seat
as supplied is a nice representation of a typical late model Mustang
seat, albeit a little undersize, so was best replaced with an excellent
Ultracast resin seat with moulded on belts. The seat proper was painted
using Xtracolor X 114 Medium Green FS14092, with the seat back pad
finished in faded Olive Drab. The shoulder belts were picked out with
Xtracolor RFC Doped Linen and the seat belts were finished in Xtracolor X
119 SAC Tan/Green FS14201.
The seat
as supplied is a nice representation of a typical late model Mustang
seat, albeit a little undersize, so was best replaced with an excellent
Ultracast resin seat with moulded on belts. The seat proper was painted
using Xtracolor X 114 Medium Green FS14092, with the seat back pad
finished in faded Olive Drab. The shoulder belts were picked out with
Xtracolor RFC Doped Linen and the seat belts were finished in Xtracolor X
119 SAC Tan/Green FS14201.
Part A7 is the radiator assembly, which was painted brass, with a dark wash to pick out the fine detail. The tunnel assembly, part A17, to which it fastens should be painted Chromate Yellow on the inside. The inside surfaces of the tail wheel doors should also be finished in Chromate Yellow, with the obligatory dark washes and lighter dry-brushing.
The completed cockpit/fuel tank assembly, minus the pilot’s seat, was trapped between the fuselage halves and part A9, which is the upper engine cowl was installed. I cannot say enough about the fit of this kit. No filler was required on any part of the fuselage seams and the engine cowl fits so tightly, that glue would not be required. This seemed like a good time to drill out the engine cowl breather panels, along with the various fuel vents below the trailing edge of the wing, while the battery vent on the port side of the nose was removed.
Prior to joining the upper and lower surfaces of the wing, the bomb pylon attachment points were drilled out and the main gear bay was painted. It is infinitely easier to paint the landing gear bay at this point, because of the variety of colours required. The main spar that runs along the back of the gear bay was finished in Chromate Yellow, the main spar which separates the 2 wheel wells was painted Interior Green and the remainder of the wheel well was finished in Testors Metalizer Non-Buffing Aluminum. Some dark washes and various dry-brushings popped out the details and added depth and life to this area. With the wing assembly completed, both it and the tail planes were installed. It was starting to look like a Mustang now, and still no need for filler.
 Tamiya
has done a nice job of casting the main undercarriage and as it comes,
does not need much to look good, so I just drilled out the oleo torque
links and the tow bar attachment points. The legs were then airbrushed
with Metalizer Steel, followed by a black wash and some discreet dry
brushing with silver. The final detail for the legs was to cover the
shock portion of the legs with aluminum foil. As I mentioned previously,
the wheel hubs are cast as separate pieces, which greatly simplified the
process of drilling out between the spokes. The strut side is much
easier to drill as it has only 10 small holes per hub. However, the
outboard side is more difficult owing to the triangular shaped openings.
Each spoke opening is drilled in 3 places. This serves to identify the
location of the spokes when viewing the hub from the backside. Then,
from this reverse side, the hubs are thinned down enough to allow for the
excess plastic to be easily removed using a new #11 X-acto blade. Next
the tires were airbrushed with Testors Rubber, followed by flat black on
just the tread portion. Then, a multi-step dry-brushing process takes
place. Starting with dark grey and working to down a lighter grey. The
wheel hubs are finished in Metalizer Steel and given a dark wash, in the
same manner as the gear legs. The completed undercarriage was set aside
until later, as the Metalizer finish is somewhat fragile and excessive
handling will remove some of the paint.
Tamiya
has done a nice job of casting the main undercarriage and as it comes,
does not need much to look good, so I just drilled out the oleo torque
links and the tow bar attachment points. The legs were then airbrushed
with Metalizer Steel, followed by a black wash and some discreet dry
brushing with silver. The final detail for the legs was to cover the
shock portion of the legs with aluminum foil. As I mentioned previously,
the wheel hubs are cast as separate pieces, which greatly simplified the
process of drilling out between the spokes. The strut side is much
easier to drill as it has only 10 small holes per hub. However, the
outboard side is more difficult owing to the triangular shaped openings.
Each spoke opening is drilled in 3 places. This serves to identify the
location of the spokes when viewing the hub from the backside. Then,
from this reverse side, the hubs are thinned down enough to allow for the
excess plastic to be easily removed using a new #11 X-acto blade. Next
the tires were airbrushed with Testors Rubber, followed by flat black on
just the tread portion. Then, a multi-step dry-brushing process takes
place. Starting with dark grey and working to down a lighter grey. The
wheel hubs are finished in Metalizer Steel and given a dark wash, in the
same manner as the gear legs. The completed undercarriage was set aside
until later, as the Metalizer finish is somewhat fragile and excessive
handling will remove some of the paint.
One of
the main, if not the only complaint with the Tamiya bubble top is the
canopy itself. The engineering of the two parts which make up the
sliding canopy results in an unsightly seam. This coupled with the sprue
attachment points on the bottom edge of the clear part; make for one
tricky problem to overcome. The method I used to get around this problem
was a combination of a little extra care when removing the canopy from
the sprue and a small amount of deception. First, do not
 remove the
clear canopy from the sprue by cutting or snipping the part free. This
will cause minute stress cracks to form in the clear part around the
attachment points. The preferred method to remove the canopy would be
with a hot knife, with a razor saw as a second choice. In either case,
leave a small nubbin' of the sprue on the canopy. Part C1, which is the
grey canopy frame can be removed like any other part. I then joined the
clear part and the lower canopy frame using small amounts of liquid
cement. Once this had set up, I applied super glue to the outside of the
joint and then proceeded to sand the joint smooth. No need to worry
about scratching the clear part, as it will be polished out later. This
sanding will remove the small piece of clear sprue, which was left
protruding from the canopy and will not induce any stress cracks. This
concluded the extra care portion of the solution. The deception part was
as simple as raising the cheat line, or colour demarcation line between
the frame and clear part just slightly above the seam between the two
parts. While not as simple as dealing with a vacuform canopy or using a
Hasegawa hood, it does eliminate the problem and help conform to the
out-of-the-box rules if so desired. The same method of removing the
windscreen, part D4, from the sprue was followed, as it has a sprue
attachment point on the bottom of the side window and does not border on
any framing. With the windscreen attached, it was masked off using EZ
Masks.
remove the
clear canopy from the sprue by cutting or snipping the part free. This
will cause minute stress cracks to form in the clear part around the
attachment points. The preferred method to remove the canopy would be
with a hot knife, with a razor saw as a second choice. In either case,
leave a small nubbin' of the sprue on the canopy. Part C1, which is the
grey canopy frame can be removed like any other part. I then joined the
clear part and the lower canopy frame using small amounts of liquid
cement. Once this had set up, I applied super glue to the outside of the
joint and then proceeded to sand the joint smooth. No need to worry
about scratching the clear part, as it will be polished out later. This
sanding will remove the small piece of clear sprue, which was left
protruding from the canopy and will not induce any stress cracks. This
concluded the extra care portion of the solution. The deception part was
as simple as raising the cheat line, or colour demarcation line between
the frame and clear part just slightly above the seam between the two
parts. While not as simple as dealing with a vacuform canopy or using a
Hasegawa hood, it does eliminate the problem and help conform to the
out-of-the-box rules if so desired. The same method of removing the
windscreen, part D4, from the sprue was followed, as it has a sprue
attachment point on the bottom of the side window and does not border on
any framing. With the windscreen attached, it was masked off using EZ
Masks.
|
COLORS AND MARKINGS |
At this time I was ready to paint the airframe, but was undecided as to what silver finish I would apply. My preference was to use SnJ Aluminum, but the contents of my bottle were starting to congeal and no amount of shaking or stirring was getting rid of the lumps. Unable to obtain any replacement SnJ in Ottawa, I was left with no other option than to use my Alclad II.
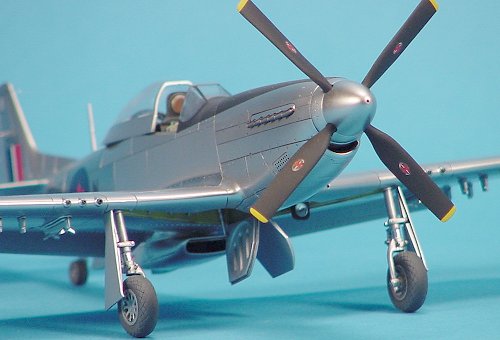
 First up
the model was primed with Tamiya TS-14 Gloss Black and once dry, rubbed
out to smooth the finish. Then, turning the air pressure on the
compressor down to 15psi, I misted on a few light coats of Alclad
Polished Aluminum. After it had dried, I masked off all the areas which
I were to retain a high polished look and then applied a few light coats
of Alclad Aluminum. Next selected panels were airbrushed with Alclad
Duraluminum and the fabric rudder was finished with Alclad White
Aluminum.
First up
the model was primed with Tamiya TS-14 Gloss Black and once dry, rubbed
out to smooth the finish. Then, turning the air pressure on the
compressor down to 15psi, I misted on a few light coats of Alclad
Polished Aluminum. After it had dried, I masked off all the areas which
I were to retain a high polished look and then applied a few light coats
of Alclad Aluminum. Next selected panels were airbrushed with Alclad
Duraluminum and the fabric rudder was finished with Alclad White
Aluminum.
Instead of the usual Olive Drab anti-glare panel, this Mustang featured a Flat Black anti-glare. This was applied using Tamiya Gloss Black and was followed by a grey wash in the anti-glare panel lines and very light chipping around some of the fasteners. Finally I applied a few coats of Testors Dullcoat. I am happy to report that I had no trouble whatsoever masking over the Alclad and did not have any silver paint lift off with the tape. As a final step, the panels around the exhaust manifolds were painted with a darker shade of Metalizer.
The decals for this subject came from an old Scale Model Products sheet on Foreign Mustangs. Fortunately they went on without any problems, with the aid of Solvaset as a setting solution.
|
FINAL ASSEMBLY |
A dark
grey, acrylic water-colour
wash was applied to all the panel lines, while a black water
colour wash was flowed into all
the control surface recesses. With this step completed I attached the
landing gear, pylon and rocket mounts and prop. The landing light
as provided by Tamiya is not bad, but can be improved. I hollowed
out the lamp portion, painted the lamp assembly Flat Black, with the
required lighter dry  brushings
and finally installed an MV Products railroad lens. It was
time to install the sliding hood, but prior to this I needed to drill a
fine hole in the clear canopy to allow the antenna wire to pass through.
To ensure that I did not inadvertently scratch the canopy with a
wandering drill bit, I placed a small piece of masking tape in the area
where the hole was to be, prior to actually making the hole with a #80
drill bit. Stretched sprue was used for the antenna wire and was
first fastened to the back of the pilot’s headrest. Once it had set
up, the sprue was carefully threaded through the hole in the canopy and
then the canopy was glued in place. Finally, the other end of the
sprue was fastened to a small hole previously drilled in the leading edge
of the vertical fin.
brushings
and finally installed an MV Products railroad lens. It was
time to install the sliding hood, but prior to this I needed to drill a
fine hole in the clear canopy to allow the antenna wire to pass through.
To ensure that I did not inadvertently scratch the canopy with a
wandering drill bit, I placed a small piece of masking tape in the area
where the hole was to be, prior to actually making the hole with a #80
drill bit. Stretched sprue was used for the antenna wire and was
first fastened to the back of the pilot’s headrest. Once it had set
up, the sprue was carefully threaded through the hole in the canopy and
then the canopy was glued in place. Finally, the other end of the
sprue was fastened to a small hole previously drilled in the leading edge
of the vertical fin.
Using Humbrol gloss Crimson and Xtracolor Air Canada Teal, I painted the wing tip navigation lights, while the 3 underwing recognition lights were finished with Tamiya Transparent Red and Green and Testors Turn Signal Amber.
|
CONCLUSIONS |
This was a scheme that had been tugging at me for the past 20 years and I am glad it is finally completed. I hope that it does not take me another 20 years to finish some of the other attractive schemes that I have in mind.
January 2004
|
REFERENCES |
Aero Detail No. 13 North American P-51D Mustang
Model Art No. 401 North American P-51 Mustang
Squadron Walk Around No. 7 P-51D
Photos from the DND Photo Lab
Editor's Note: This article is typical of what you will find in 'Random Thoughts' the bi-monthy publication of IPMS Canada. If you are not a member, then you need to look into joining. I have been a member for years and have never regretted it.
If you would like your product reviewed fairly and fairly quickly , please contact the editor or see other details in the Note to Contributors.