|
KIT: |
Fujimi 1/72 F-86F-30 'Mig Killer' |
|
KIT # |
F 19 |
|
PRICE: |
$8.50 (1991) |
|
DECALS: |
4 Versions--”MiG Mad Marine” of the 25th FIS flown by Major John Glenn, “Billie/Marge” of the 3335th FIS flown by Captain L.R. Moore, “THE HUFF” of the 39th FIS flown by Lieutenant Jim Thompson, and “Marlene, Nancy, and Marian” of the 39th FIS. |
|
REVIEW : |
Drew
Nix |
|
NOTES: |
|
Coming from the same stable that gave the world the P-51 Mustang, the F-86 proved to be a worthy heir to that thoroughbred. The original design of the Sabre incorporated a straight wing following the lead of the Lockheed F-80 and the Republic F-84 in design thinking. Captured German research (as well as some of their captured aeronautical engineers) led the design team at North American Aviation to experiment with a swept wing for greater speed. The results were outstanding. Most noted for epic battles high over the Korean landscape with its most well-known rival, the Soviet-built MiG-15 (they had captured data and engineers, too!), the Sabre became the most prolific Western fighter of the early 1950’s. Today considered a classic design, it can still be seen sometimes flying at airshows (ironically often with MiG-15s) in the hands of private pilots.
 The Fujimi F-86F is a little gem in 72nd scale! The kit is molded in a light
gray plastic with a hardness that is typical of Fujimi kits. All panel lines
are petitely engraved.
The Fujimi F-86F is a little gem in 72nd scale! The kit is molded in a light
gray plastic with a hardness that is typical of Fujimi kits. All panel lines
are petitely engraved.
Starting with the cockpit, you get a somewhat unusual arrangement. The cockpit tub is molded into the top half of the intake trunk. You get an instrument panel, the control stick, an ejection seat shape, seat back, headrest, and rear bulkhead to add to the basic tub. The instrument panel and the side consoles have nicely raised knob, dials, and switches making the decals that are supposed to cover them unnecessary. Once completed the cockpit looks very complete. Adding seat belts and harnesses will add even more to the overall effect The cockpits of Sabres were generally painted black, but unless you want it to look like a coal pit, then I suggest you use a “scale black” (dark gray) for your basic color. Drybrushing does wonders for this area.
 The rest of the kit goes together without any difficulty. The only areas
I had real trouble with were the aforementioned intake trunk. It comes in
a top and bottom piece. This means two seams running more than half way down
the inside of the fuselage. For those with extremely small fingers this may
not pose a problem, but for Big Thumb modelers like me, it was impossible
to fill and sand those seams. That’s too bad because Fujimi gives you
a nice compressor face to glue to the back of the intake trunk so that if
you look into the intake you can see the engine front just like on the real
thing. But, and this is what puts this kit above the average Sabre kit, Fujimi
gives you an intake cover and a tailpipe cover to glue in place so those
nasty seams are hidden!
The rest of the kit goes together without any difficulty. The only areas
I had real trouble with were the aforementioned intake trunk. It comes in
a top and bottom piece. This means two seams running more than half way down
the inside of the fuselage. For those with extremely small fingers this may
not pose a problem, but for Big Thumb modelers like me, it was impossible
to fill and sand those seams. That’s too bad because Fujimi gives you
a nice compressor face to glue to the back of the intake trunk so that if
you look into the intake you can see the engine front just like on the real
thing. But, and this is what puts this kit above the average Sabre kit, Fujimi
gives you an intake cover and a tailpipe cover to glue in place so those
nasty seams are hidden!
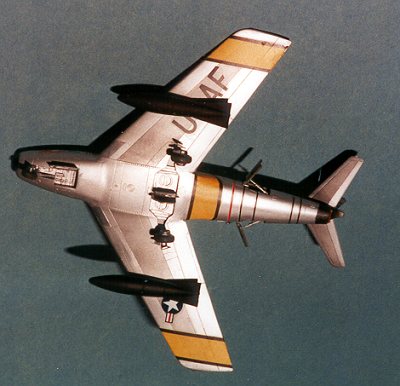 Fujimi also gives you the option of adding Sidewinder missiles to your Sabre.
You have to open up some holes in the wing bottom to do this. DON’T
DO IT for any of the Sabres shown on the decal sheet. Only AFTER the Korean
War did Sabres carry Sidewinders! The 120 gallon drop tanks are nicely done
and should be used with this kit. The early jets were notoriously thirsty
beasts, so drop tanks were required if the pilot had any long distance flying
and fighting to do.
Fujimi also gives you the option of adding Sidewinder missiles to your Sabre.
You have to open up some holes in the wing bottom to do this. DON’T
DO IT for any of the Sabres shown on the decal sheet. Only AFTER the Korean
War did Sabres carry Sidewinders! The 120 gallon drop tanks are nicely done
and should be used with this kit. The early jets were notoriously thirsty
beasts, so drop tanks were required if the pilot had any long distance flying
and fighting to do.
This kit does have some “fiddly” parts, but not so many as to discourage the modeler with average skills. As mentioned, Fujimi seems to prefer a hard plastic. Not only is it hard to rescribe lost panel lines, but it makes their clear parts brittle. I broke the kit’s canopy while polishing it. I bought another kit and used the canopy from that one. When the Hobbycraft knock off of this kit came on the market, I bought it and gave it as a gift to a friend along with the rest of the second Fujimi kit.
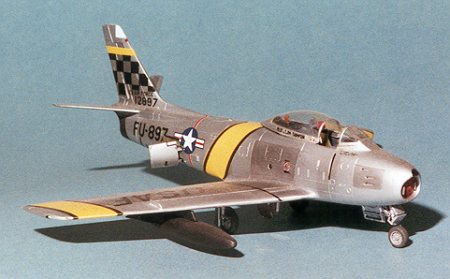
What will daunt many builders is the fact that all Sabres shown on the decal sheet are finished in natural metal. I used my own concoction of 60% Floquil Old Silver, 20% Floquil Crystal Cote, and 20% Testors Model Master Thinner to get the basic metal finish. This formula can be tricky, so try it on some scrap plastic before committing it to your pride and joy. If you hold your mouth right and if the painting gods are smiling, you will get a nice hard metal finish. I have sprayed this formula over primed plastic without any problems. It dries hard in about five minutes and can be taped over without worry. I used different shades of Testors Metallizer to do some individual panels.
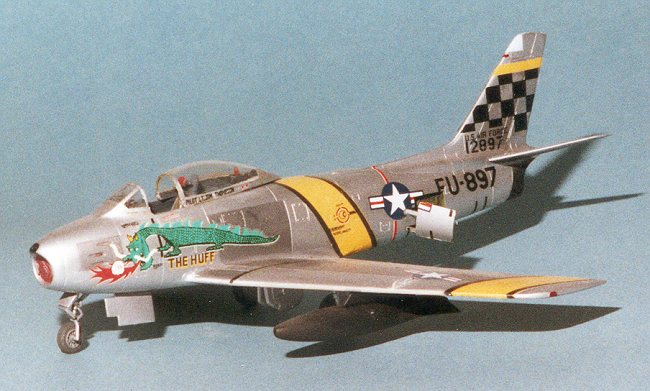
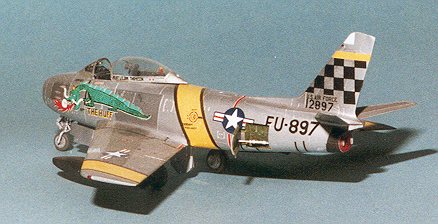
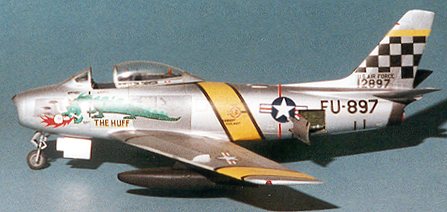 Surprisingly for me, I used the kit decals. I chose “THE HUFF”
for its colorful firebreathing dragon design. The decals went on without
any trouble except for the fuselage band, it never did want to conform right
to the contours. I fiddled with it so much, that part of it shattered, causing
me to have to patch it with other decal bits. If you’ve ever worked
with a natural metal finish before, you know you have a problem with decal
film showing, particularly on the darker metal panels. I tediously trimmed
the excess film from around the larger numbers and letters, such as U S A
F, before applying the decals. In doing research on “THE HUFF”,
I came across a color picture of this aircraft in the excellent Squadron/Signal
book “MiG Alley”. I thought the drop tanks looked like they had
been painted black, so I painted my model’s tanks black. Several months
later, in perusing the book again, I noticed that the tanks were actually
a very dark Olive Drab! Too late to change, it just underscores the old maxim
“do your research”!
Surprisingly for me, I used the kit decals. I chose “THE HUFF”
for its colorful firebreathing dragon design. The decals went on without
any trouble except for the fuselage band, it never did want to conform right
to the contours. I fiddled with it so much, that part of it shattered, causing
me to have to patch it with other decal bits. If you’ve ever worked
with a natural metal finish before, you know you have a problem with decal
film showing, particularly on the darker metal panels. I tediously trimmed
the excess film from around the larger numbers and letters, such as U S A
F, before applying the decals. In doing research on “THE HUFF”,
I came across a color picture of this aircraft in the excellent Squadron/Signal
book “MiG Alley”. I thought the drop tanks looked like they had
been painted black, so I painted my model’s tanks black. Several months
later, in perusing the book again, I noticed that the tanks were actually
a very dark Olive Drab! Too late to change, it just underscores the old maxim
“do your research”!
This is, by far, the best F-86 kit in this scale and before the advent of the 1/48 Hasegawa Sabres, it was the best Sabre kit in any scale. Recommended.