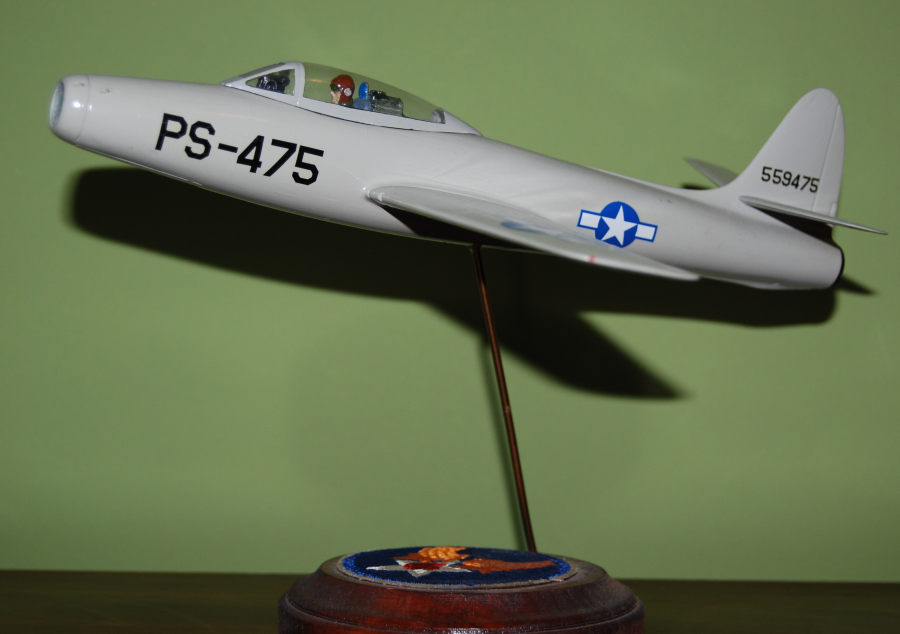
Hawk 1/48 XP-84 Thunderjet
| KIT #: | 5050 |
| PRICE: | $2.00 |
| DECALS: | One option |
| REVIEWER: | Christopher Campbell |
| NOTES: | Very dated kit. Good for nostalgia build |

| HISTORY |
The Republic P-84 dates from the dawning of the American Jet Age, though not before the Bell P-59 Airacomet and Lockheed P-80 Shooting Star were already flying. A General Operational Requirement that would result in the Thunderjet was issued in September of 1944. This was for a mid-wing jet aircraft with a top speed of 600 miles per hour and a combat radius of 850 miles.
Republic’s design team headed by Alexander Kartveli initially had the idea to offer up a jet powered version of the, by then legendary P-47 Thunderbolt. However, after a month of work it became clear that a clean, or very nearly so slate was needed. The resulting design was a single engine jet fighter with the intake at the nose, setting the pattern for many jets, U.S. and foreign, to come. Traces of the P-47’s DNA were in evidence, as the wing was clearly influenced by that of the P-47N. Like all Republic designs, it would also be rugged, as it would show under the harsh combat conditions in the Korean War.
It was unveiled as a mockup during February of 1945. The Army Air Force was impressed with what they saw, and the XP-84 would proceed to the prototype stage. Moreover, a contract was issued to Republic for fifteen YP-84A developmental test aircraft and eighty-five P-84B production aircraft. This before the prototype had yet flown!
The first aircraft to be powered by General Electric (Later to be produced principally by Allison) J-35 axial flow turbo jet, the XP-84 took to the air for the first time on February 28, 1946. In August the second prototype would set a U.S. speed record of 611 mph. at Muroc Army Air Field (later Edwards air Force Base). This was only five miles per hour slower than the world speed record established earlier the same year by a Gloster Meteor F.4.
Armament would initially be in the form of six .50 M3 Browning machine guns with 300 rounds per gun. Four were mounted in the nose and one in each wing root. This would be changed to the more commonly used M2 variant with a slower rate of fire in production aircraft.
Later development aircraft and F-84B models would carry 230 gallon fuel tanks on the wingtips, giving the aircraft its familiar silhouette. Additional tanks could be carried on the inboard pylons or various bombs or rockets. Retractable, folding stubs allowed additional rockets to be carried on the wings outboard of the landing gear. An ejection seat would be fitted, though pilots were initially not authorized to use it! This was not the only problem.
There were initially issues with an insufficient supply of parts for necessary maintenance as well as the crews having equally insufficient training to adequately perform said maintenance, especially on the J-35 engine. There were problems with trim reversal, unexpected wrinkling in the fuselage skin, and even structural failures, resulting in all aircraft being grounded for a time.
 Meanwhile,
the United States Air Force had just become its own, independent service. All
formerly designated Pursuit aircraft would now be designated as Fighters. Thus,
the Thunderjet became the F-84.
The problems noted with the F-84B would be addressed on the production line and improved aircraft would be designated F-84C’s. This in turn would be superseded by the F-84D, E, and G models, all of which carried numerous improvements over the earlier models. The G variant would be the superlative form.
By the time production of the straight wing F-84 had ended in 1953, more than seven thousand had been produced. Starting with the E variant, inflight refueling capability had been added. Thrust to weight ratio had improved with newer versions of the J-35 and optional R.A.T.O. packs were available, allowing for take-offs with quite significant ordinance loads. In the G model, this would include the capability to deliver a nuclear weapon.
In combat during the Korean War D, E, and G models flew more than 86,000 missions. This included escorting B-29 bombers initially. However, after two were lost for a single MiG-15 downed, the North American F-86 Sabre soon inherited these duties and the Thunderjet was relegated to a task at which it excelled: ground strike. Carrying rockets, conventional bombs, and/or napalm, it was a ground pounder par excellence. Many would fly hundreds of missions, several exceeding the 1,000 hour mark.
E and G variants would serve in the air forces of export customers around the globe. These would include Belgium, Denmark, France, Greece, Iran, Italy, Netherlands, Norway, Portugal, Taiwan, Thailand, Turkey, and Yugoslavia.
The F-84G would also be the first aircraft of the U.S.A.F. Thunderbirds aerial demonstration team, beginning in 1953. It would be superseded in this role by the swept wing F-84F Thunderstreak in 1955. However, this was not the first time that the Thunderjet had served in a demonstration team, with the U.S.A.F.E. Skyblazers transitioning to the F-84E in 1950 after having initially flown with the Lockheed P-80B shooting star. In this role, it would serve for three years, replaced by the F-86 Sabre in the same year that the Thunderbirds first took to the air.
A vastly redesigned version, the F-84F Thunderstreak with swept wings and powered by a Wright J-65 jet engine producing more than 7,000 pounds of thrust would enter service in 1954. It would in turn be developed into the RF-84F Thunderflash, a highly successful reconnaissance platform. Both would also serve with numerous air forces world-wide.
Following the Korean War, the Thunderjet would increasingly be relegated to Air Guard service in the U.S. They remained in Strategic Air Command service for the longest, the last standing down in 1957. Even in this Secondary role, it would be retired by 1964, as time and newer aircraft designs had passed it by. Its final foreign service would be in Yugoslavia, with theirs being retired a decade later. The Thunderstreak would leave Air Guard service by the end of 1972. The last operational RF-84F’s were retired by Greece’s Hellenic Air Force in 1991.
Despite its long service, the Thunderjet and subsequent Thunderstreak and Thunderflash models never quite escaped its early reputation as being a troublesome aircraft to maintain. It was often nicknamed the “Mechanic’s Nightmare,” “Lead Sled,” or “Super Hog.” Yet it proved its worth in Korea many times over. This is unfortunately largely overshadowed by the F-86 Sabre, largely due to its reputation as a MiG killer. (To that, and some others, I can apply a favorite quote from the movie Flight of the Intruder: “Fighter pilots make movies. Bomber pilots make HISTORY!”)
It may not have been as pretty or as glamorous as some fighters. Yet it was tough and reliable, despite a reputation to the contrary. Many came back with damage that would have brought down a Sabre. Then it would go on to serve into the age of jets such as the F-4 Phantom II, F-15 Eagle, and F-16 Falcon/Viper. In some cases, it may have even been replaced by the Phantom or the Falcon. Even the legendary F-104 Starfighter that oft superseded it with many squadrons both in U.S. and foreign service only lasted four years longer in Air National Guard service. That is not a bad legacy at all.
| THE KIT |
First released by Hawk in 1957, this kit is typical of releases of this era. The pilot and “cockpit” are molded into the top of the fuselage, and there is no actual cockpit, merely some hints of an ejection seat and an instrument cowl and gunsight. The kit features wingtip and underwing tanks. The former may be omitted if one chooses, as the wingtips are molded so that it could be displayed without them. There is landing gear, though the bays are open hollows with no detail whatsoever.
The canopy in the version that I had was the unframed type seen in earlier F-84 variants before the G model (though D’s and some E’s seem to have carried this type canopy as well). However, I have heard that it was at one point released with a canopy molded with G type framing. The first one of these that I built seems to have had this, from my recollection. This would have been the 1970 release which I bought one of around 1976 or 1977 from the local Gamco Hobby Shop a few miles from the house where I grew up in Huntsville, Alabama, near an intersection called Five Points.
 This mold
has been revised several times over the years. I believe that it formerly
featured decal locators which were removed from the molds at some point. It was
also offered at least once as a Hawk chrome plated release. So far as I am
aware, it has only been offered with U.S.A.F. decals, though there was no
shortage of foreign operators.
This particular release was one of the later Testors H.S.O. (Hobby Shop Only) releases and was molded in soft grey plastic. Parts count is low, as it is a very simple kit. You get the wing halves, the fuselage halves, wing and underwing tanks, landing gear, wheels, and bay doors, a horizontal tail, and the canopy.
As noted, I acquired two of these in the bags with instructions and decals. I had decided to build one out of general nostalgia, though would unquestionably build it up in flight, as I did not want to deal with fabricating gear bays for it, especially given that the Monogram, ProModeler, and Tamiya kits were available by this time. It seems to have been released as a knockoff or “clone” kit from Chematic as recently as 2010.
One final note, a few years ago I came across something a bit odd in an antique store. This was an old water gun that had clearly been based on the old Hawk 1/48 mold, though made by Marx toy company. However, as I looked it over, there was no question that it was derived from the mold somehow, fitted with a pistol grip and squirt gun works. Interestingly, it had decal locators molded onto it, including a very dated PS serial number. If the Hawk kit ever wore this type of serial, I have not seen it, though. In this guise it was known as the Marx Jet Shot Plane Pistol.
| CONSTRUCTION |
I was looking through my copy of the Squadron/Signal F-84 in Action book and wondering what to do with these two bagged kits when I saw photos of the XP-84 Thunderjet in the same dove/pearl grey paint that I found so striking on the early P-80’s. I immediately knew that this was what I wanted to build: the XP-84. This would be simplified by the fact that the tip tanks could be omitted.
I had no intention of building a show piece. I simply wanted to have fun and build something that I would enjoy having on my display shelves, simple as it would be. This was going to be a little blast from the past.
I started by assembling the wings with traditional Testors tube cement, going a bit nostalgic as it were. These were clamped shut with rubber bands and set aside. I then turned my attention to the simple changes that I would make to the interior so that it would not be a see through model if you looked in the intake or exhaust.
For the intake, I made an exhaust splitter out of a pair of Otaki Fw.190 underwing gun packs, glued together and sanded to shape. A tailpipe was fabricated from some appropriately sized plastic tube with some plastic card used to blank it off. This was painted inside and out using Testors Jet Exhaust, with Flat Black used on the blanking plate.
 The forward
area of the interior, inside in the intake, as well as the splitter were sprayed
with Testors Aluminum. While this dried, I worked on the wings, sanding the
seams and filling any remaining gaps with CA glue. This was sanded smooth with
400 grit sandpaper and finished with 0000 steel wool.
Once this was done, the splitter and tail pipe were glued in place with CA glue. Then the one-piece horizontal tailplane was fitted into its slot and the fuselage was closed up with gap-filling CA glue. I had left the horizontal tail loose and tacked it in place with CA glue applied with a toothpick once the fuselage was clamped together with rubber bands.
When this was dry the seams were sanded with 400 grit sandpaper. Any remaining gaps were filled with CA glue and sanded smooth, then finished with 0000 steel wool. The wings were glued in place and required a little filling. This was accomplished with Squadron Green Putty, then sanded and finished out in the same manner.
The gun ports in the nose were drilled out with a fine bit in a pin-vise. This was also done for the wing root guns. A hole was also drilled in the ventral fuselage in order to accommodate the length of copper braising rod that would be used for a stand. Everything was given a light rubdown with dryer sheets to smooth out remaining traces of sanding and blown off to remove any remaining dust. Now it was time to paint.
| COLORS & MARKINGS |
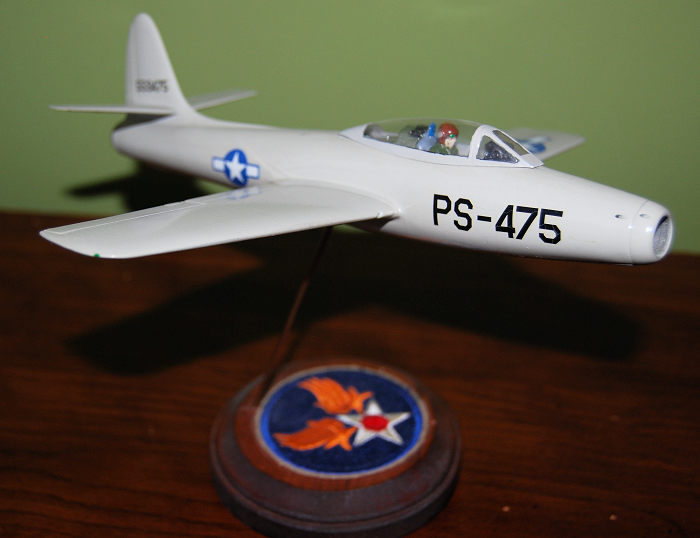
Painting was quite simple, as it was essentially all one color. This was the same dove or pearl grey as worn by the early P-80’s. To this end I planned to use the remaining paint that I had left from the conversion of the Monogram F-80C to an early P-80A. However, one look in the bottle indicated that I did not have quite enough. I attempted to reconstitute my mix. However, this time it came out a shade or two lighter than before, though still close to the right tone.
To make it simple to handle while spraying, a grip was fashioned from a piece of wooden dowl wrapped in plain masking tape so that it would just fit in the exhaust pipe. With this I was able to hold it easily while airbrushing it. I did not bother with masking the “cockpit,” electing to hand paint those details once it had dried. Satisfied with the results, I clamped the dowel in a bench vice and set it aside to dry for the better part of the afternoon.
The “cockpit” details were then painted by hand in Testors Flat Black, Flat Grey, and Model Master Medium Green. The pilot’s flight suit was painted in a mix of Medium Green and Olive Drab with a small blue Air Corps patch added to the shoulder with tiny yellow wings. While the helmet was molded as a more modern, hardshell type, I painted it in Testors Leather to represent the earlier type of cap in use when the Thunderjet first flew as well as painting the goggles and tinting them green. Some minor dry brushing was done in a few spots with Testors Silver.
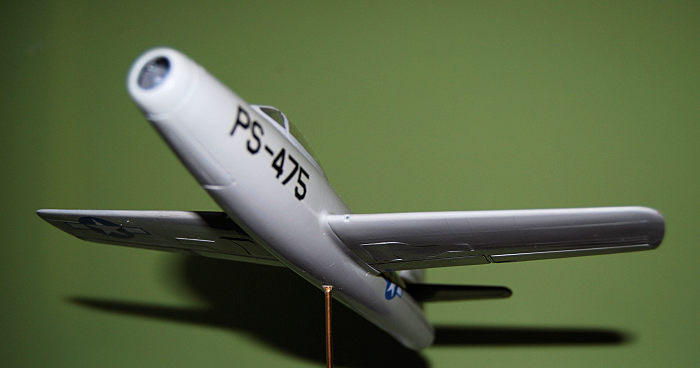 Finally, the
engine exhaust ring was painted in Model Master Dark Anodonic Grey. Then the
whole model was shot with Model Master Gloss from a good old rattle can. This
was set aside to dry for the rest of the afternoon.
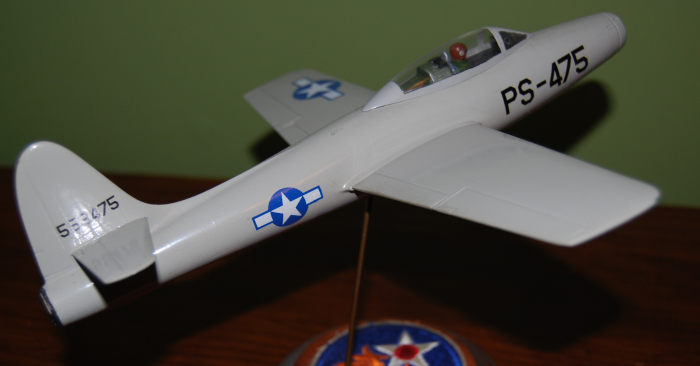
The decals for this were nearly as simple as the paint. Serial numbers for the nose and tail were gleaned from my “Numbers & Letters” file in my decal cabinet, though I could no longer say what sheet they actually came from. These were, of course, assembled number by number and letter by letter. For those who have done this, we all know that this can be a bit tricky with getting the spacing and alignment just right. For those who have not had that experience, it is not as bad as it might sound. As with most decaling, patience is everything.
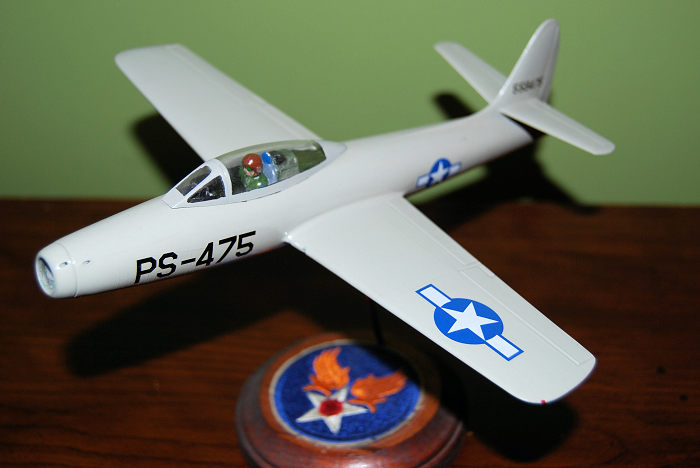
The only other markings, the national insignia on the wings and fuselage were another matter. I did not have a great deal of insignias of this style in my stash at the time that were not part of an uncut sheet slated for one W.W.II aircraft or another. Since the wing decals are quite large, the only thing that seemed to fit belonged to a few P-47 sheets that I definitely had plans for. I looked through my decal remnants binder and found a set that I believe started life with an Otaki 1/48 Corsair. They were noticeably too light a shade, though were all that I had at the time.
All of the decals went on without problems and settled down with a small amount of Solvaset. Once they had cured for a bit, everything was shot once more with Model Master Gloss, as before.
| FINAL ITEMS |
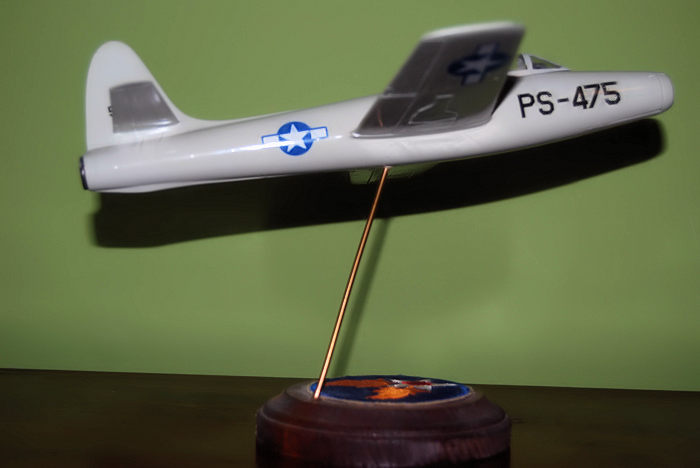 While the
clear coat was drying, I set about building a stand from a simple round base
that I had on hand. This was given some wood stain and drilled out to accept
the length of copper braising rod that I had chosen for the support. A U.S.
Army Air Corps shoulder insignia patch that I had on hand was glued to the
base with Elmer’s Glue All to add a little color and flair to it.
The canopy framing was then hand painted in the same paint used for the aircraft. A bit of clear plastic was glued to the gunsight at an angle to add a little more detail to the sorely lacking “cockpit.” The canopy was glued in place with a little CA glue. Then the model was glued in place on the copper wire stand using the same Elmer’s Glue All so that I could remove it or reposition it if I cared to later. Finally, wing tip lights were added with Testors Green and Red using a fine brush.
| CONCLUSIONS |
In retrospect, I should have just used better national insignia. Still, I could replace these now and might. These decals went on so cleanly and nicely that I have adopted something of an “if it ain’t broke, don’t fix it attitude.” In looking at photos in a couple of books while writing this, I noticed that I missed adding the finned pitot tube to the port wing. This would be easy to correct and probably will be corrected, now.
To say that this kit is basic, even primitive, and long in the tooth is a gross understatement. It was at the time that I built it nearly twenty years ago. More so, it was when I built one in elementary school. Still, it was fun and easy.
The whole thing was built on a single Sunday in 2005 and most importantly, it was fun, taking me back to when I would build a model over the course of an afternoon or a weekend, though with better looking results now. I think the actual working time was less than four hours.
It is no showpiece, though I have shown it for the fun of it a few times. I have never seen another XP-84 at any show that I have attended. In that respect, it gets some attention.
I still have the other kit. I plan to build it up as well, in flight, of course. This one will wear a most unusual paint scheme, an overall red as one of a handful of U.S. Navy F-84G drones. Again, it will mostly be fun and just adding another aircraft in an unusual livery to my shelves.
This is no longer a kit for a serious modeler by any stretch, nor has it been one for decades. Monogram & ProModeller (subsequently Revell) and Tamiya have released thoroughly modern kits of the Thunderjet in F-84E & G variants. These could be readily backdated to an earlier variant by a modeler with a little experience and fortitude. This is mainly a collector’s piece now.
Still, if one happens across a bagged kit, as I did, it would make a nice project for a beginning modeler, as it is very simple and has a minimum of fit issues, owing to this simplicity. For myself, these kits were extras in a box and I decided to have a little fun and take a break from building something complex or complicated. The results were everything that I had hoped for. I suspect I will find the same when I build the somewhat oddball U.S. Navy drone.
As always, have fun. Enjoy your build and be satisfied with what you did. That is what makes a hobby fun and most importantly, relaxing.
| REFERENCES |
F-84 Thunderjet in Action by Larry Davis & David Menard, #61, Squadron/Signal Publications, 1983
F-84 Thunderjet in Action by Larry Davis, #1224, Squadron/Signal Publications, 2011
F-84 Thunderjet in Detail & Scale by Bert Kinzey, Vol. 59, Squadron/Signal Publications, 1999
Republic F-84 Thunderjet, Thunderstreak, & Thunderflash by David R. McLaren, Schiffer Military Books, 1998
12 November 2024
Copyright ModelingMadness.com. All rights reserved. No reproduction in part or in whole without express permission.
If you would like your product reviewed fairly and fairly quickly, please contact the editor or see other details in the Note to Contributors.