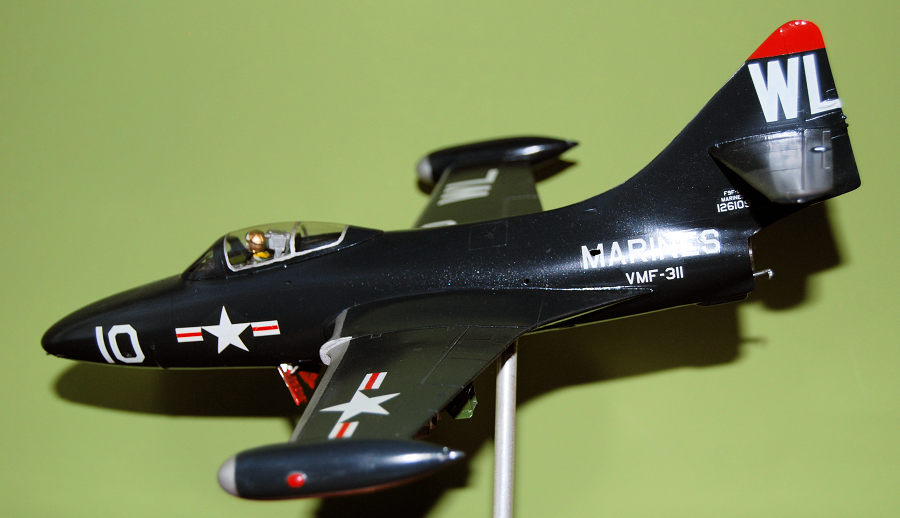
Monogram 1/48 F9F-5 Panther
| KIT #: | 5456 |
| PRICE: |
$10.00 'used' |
| DECALS: | One option |
| REVIEWER: | Christopher Campbell |
| NOTES: |
An older kit that stands the test of time. |

| HISTORY |
The history of the Grumman F9F Panther has, to a large degree, been done to death, including on this website. I will keep this brief and mainly concentrate on the subject of my build.
The Grumman F9F was one of several contenders to become the U.S. Navy’s first frontline jet fighter at the dawn of the jet age. The first design ideas were for a twin engine jet with engines in wing mounted pods, looking something like a Gloster Meteor and a Panther put in a blender. Redesigned around a single engine, the Rolls Royce Tay (an improved version of the famous Nene), produced under license by Pratt & Whitney as the J-42, it would first fly in 1947.
By this time, the Navy already had three first generation jets: the FH-1 Phantom, the FJ-1 Fury, and the F6U Pirate. All were decidedly inferior designs and primitive in some respects compared to the Panther. The Phantom would go on to be developed into the F2H Banshee which would see action alongside the Panther in Korea. The Fury, with radical modification to its basic design would eventually evolve into the legendary F-86 Sabre, and in turn to the swept wing FJ Fury variants.
However, the Panther was the class of its field from the onset. Production would begin in 1948. Multiple variants would see action in Korea both with U.S. Navy and Marine Corps squadrons. These included both the -2,-3, and -5 versions as well as photo recon versions.
 Along with
the nearly indestructible Skyraider and venerable Corsair, it would be the
workhorse fighter bomber of the Navy and the Marines during the conflict. More
than 78,000 combat sorties were flown, mostly against ground targets. However,
it could also hold its own in a dogfight, downing seven MiG-15’s over the course
of the war and scored the first U.S. Navy jet air to air kill, downing a Yak-9
in 1950.
It would also serve as the first jet mount of the Blue Angels aerobatic team, beginning in 1951. It would continue in this role until replaced by a swept wing development of the same airframe, the F9F-8 Cougar in 1954. These would eventually be replaced by the F11F Tiger in 1957.
The Panther would be withdrawn from frontline service starting in 1956, most often replaced by its direct descendent, the swept wing F9F-7/8 Cougar. Some would continue on in reserve and secondary roles until 1962. The Cougar would continue on in U.S. service for quite some time. While frontline service ended before 1960, it would serve in reserve units and training roles as late as 1971.
The only foreign operator would be Argentina, receiving F9F-2’s beginning in 1958. They would also operate a pair of F9F-8T Cougar trainers, also this type’s old export customer. The Argentine Navy would operate them until 1969 and 1971, respectively. They would see action internally during the Naval Revolt of 1963.
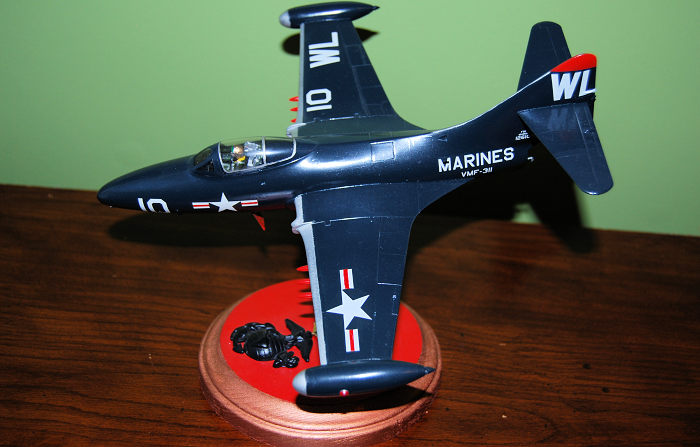
The subject of this particular Panther build would be that of Boston Redsox legend Ted Williams’ F9F-5 from his Marine Corps service during the Korean War. This was not his first war, however, having enlisted in the Naval Reserve in May 1942 and receiving his wings as a Marine Aviator almost exactly two years later. While slated for deployment towards the end of World War II, Williams spent most of the War as a flight instructor in Pensacola, having proven himself a natural and adept pilot.
Entering the inactive reserve in 1946, he was recalled to active duty in May of 1952. At this point he had not flown an aircraft since shortly after the end of the War. This was not uncommon, as inactive reservists were frequently called up before active during Korea. (Such is much the story depicted in the book and film The Bridges at Toko Ri, with the protagonist Lt. Brubaker’s story being quite similar, and not an uncommon one.)
Now a Captain, he would be assigned to Marine Corps squadron VMF-311 and deployed to Korea towards the end of 1952. He would fly as wingman to future astronaut John Glenn on many missions. Glenn would describe him as one of the best pilots that he had ever flown with. This echoed what fellow pilots noted about him during his World War II service.
 In addition
to his skills as an aviator, he also exhibited exceptional gunnery, shredding
tow targets during trainings exercises. This was no doubt in part due to his
well known 20-15 vision (It has been said that he could see the stitches in
rotation on an approaching baseball and judge which way even the wildest curve
ball might turn. Fellow servicemen also noted that he could read the label on a
78rpm record while it was spinning. Try that sometime!)
Flying out of Pohang, Ted Willaims would fly thirty-nine combat missions. On his third, near Pyongyang in February of 1953 in which his Panther took significant flak and small arms damage, losing hydraulics and electricals. He made a belly landing with the aircraft on fire at Suwon. The aircraft was a total write off, though Williams was uninjured and in combat again the next day.
In June of 1953 he was hospitalized, having developed pneumonia. During his convalescence, an inner ear infection was discovered. This would lead to the revocation of his flight status and ultimately his return to the U.S. in August. He would resign his commission shortly after, returning to baseball and playing for the Boston Redsox again from 1954 through 1960. After retirement from playing, he would manage the Washington Senators and Texas Rangers for a time. He passed away in 2002 at the age of 83.
As a final note, I have several times seen it reported that during his time in Korea, Ted Williams downed anywhere from one to four MiG’s. Nothing that I have ever read from what I would classify as a credible source corroborates this. I believe that this is confusion (or, perhaps, wishful thinking by fans), due to the same last name with U.S. Navy aviator Lieutenant Royce Williams. His kills were scored in an F9F Panther around the same time as Captain Ted Williams arrived in the theater.
This is not in any way to diminish Ted Williams’s service record, having served five years in two wars, but rather a clarification. While it was revealed in later years that he was notably unhappy with being recalled to service during the Korean war, he was pleased enough to do what he considered his patriotic duty. That sense of patriotism was part of why he has always placed near or at the top of my list of favorite baseball players.
| THE KIT |
Released by Monogram in 1990, this kit represents an F9F-5 variant and is molded in dark blue plastic with nicely rendered raised panel lines. It features fixed wings with under wing stores of both rockets and bombs. Having gone through four releases, it has also been offered as an F9F-5P recon version in 2004.
 For many
years, the only 1/48 F9F Panther kits were the quite old Hawk, Aurora, and
Premier releases, some dating from the Korean War itself. However, AMT would
release an F9F-2 version in 1977 during their sudden run of rather eclectic 1/48
scale offerings. This kit, while original, was barely an improvement over it
predecessors in terms of the level of detail offered.
The Monogram kit was a quantum leap over what had come before and quite welcome upon its arrival. It has always been offered with decals featuring markings for either one or two U.S. Navy and/or Marine Corps Aircraft. It has a very accurate shape and generally good details, especially given that this mold is now over thirty years old. It has since been hotly debated by some in comparison to the somewhat more detailed and newer Trumpeter Panther, this debate being rather polarizing.
For myself, when I built this kit, the Trumpeter issue of their own kit was still three or four years off. In truth, I have never seen the inside of the box of one and cannot make an assessment one way or the other. I was happy enough with what I had to work with in the monogram kit and will definitely build more. My only complaint with it is that it would have been nice to have the option of wing-folds included in the kit, though this is something of a minor one from my perspective.
| CONSTRUCTION |
When I came across the Yellowhammer Models Decal sheet 48-09 featuring the markings for Ted Willaims’ F9F-5 Panther at a model show, I bought it immediately. Then I set about looking around the show for a kit to use it on. It took a few minutes, though I found one of the original releases from 1990 and bought it as well.
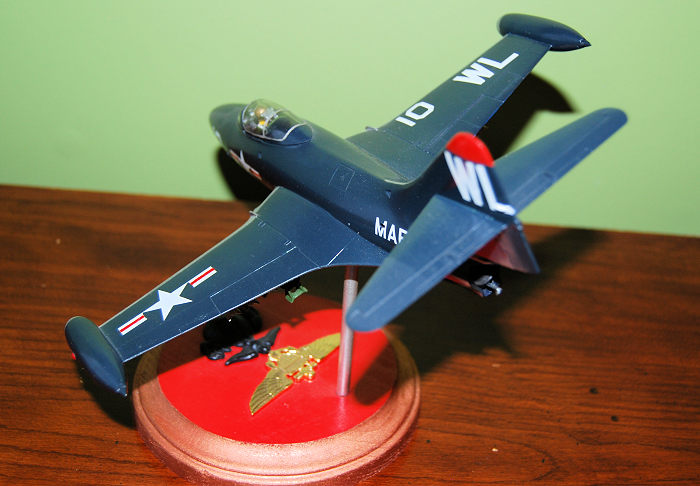
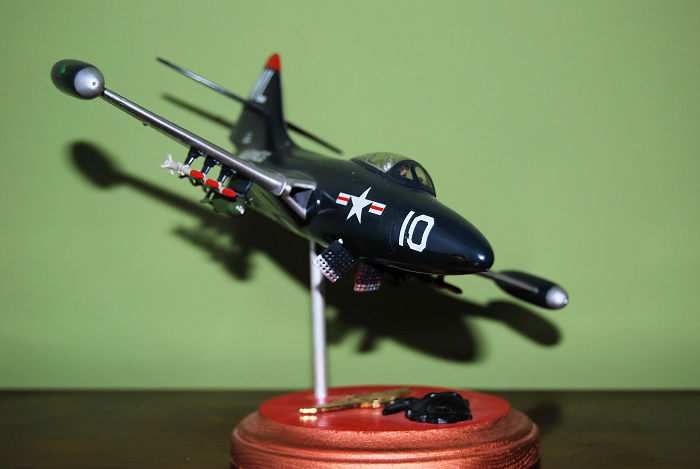
While in-flight display and stands are no longer in vogue for modeling, nor have they been for some time, I was struck by the lines of the Panther and how good it might look if displayed in flight. This was nothing entirely new, as I had the AMT kit hanging from the ceiling of my bedroom in-flight when I was in elementary school, and it was a new release. Thus, I decided that was what I wanted to do with this one, build it up in flight on an attractive stand.
I started with the cockpit and the pilot figure, building it by standard instructions as to painting with Model Master Interior Green used for the cockpit with appropriate panels painted in Model Master Flat black. Gauges and knobs were drybrushed in Testors silver to bring out details along with picking out others with Flat Red, Flat Yellow, Flat Grey, and Flat Green using a fine brush or a toothpick, as needed. Specific colors used in painting the pilot figure are not recalled at this point. The only thing that I am definitively certain of is using Gold with a splash of brass in it for the “old gold” color of the helmet, as seen in various photos of Williams during his service.
 The cannon
barrels are their own separate pieces that must be glued in from inside the
fuselage before closing it up. Since there is no doubt that paint will get on
these pieces during painting the main airframes, it seems sort of pointless.
There would have been little visible difference if they were molded with the
fuselage, and I suspect the likelihood of breaking them during work no
different.
These were glued in place with CA glue. The exhaust pieces were painted in Testors Jet Exhaust and then glued in place as well, along with the nose gear well. Then the cockpit tub, complete with the seat and pilot figure glued in place were then fitted and the fuselage was closed up using thick CA glue. This took care of ay real gaps and I managed to smooth things out using 320 grit paper followed by 400 and 0000 steel wool.
This was when I noticed that some things would have to be changed from the kit standard assembly in order to build it up in flight. First of all, the tail bumper is molded in the down position. This was simple enough to cut away, trim and glue back in place as it would be in flight. The landing gear doors would be a little more trouble, though. More on that later.
The wing assembly proved simple. Make certain to open the ports in the ventral wing surfaces so that weapons pylons can be attached, if you wish to use them. Intake trunking is provided and was glued in place with CA glue. The wings were then glued up using Thick CA glue and sanded much in the same manner as the fuselage. This subassembly was then glued to the fuselage and mine proved to be a fairly tight fit. It was not perfect, though, necessitating some minor filling with Squadron Green Putty. Once sanded smooth, any additional filling of small remaining gaps was done with standard CA glue and finished out with a little sanding.
Before installing the horizontal stabilizers, the landing gear doors were addressed. Gone, it would seem, for the most part, are the days when one had the option of building a model with the landing gear either up or down. This seems to have vanished, mostly, sometime in the 1980’s. The landing gear covers would fit over their respective bays. However, they were molded so as to be displayed open. Some trimming and cutting of tabs and such was required to make things fit cleanly and look as though it was an aircraft in flight with the gear stowed. This took test fitting of every piece until everything looked as though it would fit. Things were glued up with CA glue and any excess sanded away with 0000 steel wool.
The horizontal stabilizers were glued in place and proved a good fit with only a minimum of cleanup. The main bomb pylons and the rocket pylons were glued in place with CA as well. Now it was nearly time to paint.
One last thing was done first. This was drilling out a hole in the ventral part of the aircraft where I would mount the aluminum tubing post for the stand once painting and decaling was complete. This was done with a pinvise and successively larger bits until I reached the size for the piece of tubing that I would eventually use.
| COLORS & MARKINGS |
Painting could hardly have been simpler. The cockpit and pilot was masked off with Tamiya tape and the intakes and exhaust were stuffed with damp paper towel bits. Then, every thing was sprayed with Model Master Gloss Dark Sea Blue. Once dry, the leading edges of the wings were masked off and sprayed with Testors Silver. The tip of the tail was also masked off and sprayed in Testors Flat Red.
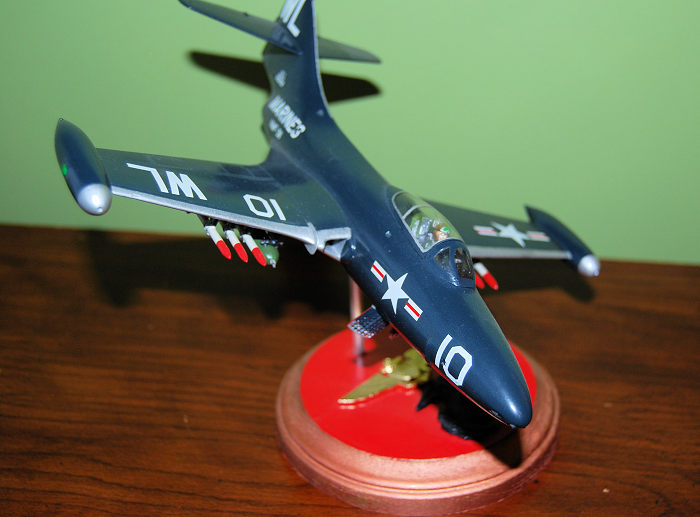
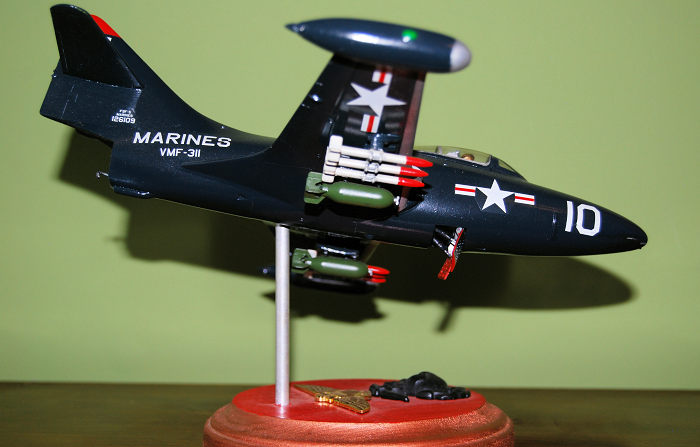
While waiting for other paint to dry, the 1000 lb bombs were assembled and painted in Model Master Medium Green. The rockets were painted in Testors Flat White with Flat Red tips.
The decals used were from Yellowhammer Models sheet 48-09. First, any masking was removed and the model was given a coat of Model Master rattle can gloss. Decals were then applied using Solvaset, though this seemed a little harsh for the decals and I very nearly had trouble with one or two.
 Once these
were all in place and had settled down and cured, a light coat of Model Master
Gloss was sprayed over everything again. The running lights were painted in
Testors Flat Red and a no longer remembered Humbrol Green.
The bombs and rockets were glued in place. The bombs pylons have very nicely molded shackles, making this a little more realistic than many kits in the scale and provide multiple attachment points. As with most rockets in any scale, there is no very positive point of alignment for these. This makes it a bit tricky, though somewhat to be expected.
The pitot tube and miscellaneous antenna and small details were added, also painted in Gloss Dark Sea Blue. The speed brakes were installed in the deployed position, as I liked the look of them like this. Then the canopy framing was painted by hand and the canopy and windscreen were carefully installed using CA glue applied with a toothpick.
I used a generic, round wooden base painted in U.S.M.C. Scarlet rimmed in Testors Copper. It was drilled out to accept the aluminum tubing for the stand. Then a U.S.M.C. emblem and golden Aviator wings were added.
The tubing was glued in place on the stand using some J-B Weld. The Panther was then set on the stand and adjusted until an appealing angle was found. It was then “secured” in position using some Elmer’s white glue so that it could be removed at a later time or repositioned if desired.
| CONCLUSIONS |
There is little to say about the Monogram F9F Panther kit that I have not already noted. While I will admit that I have not personally looked at any of the newest 1/48 Panther kits to have been offered, I personally find this one rather sufficient, even if it my not be a shake and bake kit. I have two more in the stash, one to build as the F9F-5P version, which was the recent version released in 2008.
It builds up fairly easily and most of the fit is good enough for any modeler with even a little experience to build it up into something very eye-catching. There are also numerous aftermarket decals for various Panthers, so markings will not be a problem. It still builds into a very attractive model of a very attractive aircraft. It also lends itself well to detailing, and I have seen several on the internet or at shows that have been modified with folding wings and other modifications. I recommend this one to all.
| REFERENCES |
F9F Panther/Cougar in Action by Jim Sullivan, #1051, Squadron/Signal Publishing, 1982
USN/USMC Over Korea by Thomas E. Doll, #6048, Squadron/Signal Publishing, 1988
Air War Over Korea by Jim Mesko, #6082, Squadron/Signal Publishing, 2000
Air War Over Korea by Larry Davis, #6035, Squadron/Signal Publishing, 1982
U.S. Fighters of the Fifties by Nico Sgarlato and Franco Ragni, #6023, Squadron/Signal Publishing, 1979
F9F Panther in Detail & Scale, Vol. 15, by Bert Kinzey, Aero Publishers, Inc., 1983
Ted Williams at War by Bill Nowlin, Rounder records Corp, 2007
https://en.wikipedia.org/wiki/Grumman_F9F_Panther
https://en.wikipedia.org/wiki/Ted_Williams
4 November 2024 Copyright ModelingMadness.com. All rights reserved. No
reproduction in part or in whole without express permission. If you would like your product reviewed fairly and fairly quickly, please
contact the editor or see other details in the
Note to
Contributors.