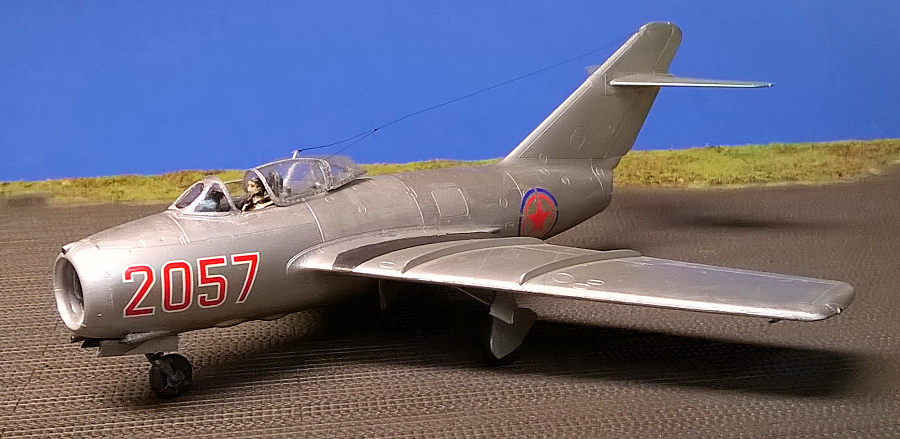
| KIT #: | 7424 |
| PRICE: | £8.24 |
| DECALS: | One option |
| REVIEWER: | Ed Bailey |
| NOTES: | Modified kit decals and borrowed decals from Smer No. 0933 "MiG-15 USAF." Base is Italeri No. 1327 "Pierced Steel Planking" |

| HISTORY |
Back in the mid 1980s, I was working on my BS in aeronautical engineering at Embry-Riddle Aeronautical University in Daytona Beach. The professor for my drafting course was a man named Kenneth Rowe. I didn't I know much about him at the time. I think I knew he was from Korea. He was a strongly-built, soft-spoken man, who taught the course more by demonstration on the board than by lecturing. He was a gifted teacher. I'd studied mechanical drawing in high school, and thought I knew my stuff, but I had a lot to learn from Mr. Rowe. One thing he showed us very clearly was how to do projections; that is, how to generate a view of an object from any desired direction using the views we already had. He especially made the process of doing projections really click with me. All of a sudden, my mind's eye changed! Previously, my mind's eye was something like a flat piece of paper, with flat pictures on it. He helped change my mind's eye into a three-dimensional space, where I could fold the "paper" around a three-dimensional object to capture sight lines and describe the object from any direction. It's not really an exaggeration to say that Mr. Rowe taught me how to see, and it's been a huge help to me ever since, one of the most valuable things anyone ever taught me. Back then, even CAD drafting was mainly 2D, and the third dimension needed to be in the draftsman's head, but since the late '90s, I've done most of my CAD work in 3D, and even with the computer screen, I wouldn't be able to visualize what I was doing without what he taught me.
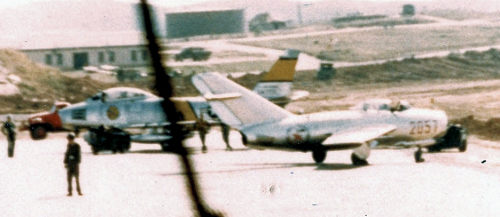 The following semester, I
was talking about him to another student who said, "Don't you know? He's the guy
who flew the MiG-15 down from North Korea and defected!" Wow! Mr. Rowe was in
fact someone famous to me, not by name (I didn't know the name No Kum-Sok) but
by his daring act. I grew up with aviation stories, mostly from my dad, and knew
all about American WW2 fighter aces and so on, and also knew about a North
Korean pilot who shortly after the armistice in 1953 dared to escape to freedom
by flying his MiG-15 down to Kimpo Air Base and landing there. He was at serious
risk of being shot down, either by his comrades or by the fighters and
anti-aircraft batteries defending South Korea.
Over time, my modeling has come to be more about people and their stories, and not just about machines. Gradually the notion snuck into the back of my mind to build a model of Lt. No Kum-Sok in his MiG-15bis, just landed at Kimpo Air Base. Mr. Rowe wrote a book about his adventure (A MiG-15 to Freedom) that I found useful for this model, especially for modifying and painting the pilot figure. He describes his flight suit, which was mainly black leather with a black leather flying helmet, standard issue for Soviet pilots since WW2, and he mentions that as soon as he landed at Kimpo Air Base he pulled off his oxygen mask to breathe the sweet air of freedom. That may sound like a trite cliche to some people perhaps, but I have no doubt it falls utterly short of what he was feeling at the time.
An unfortunate side note is that the North Korean government executed several innocent people associated with him who had no involvement in his defection. This only underscores what a hellish place he escaped from.
| THE KIT |
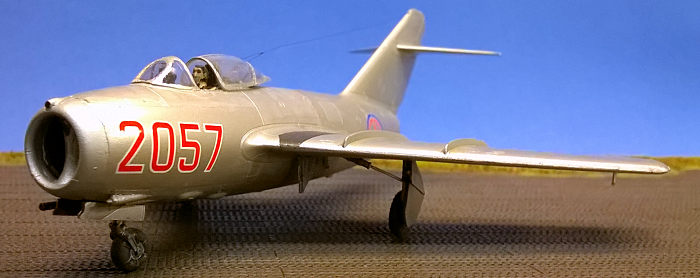 Scott Van Aken did a
preview of this kit. My impression is that it's
beautifully molded but fiddly, not from excessive parts count or from parts too
tiny to handle, but from the way it's engineered. More about this as I go into
construction. The tooling dates from 2013 and Eduard's kits came a long way
before that but have come a long way since. This kit provides parts that enable
you to build different versions of the MiG-15bis, which like many aircraft went
through production changes as old parts and assemblies were used up and new ones
were substituted. In order to build the plane I had in mind, research was
necessary to know when to follow the kit instructions and when not to. My
research indicated the kit decals needed modification, and they were tough
enough to stand up to it while being thin and lying down nicely.
| CONSTRUCTION |
Let me admit up front that I did a poor job on this model. I did my best to fix things, but it won't win any awards unless the IPMS starts giving out participation trophies. I fouled up in part due to trying new things, which is a sure-fire way of wrecking a model. This build marks my first use of Alclad II, of Perfect Plastic Putty, and of washi tape. I also tried out a product for rigging, some 0.03mm (.0012") diameter copper wire by Thomas' Modelworks, a gift from my friend Sunny Lam (a fellow member of Delaware Valley Scale Modelers) that he brought back from one of his trips to Hong Kong. I also had a horribly cluttered workbench the entire time. But the first problem was the imperfect fit, starting with the cockpit, disrupting the fit of subsequent assemblies.
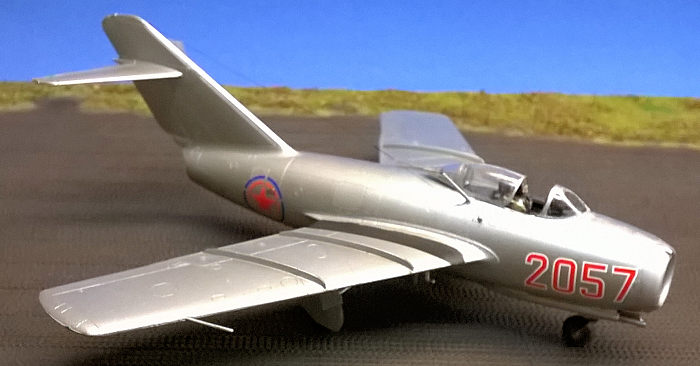 As is customary, assembly
starts with the cockpit. In the case of the MiG-15, however, the jet intake
splits around the cockpit and nosegear well, and the inner faces of the intake
ducting, represented by parts C43 and C37, form the cockpit sidewalls. Since
these need to fit within the fuselage halves, any error here will tend to pry
the fuselage halves apart later, which is exactly what transpired. I knew this
plane would be a tail-sitter, so I put bits of lead in the space available as
far forward of the main gear as possible, secured with superglue. I expect this
was where I went wrong. Anyway, I continued with assembly and painting of the
cockpit and nosegear bay. One might expect the MiG-15 cockpit color to be that
turquoise color that we associate with Russian aircraft (which they supposedly
use because it helps aircrews remain calm but alert), but at that time the paint
used on interior surfaces was a somewhat bluish medium grey. I used photos of
the very aircraft I was modeling, which resides at the National Museum of the
United States Air Force at Wright-Patterson AFB, to estimate the color as I
mixed it using what acrylic paints I had on hand.
Since a pilot figure was mandatory to show the moment when Lt. No was taxying to a stop at Kimpo Air Base, I raided an Italeri kit for a pilot, which I modified by cutting off the arms and repositioning them. I also made an oxygen mask and hose, and put these on the figure but unsnapped from the flight helmet on one side. It came as a surprise to me that MiG pilots during the Korean War were still wearing old leather flying helmets, but hey, building models can be educational! One feature Eduard left in this Weekend Edition kit is the "super fabric" harness, which I applied over the pilot figure.
Assembly moved on to the fuselage, which as I stated, didn't quite fit together with the cockpit assembly inside. I only discovered this when I tried to fit the lip of the intake (part C46) onto the front. Some sanding and rescribing of panel lines ensued. Next came the wing. Try as I might, it didn't fit right on the left side. (Note: one problem with plastic aircraft models is that they get us talking about "left" and "right" wings, and considering them to be two wings. Real aircraft and flying models are not built this way. The wing goes straight through for structural reasons, and most of us modelers have experienced structural failure of plastic models due to the load on the wing prying the fuselage apart. In the case of the MiG-15, the structure is a little more complicated: the front half of the wing goes straight through, splitting the two intake ducts into four, but the rear spar attaches to a ring-shaped fuselage frame right in front of the engine, so the four separate ducts recombine into one duct before the engine inlet.)
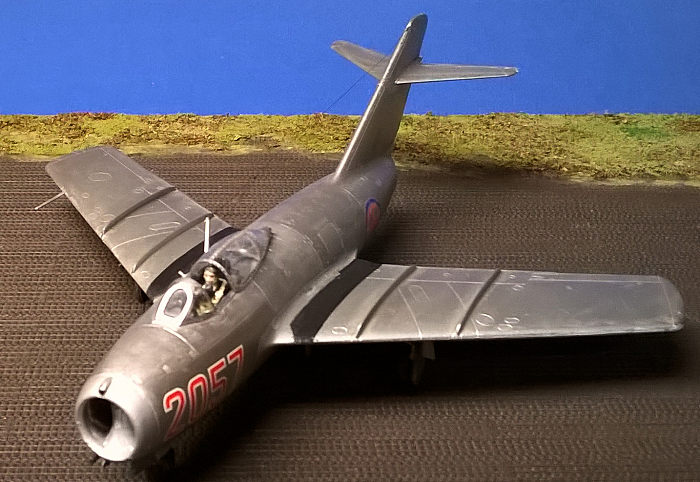 Anyway, I trimmed away
excess material from the slot and tab where the "left wing" attached, but never
got a perfect fit. I also used a simple fixture for getting the correct dihedral
angle (or in the case of the MiG-15, anhedral angle). This was something I'd
built out of two scraps of wood held together with a screw and a wingnut. I
measured the anhedral angle from a drawing in Squadron-Signal's MiG-15 in Action
by Hans-Heiri Stapfer. I also noticed the kit's wing doesn't quite match the
plan view in the book, but I don't know whether the error lies in the kit or the
book, or a little of both.
Lt. No's MiG, Red 2057, didn't have all the features of later production aircraft, and I had to choose parts included in the kit to reflect this. For starters, the landing light was still in the top of the center fairing in the front of the split intake, and not the retractable unit in the lower left wing root as in later aircraft. This meant I had to use the alternate parts that Eduard includes, part A9 instead of C28 for the intake splitter and B9 instead of B10 for the lower left wing half. (I'll just mention the few other differences right here, that this particular MiG had no IFF antenna on top of the fuselage, and had a T-antenna configuration with the aerial wire going from the top of the mast to the top of the tail, with a lead going to a connector behind the right side of the cockpit. Many MiGs simply had a wire going from this connector to the top of the tail. Also, as far as I can tell from photos, it has unspoked main gear wheels. Next time I get to the Air Force Museum, I may find out I'm wrong about this.)
Assembly progressed to the smaller bits like landing gear, but only after applying the natural metal finish. Here was another fiddly aspect of this kit. The doors covering the main gear struts, as on many aircraft, are split into two panels to allow for the compression of the strut. The lower panel is rigidly fastened to the strut and the upper is hinged to the lower wing with a link connecting to the strut to swing it clear of the lower panel as the gear comes down. For some inscrutable reason, instead of making this link come off the strut at the correct angle, Eduard asks the modeler to bend it so it will meet the upper panel at the right place. No doubt this decision has elicited cursing in English, Czech, and many other languages. The cylinders for actuating the main gear (parts C22 and C23) are the most delicate parts in this kit. I broke one and fixed it, not perfectly, but kudos to anyone who can tell from my photos which one it is.
The main gear also are designed to avoid a cheat lots of model manufacturers have used: the top of the strut is a peg that fits into a recess molded into the landing gear bay in upper wing half. This makes assembly easier, but if the real thing were assembled this way, how would the gear retract? Instead, Eduard has shows the hinge pin of the real thing, which makes a T at the top of the strut, and their cheat is a third pin that disappears between the wing halves after assembly. Unfortunately, this calls for really tight assembly tolerances for the upper and lower wing halves to provide a good fit for the landing gear, but you're not necessarily going to notice the fit problem until it's too late. As a result, one of my main gear struts had a rather wobbly fit. I aligned it by eye and hoped it'd stay put after the glue dried, and so far so good, knock wood.
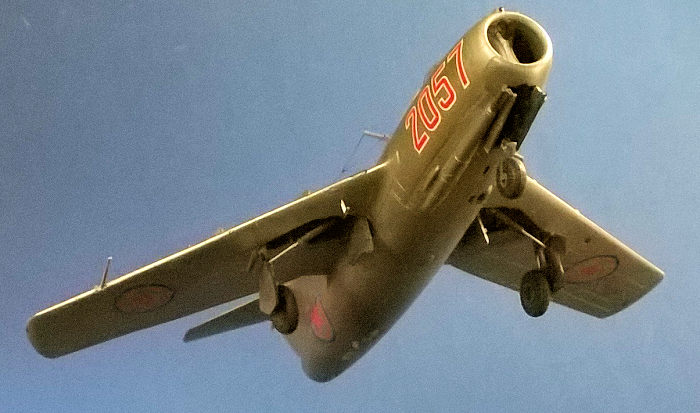 The sliding section of the
canopy is a three-piece affair with optional parts (why, I wonder) for open and
closed options. A pin on its bottom causes the open canopy to stick up at an
improbable angle, so I trimmed this off before attaching it with white glue.
I left off the antenna mast and pitot tube until I was completely done with decals and weathering, but I'll mention this step here instead of coming back to it. The pitot goes into a hole between the wing halves, but the antenna mast just gets glued onto the fuselage inside a small scribed rectangle. A dab of gel superglue, some accelerator applied with a liner brush, and then don't even breathe on it! The wire aerial needed to have a more secure purchase, so I drilled tiny holes in the top of the tail and where the lead comes into the fuselage, and stuck the fine copper wire in wrapped around a length of stretched sprue with gel superglue on it. The copper wire, at .0012", comes out to less than 3/32" at this scale. The connector on the fuselage actually sticks out into the airstream, so I left the stretched sprue stick out a bit there. It took many attempts to make the T-antenna, but finally I got the other bit that goes to the mast knotted on and secured with Micro Liquitape from now-defunct Krasel Industries, a water-soluble pressure-sensitive adhesive. Finally there still ended up being a little slack in the wire, but I was no longer willing to put additional effort into this. I'll just follow Ed Wood's philosophy: "My next one will be better."
| COLORS & MARKINGS |
As stated above, this was my first time using Alclad II. I chose White Aluminum over a base of their "Black Primer and Microfiller." In all cases I used my aged Paasche VL at about 15 psi. I'd already brush-painted the tailpipe with Metalizer exhaust, and put a stick up the tailpipe to hold the model while spraying. The primer coat had some rough spots that I dealt with using K&S sanding films. It took a several thimblefulls of the aluminum to cover the aircraft completely, and after the third I realized I should have cleaned the nozzle. A little blob of the stuff landed on the underside of the right aileron. It's lacquer, so when I removed the blob, there was a divot in the aileron. This I filled with Perfect Plastic Putty. This is one product new to me that caused no trouble at all. It's a thick acrylic paste that does not attack styrene at all, and cleans up with water. I heartily recommend it. I also masked and painted the canopy, sans primer. The Alclad went onto the transparent parts without issue, the harder clear styrene probably being less susceptible to being attacked by lacquer thinner. The sliding portion of the canopy I masked with washi tape, which was a laborious process. The fixed portion, with its tighter curves, I masked with Liquitex Gloss Super Heavy Gel. This I did with lots of magnification, good lighting, and a fine liner brush. My verdict is that as long as there's a scribed line on the canopy to paint the gel up to, it makes masking a breeze. It peels off easily, too, leaving no residue. I also used it to mask the landing light in the nose.
I masked off a few areas and painted them with Alclad II dull aluminum (the nose) and dark aluminum (blast plates in front of the guns, dive brakes, and access panels). I also cheated and used some Testors Metalizer with a brush to highlight some panels. The Alclad gives a tough finish, but the amount of handling the model received caused it to wear off in spots, especially on the wing leading edge. This I touched up with Metalizer Non-Buffing Aluminum.
The markings were a
combination of kit decals for national markings and number decals for the "2057"
on the nose from Smer "MiG-15 USAF" kit number 0933. I could have used national
markings from the latter kit, but by my estimation, their slightly larger size
didn't match Red 2057's markings. It's hard to discern from period photos, but
it looks to me like the outer blue ring on Red 2057's national markings is
stenciled in five parts, like the inner red ring, not four as on some other
North Korean aircraft and on the kit decals for both kits. This i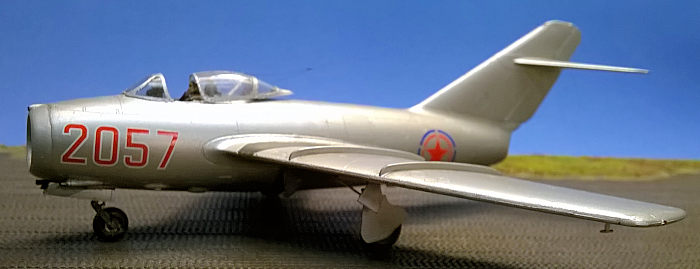 s how it's
represented on the restored aircraft at the Air Force Museum, and I believe the
guys who restored the plane must have access to the best photos. As a result, I
modified the kit decals. I filled in all the gaps in the blue ring but for the
top one using a GSI Creos Gundam marker that matched the color almost perfectly
(no, I'm not into Gundam, but the price was right and they come in handy). Then
I used a sharp No. 11 blade to cut the new gaps in the ring. Even with the abuse
I put these decals to, they behaved nicely. Maybe this thing with the decals is
a small detail, but if you aren't into small details, what the heck are you
building models for anyway?
I didn't bother checking the accuracy of the "2057" markings from Smer's decal sheet until after they were on, since they were all I had and it wouldn't have been feasible to modify them. In comparing them to photos of the actual aircraft, I noticed they're about 10% too wide and the numerals aren't quite the right shape, particularly the "2." If ever I do this subject again, perhaps I'll need custom printed decals.
Next came light weathering. This was a wash of Polly Scale grey and brown from my dwindling stock, mostly wiped off just to give the impression of use.
I stopped painting tires black ages ago, since they aren't really black, and my current go-to paint for tires is Vallejo Model Color German Grey, which I lighten a bit for the tread area. Eduard made painting the tires a breeze for the main gear, since the hubs are separate parts, but the nosewheel and strut are all one piece, so you need either super careful masking or a really steady hand. I opted for the latter. A steady hand mostly relies on resting the hand on the workpiece, so the only thing moving is the fingers holding the brush (or whatever tool you're using).
To provide a display base that looks like Kimpo Air Base in 1953, I used Italeri kit No. 1327 "Pierced Steel Planking." It comes with other airfield accessories that I haven't used yet, and seems geared toward a WW2 diorama. I've read that a different pattern of PSP came out by the Korean War but it was still steel. I figure it's close enough to the runway matting then in use a Kimpo. I gave it a shot of black automotive primer and drybrushed it heavily with Model Master Schokoladenbraun enamel, which I scrubbed with a toothbrush to burnish it till it had the look of corrosion-resistant steel. Along the edge it seems to have mud deposited over the matting by erosion, with some overscale footprints I puttied over, and I painted this various shades of brown and yellow and added Woodland Scenics foliage and some dried tea leaves pressed into Liquitex Gloss Super Heavy Gel. It will come in handy for photographing other models, too.
| CONCLUSIONS |
Eduard's 1/72 MiG-15 family of kits are a big step up from what came before in this scale. I can speak to two others from my stash, the rivety old KP kit recently reboxed by Smer and the later DML kit with its modern tooling but completely incorrect wing planform. I haven't looked for inaccuracies in Eduard's kit, since that tires me out, but did notice the wing fillet is incorrectly shaped but looks right for a MiG-15UTI, the trainer version. It's also a fiddly kit, with challenging assembly that requires a lot of test fitting. More than once I encountered fit problems as a result of prior subassemblies that had apparently gone together well.
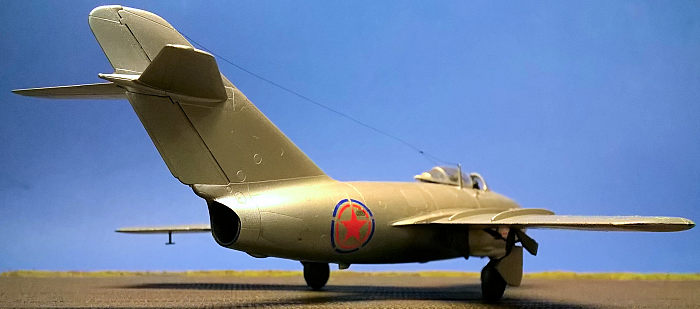 I'm glad I finally tried
Alclad II, and intend to go on using it. It's durable compared to Metalizer and
forms a coat more like paint. I was careful to respect it, since it's lacquer,
the natural enemy of styrene, so I made sure to apply light coats with my
airbrush. I did experiment with brush painting it, as I do with Metalizer on
small parts like pitot tubes, but this didn't work at all. There wasn't nearly
as much difference between White Aluminum and Dark Aluminum as I expected, but
there's quite a contrast between those and Dull Aluminum. I also brushed
Metalizer over Alclad, just to give contrast to a few panels without the need of
masking, and was happy with the results. Metalizer isn't quite as hot stuff as
lacquer, and seems not to attack the Alclad.
Perfect Plastic Putty is great stuff and I recommend it.
Thanks to Sunny Lam for the rigging wire. I'll have to use it to rig some biplanes and waterline ships next!
Thanks most of all to Mr. Rowe for being a great teacher, and for writing a book about his adventure. It's a good read.
| REFERENCES |
No, Kum-Sok. A MiG-15 to Freedom. McFarland & Company, 1996.
Stapfer, Heinz-Heiri. MiG-15 in action. Aircraft Number 116, Squadron/Signal Publications, 1991.
If you would like your product reviewed fairly and
fairly quickly, please
contact
the editor or see other details in the
Note to
Contributors.