Hasegawa 1/48 Pilot/Deck Crew set A
| KIT #: | 36006 |
| PRICE: | $20.00 or so |
| DECALS: | ` |
| REVIEWER: | Martin McClendon |
| NOTES: | You get a lot of figures to work with for your money. |

| CONSTRUCTION |
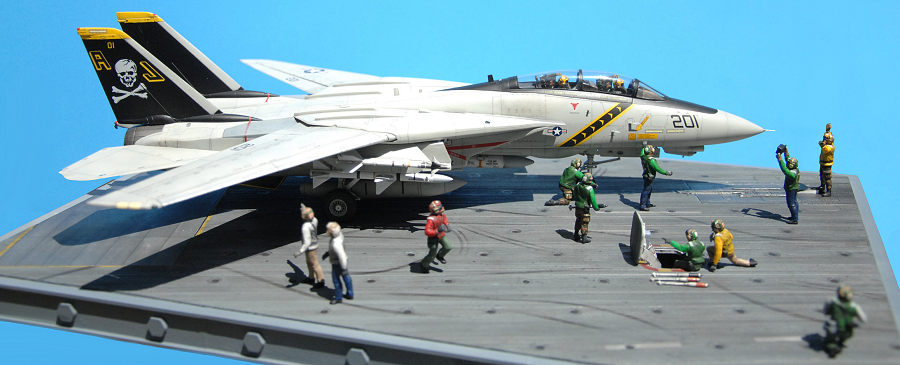
This article will go over the creation of a diorama base for display of the Hasegawa 1/48 F-14A Tomcat I recently built.
I prefer to set my aircraft on some kind of base and populate the scene with figures whenever possible. It gives a sense of scale, life, and movement to what is, let’s face it, a pretty static object when all is said and done. When making these bases I always turn to advice from the legendary Shep Paine; his books provide great guidance. He stresses the importance of making sure to tell some kind of story with his pieces. He also pre-planned all his dioramas and laid them out to ascertain exactly where to put all the elements for maximum impact.
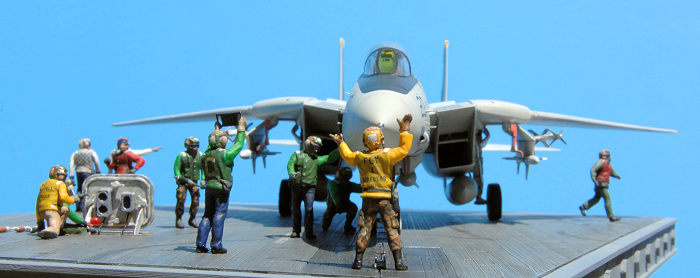
In telling a story about this carrier deck, I decided
it was the moment when our Tomcat is approaching the catapult. “201” is almost
there, being guided by the flight director while catapult crew help get the nose
gear lined up. The pilot has just begun to spread the wings from the deck
storage position to the flight
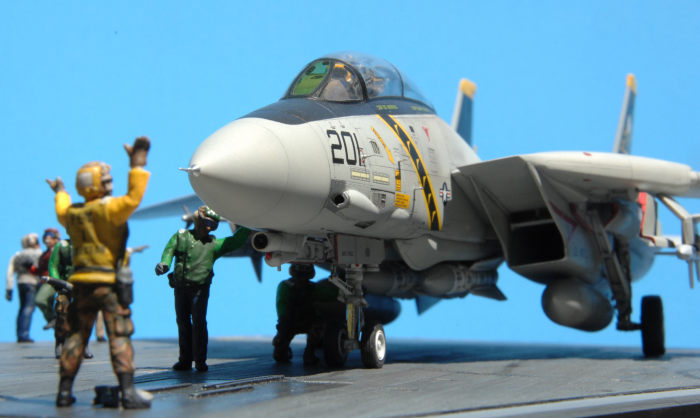 position. Meanwhile, two ordnance guys have
removed the last RBF tags and are exiting the scene. Two “plane checkers” are
coming forward to inspect something on the right rear fuselage. A cat crewman is
conferring with the “shooter” as they get ready to launch, and the “weight
board” operator is confirming the pilot’s weight estimate. Another cat crewman
is bringing over the “holdback bar” to attach to the nose gear, and lastly, a
publicity photographer is kneeling with camera in hand to capture the scene. In
reality, these things might not all happen in the same instant, but in keeping
with Shep’s advice I’m compressing the action to make a more interesting scene.
I have certainly seen plenty of photos where crew people are swarming all over
an aircraft before launch.
I had acquired the Hasegawa US Navy deck crew kit, which contains figures in various poses. There are a lot of figures in there for the money. To add variety I adapted their standard poses to all kinds of new ones over the course of several weeks. Legs and arms were broken, heads chopped off, and tiny gobs of Milliput and white putty used to heal the wounds. I did a lot of research on the various colors of “cranials” and “float coats” and made my best guess at how to distribute the crew around the plane. I came up with 12 figures, only two of which retained their OOB poses. After meticulous base painting with Tamiya acrylics, I went in with oils to add the subtle shading to faces and clothing that brings figures to life. Deck clothing gets pretty filthy from the photos I saw online, so the emphasis was on darker washes and grime. Goggles were painted with a mix of Tamiya dark blue and chrome to give a tiny bit of sparkle to the visors. Instead of using the provided white rectangle decals for the reflective spots on helmets, I base painted them white and used Tamiya tape to make tiny masks, then covering them with the various colors needed. Tiny pieces of wire were used to connect radio packs to headsets.
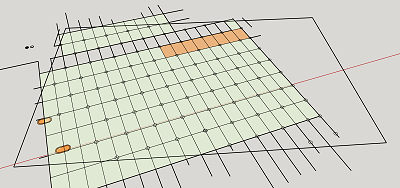 Meantime I began with the carrier deck. My display
space is limited, so existing kits could not be used. I decided to draw out my
ideal deck design in Sketchup and 3D print the deck parts at my preferred size
of 12” x 18”.
If you are interested in making your own model parts, Sketchup is a good place to start. It features a free online version that is a good entry-level software for learning how to design with CAD. I have an entry-level 3D printer I bought for about $200 back during the pandemic. It’s not fancy but for the basic shapes I usually print, it’s perfectly adequate.
After drawing out the overall shape, I added depressions for the tie-downs and also the catapult and blast deflector areas. This was done with just creating basic circles and rectangles and using the push/pull tool to “sink” them below deck level or raise them above it. I also included a hatch to open. The base was divided into tiles due to the small size of my print bed area, and these portions were exported as STL files.
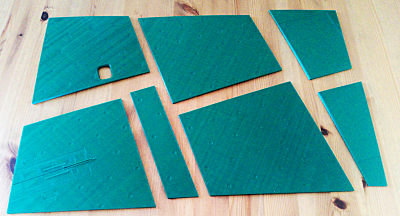 These files were then “sliced” using the open-source
software “Cura” to prepare them to print. I laid the plates onto the plywood and
traced out where the hatch would go, then used a drill and jigsaw to cut out
that portion. The plates were epoxied to the base and edged with more 3D printed
parts, fashioned to look like metal girders with giant bolt heads—vaguely like
ship superstructure, I guess.
Then it was back to Sketchup to create the hatch structure, as well as a few holdback bars, a weight board, and the catapult shuttle.
| COLORS & MARKINGS |
I used white putty to even out some of the dips
between deck plates. To make the anti-slip texture on the deck, I used Liquitex
acrylic modeling paste. It’s a little like thick white glue and has the added
advantage of obscuring the print lines from the 3D printing process. First I
used a hole punch to make little circles of masking tape to cover the tie-downs,
and then I troweled on the paste, then used a stiff brush to drag across t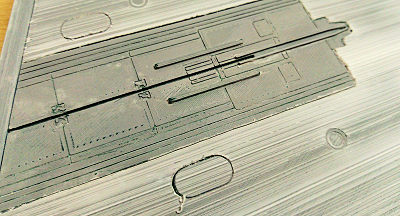 he wet
paste and create grooves. The blast deflector and catapult got a smoothing coat
of the paste, which I then sanded smooth. Once dry, I pulled up the masking tape
and hit everything with Tamiya’s light primer. The frame was painted with some
Model Master dark grey and masked off. Everything then got a coat of Tamiya IJN
Grey in a rattle can I happened to have. For the various deck markings, I just
made paper masks and taped them down, using Tamiya red, yellow, and white to add
these markings. The blast deflector area was painted Tamiya metallic grey, and
then was subdivided into individual metal plates using a pencil. I made a mask
of one plate and used it to spray individual striations of Tamiya aluminum onto
each plate. After it was dry, I retraced the pencil lines with a 0.1mm permanent
pen. The catapult was also sprayed metallic grey.
I then took Tamiya metallic grey and daubed a little
onto each of the tie-down divots. To simulate the tie-downs, I printed little
black pentagons split up into pie wedges onto clear decal sheet. After coating
each depression with Future I used the hole punch to punch out each o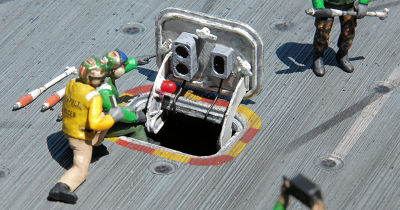 f the 82
decals, and applied them to give the illusion of the tie-down.
The deck then got several washes of heavily thinned Liquitex artist acrylic black, drenched on with a 1” wide brush. This darkened the deck and also shaded the grooves of the no-slip surface. Then it was time for tire marks. I used Sketchup to draw a series of swoops and curves, printed them onto a sheet of paper and cut them out, just positioning the paper randomly on the deck and spraying a little Tamiya flat black for the marks.
I would like to add that very much the same effect can be achieved without 3D printing. If you don’t have access to those resources, you could just draw out the tie-down pattern and other details directly onto some fine-grained plywood. Then mask off the various areas and spread modeling paste as above. Then apply the tie-down decals and use a fine-tip permanent marker to define various panels etc.
 The figures got coatings of Future where decals were
needed. Hasegawa gives you a bunch of tiny decals for the stuff written on the
backs of helmets and “float coats.” They were then sprayed with Tamiya matt
spray from a rattle can.
I then positioned the Tomcat on the deck, making tiny marks under each tire, so I can lift it off if needed. The Tomcat is not attached, but all the figures and deck accessories were now super-glued into place according to my plan. And all at once, almost a year of (non-continuous) modeling fun was done!
| CONCLUSIONS |
Navy aircraft give you lots of opportunity to create lively scenes with human figures. Hasegawa’s set is a great basis to work from, and with some basic 3D printing skills you can create a no-frills DIY setting for your finished models.
18 July 2024
Copyright ModelingMadness.com. All rights reserved. No reproduction in part or in whole without express permission.
If you would like your product reviewed fairly and fairly quickly, please contact the editor or see other details in the Note to Contributors.