Hasegawa 1/700 IJN Akagi
|
KIT # |
43201 |
|
PRICE: |
$23.99 |
|
DECALS: |
flags |
|
REVIEW : |
|
|
NOTES: |
Photoetched railings added |

|
HISTORY |
Originally conceived as an Amagi Class battlecruiser, she was converted to a carrier before completion because of the terms of the Washington Naval Treaty. Built initially to hold 60 aircraft, she was later modified to carry heavier aircraft and more AAW weaponry. As first converted she had three flight decks forward, no island and two funnels on the starboard side. During her 1935 reconstruction, the two lower flight decks were removed and the main flight deck was extended forward to the bow, plus an island was added on the port side. She led the attack on Pearl Harbor, but met her end only seven months later at the disastrous Battle of Midway.
 Akagi
Akagi
Builder- Kure Navy Yard
Laid Down- Dec.6/20
Launched- Apr.22/25
Commissioned- Mar.25/27
cancelled Feb./22 as Amagi class battlecruiser
then converted to a carrier starting in /23
island added in mid 1930's refit
attacked Jun.4/42 and badly damaged by dive bombers at Battle of Midway
scuttled by crew Jun.5/42
|
THE KIT |
See the Preview of this kit for a look at the bags.
|
CONSTRUCTION |
Assembly is basically split into
three areas:
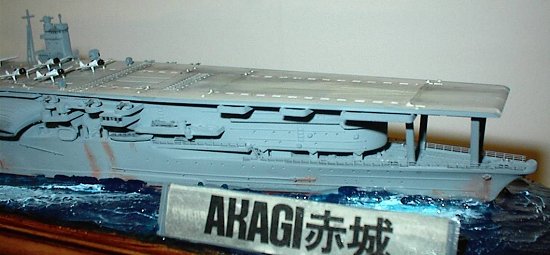
1. HULL: this includes the various anti-aircraft armament, motor launches,
anchors, etc. I dug into my spare pile of leftover photo-etched brass railings
to accent the many lower deck levels and attached them with CA glue. Many times
in 1/700 scale, brass railings seem a bit overwhelming but this kit is large
enough where I think the railings add significantly to the overall look.
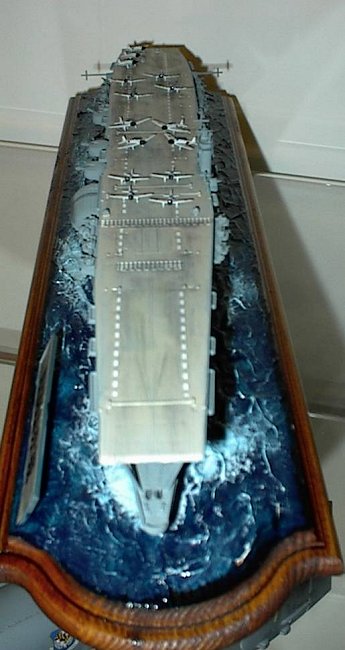
2. FLIGHT DECK: this includes the various observation sponsons, deck landing lights, the very small island, and other various communication antennas. The kit also gives you the option of showing any of the three deck elevators in the raised or lowered position. I chose to glue the three elevators in the up position in preparation for flight operations.
3. AIR WING: Though I am sorely lacking in Japanese aircraft knowledge, I think the kit includes 6 Zeroes, 4 Kates, 4 Vals, and 4 other aircraft that look a lot like P-40ís!! These were arranged on the deck after painting.
|
PAINT & DECALS |
I airbrushed Tamiya Light Grey overall which is actually a dark enough grey for the ship and scale. The flight deck was painted using Tamiya Deck Tan and was heavily weathered with earthy toned pastel chalks followed by black pastel dust to simulate rubber, oil, and exhaust stains. I also tried for the first time using colored pencils along with the pastels to give a bit more texture to the weathering. I used a metallic silver pencil to simulate bare metal on high wear surfaces like ladders, deck details, and anti-aircraft guns. I then used a reddish brown pencil for the running rust on the hull and then went over the rust again with pastel dust to smudge it around. Iím very pleased with this technique and look forward to practicing it further.
The Air Wing was painted using an old bottle of Testorís Light Grey (which is much lighter than Tamiya Light Grey!) I then painted the noses flat black. I had a set of 1/700 decals with most of the red meatballs I needed for the markings and the rest were dabbed on with red paint. The instructions indicated a camo scheme on the dive bombers so I added a mottled green color to a few of the planes to break up the grey.

|
CONSTRUCTION CONTINUES |
The water base was created using gel medium and acrylic Liquitex Blue, Green and White colors. Future floor polish provides the sheen. Mounted on a sign board, the ship appears to be moving along at a stately pace prior to flight ops. A spray of dullcote and a quick mahogany stain on the base completed the project.
|
CONCLUSIONS |
This was the first Japanese warship I have ever built. It was a nice change of pace, was an easy build and offered a good platform to practice weathering techniques on a ship underway. The kit has been around a long time but is an inexpensive kit of a ship with a long record of service. Even the brass railings were fairly easy to attach with minimal bending required to fit the edges. I can recommend it to all ship modelers.
|
REFERENCES |
http://www.warships1.com/index_ships.htm
Copyright ModelingMadness.com
If you would like your product reviewed fairly and fairly quickly, please contact the editor or see other details in the Note to Contributors.
Back to Reviews Page 2018