AMT Klingon Battle Cruiser
| KIT #: | 6743 |
| PRICE: | $15.00 when new |
| DECALS: | One option |
| REVIEWER: | George Oh |
| NOTES: |

| HISTORY |
In the original series (TOS) of Star Trek, there are two main forces confronting the Federation and Starfleet (their armed exploration ships or are they exploring warships?). They are the Romulans and the Klingons. The Klingons are a warrior race who possess a fleet of large Battlecruisers. Like the ships of Starfleet, the Klingon Battlecruiser (KBC) is capable of warp (faster-than-light) speed and travel at slower-than-light speeds on Impulse engines. They are armed with photon-torpedoes and equipped with electronic(?) defensive shields.
| THE KIT |
 This is a kit that has undergone several re-releases. This release has
been ‘updated’ by the inclusion of four small glow-in-the-dark pieces that
don’t. The 46 pieces (+ 4-piece stand) of the kit are still produced
without the problems of their age. Only a few mould seams required
cleaning-up.
The instructions are quite comprehensive, and oddly enough, are written entirely in English. The painting guide calls for three colours that blend into each other – possibly trying to re-create the effects of studio lighting. There are 6 items on the decal sheet – 2 Klingon Empire markings and 4 bars of Klingon script (not translated). I reckon that the Empire markings are too vivid.
| CONSTRUCTION |
I built this kit because of the imminent Melbourne Model Expo competition. I didn’t have much to enter so I scanned my stock of kits for something large and simple, and spied this one – perfect.
I worked on several sub-assemblies at the same time – the two engines, the hull, the stuff on the back of the hull, the boom and the bridge.
 There were some small detail pieces that had to be painted silver. These
were brush-painted with Humbrol enamel (No. 11), dry-brushed with a dark
grey, and put aside for attachment much later. The two engines and
the stuff on the back of the hull were no trouble. The photon-torpedo
tube is in the ‘chin’ of the bridge. This was a poor fit and required
several applications of putty to blend its lips with the surface of the
bridge.
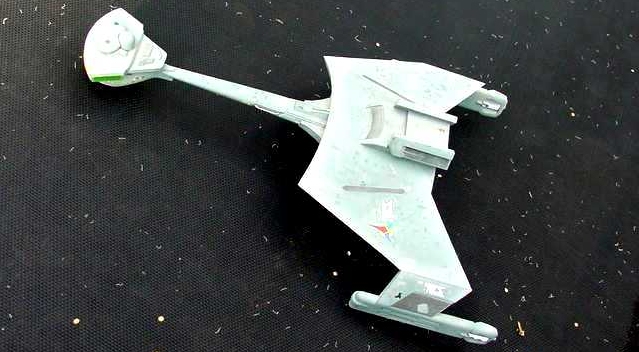
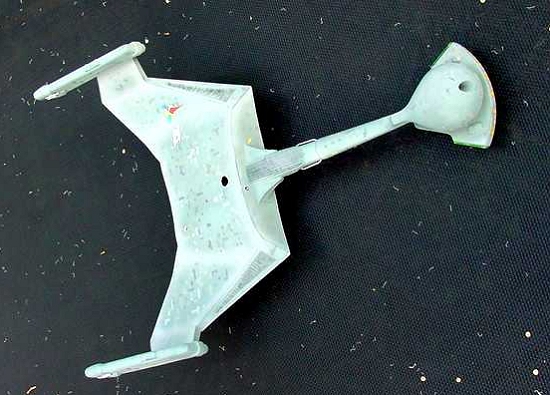
I had immediately zeroed-in on what I considered to be a weakness of the kit. The KBC has a long narrow boom that connects the bulbous bridge to the large rear hull. The boom is virtually butt-joined onto the front wall of the hull – a candidate for an easily knocked-off assembly. And the boom sockets into the back of the bridge, but the join is less than 10mm across – an easy decapitation (that Starfleet didn’t appreciate). My solution was to connect the front wall of the hull to the bridge via a long piece of coathanger wire. Additionally, I positioned pieces of brass tubing inside the bridge and hull to re-accept the wire in case of a future accident.
The big trouble with this kit came when I brought the sub-assemblies together. Plenty of glue (and some extra pegs) covered the bridge/boom/hull problem. But the engines/hull connection required lots of filler. I used plastic rod then putty to get a smooth surface with a sharp engine/body ridge.
| COLORS & MARKINGS |
Sorry, but I can’t recall what colour I sprayed-on for the overall coat, but it was a matt coat that caused me a few problems later. But right after spraying, I couldn’t help but notice that my incomplete but fearsome Klingon Battlecruiser looked like a toy. The problem was the smooth unbroken surfaces of the hull. I sprayed a faint white edge onto most of the ridges to demarcate the individual panels, but it didn’t do much. In desperation, I grabbed two 4”x4” pieces of graph paper – it’s covered with tiny connected squares – and, following the lines, I sliced a random pattern of squares and other shapes from it. With this stencil placed flat on the surface, I sprayed different colours onto the surface.
 I rotated, flipped and swapped the stencils between sprayings, and between
colour changes. Finally, I had much of the surface covered with a myriad
of panels of various colours. It was hard to know where to apply the
stencil, and when to stop.
I dry-brushed a bit of black onto all of the hard ridges to highlight them. Some surface detail received a dark grey coat brushed on, then a light grey dry-brushing. The silver bits were attached and light grey dry-brushed where appropriate. There were some portholes on the bridge – I poked some yellow paint into them.
Now I applied the decals. Remember that matt coat? Well the decals knew all about it. So I put down a small puddle of Microset, and put the decal on top of it. I got perfect decals, but the solution discoloured patches of the matt coat. My fix was to brush-paint the entire model with Microset.
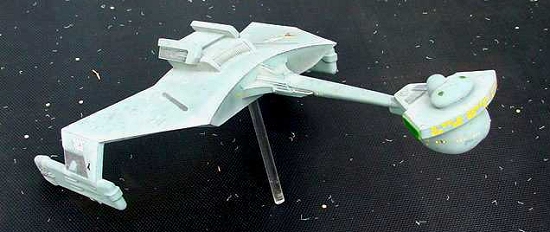
Hey, it worked, and the coat was of a uniform again, though a little darker. At the same time, I butchered an amorphous decal sheet to produce a lot of small irregular decals. Even though I hate applying lots of small decals, I stuck lots all over my Battlecruiuser – I still saw those big plain surfaces. When asked what they mean, I just shrug and say that I don’t speak Klingon. I cut-up a yellow stripe and applied the pieces to the front of the bridge to simulate more windows. A final matt coat, and my Battlecruiser was finished.
| CONCLUSIONS |
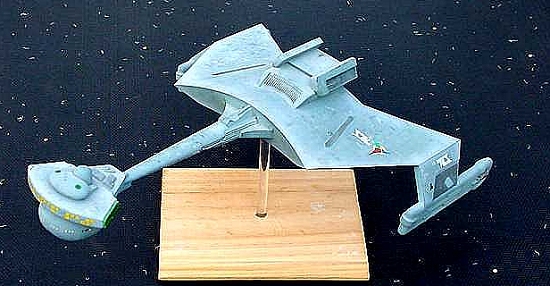
I assembled the stand – and the model promptly fell off. Why? ‘cos my model was balanced precariously on top of the stand – a pet hate of mine. My fix was to fit a piece of clear acrylic rod vertically into a piece of wood. At the same time, I widen the stand hole to accept the rod (that’s the one in some of the photos). The rod touches the underside of the roof of the hull, and holds-up my Battlecruiser. OK, my Battlecruiser can spin on the rod, but the whole lot dismantles easily for transportation.
 I built my Klingon Battlecruiser over 16 days, and some of my fixes were
the result of desperation. Apart from the puttying needed around the
photon-torpedo tube and in the engine/hull joints, this model was an easy
build, so I recommend it to anyone – especially Star Trek and Sci-Fi
buffs.
The reinforcing I included was to ensure that it was a robust model. Incidentally, I wasn’t trying for a space effect in the photos. I put my KBC on my children’s trampoline, and didn’t bother to sweep-off the bits of gumtree flowers.
If I had to build another one (and I do), I would place some vertical reinforcing inside the hull, ‘cos there ‘aint none. I would definitely rethink the windows on the bridge. And for fun, I will be fitting my next Klingon Battlecruiser with an additional two engines, possibly upside down above the existing two, or more probably underneath, at the corners of the hull.
| REFERENCES |
Recalling various episodes of Star Trek (The Original Series)
October 2004
Copyright ModelingMadness.com
If you would like your product reviewed fairly and fairly quickly, please contact the editor or see other details in the Note to Contributors.