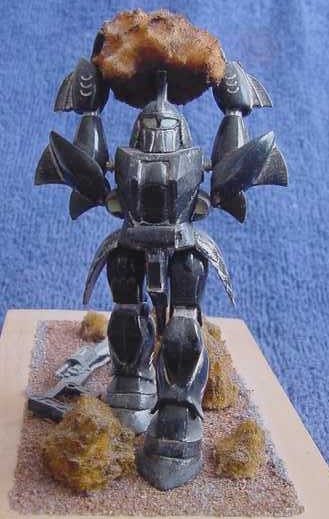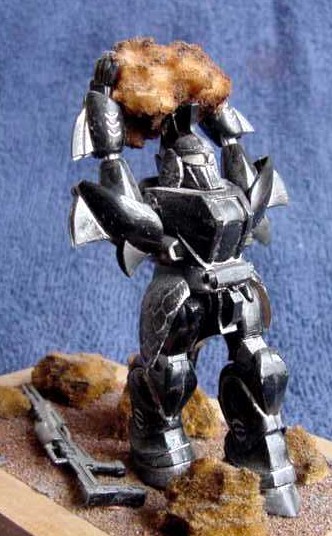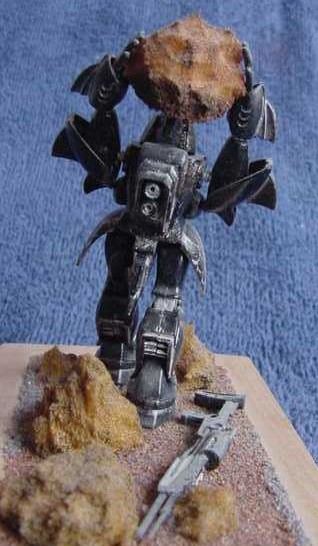
Hobbycraft 1/100 Armed Robot 'Surge'

| HISTORY |
Jap-animation is able to come-up with robots that are really chunky and functional-looking. Then the model manufacturers manage to produce them in 3-D. Which task do you reckon is harder? This was one of a set of twelve robots(?) with computer-based names like Hard-drive, RAM and Firewall. I don’t know if they come from a TV or comic series, but (according to the box) there are six robot heroes protecting the internet from six evil robots. Surge’ is a one of the bad-guy robots. I didn’t realise this till I’d completed the model.
I was impressed when my model club’s committee chose this as the subject for the Identical Kit category of our (year) 2000 annual club competition. It showed that they hit on a subject that none of us knew a lot about. The parts build into a 6”/150mm- tall model (toy, according to the instructions) armed with a long rifle/spear gun. My high-tech robot was to be modelled about to hurl a low-tech boulder.
| THE KIT |
Despite being a small, pretty-basic kit, it did not suffer from flash, sink marks or poorly-fitting parts. Even the round bits were round. Only one component wasn’t done well - the pair of hoses that went from his ‘belt buckle’ to his ‘back pack’ – so I left them off. Perhaps I should have replaced them with guitar strings (or the like).
 The instructions break the construction into seven assembly stages and are
relatively comprehensive. The decal sheet is tiny – it contains only two
eye decals. But I dumped them and just painted the robot’s eye areas.
The instructions lacked a painting guide but I guess that a robot (like a
car) can be produced, or repainted, in a variety of colours. The
alternative is to duplicate the red and blue scheme on the boxtop.
| CONSTRUCTION |
Dry-fitting told me that some sub-assemblies (fore-arms and lower legs) required painting inside as they were virtually just tubes. No problem – I’d brushed on some Testors flat black. This gave me the colour scheme for the rest of my robot – an overall gloss black with a liberal dry-brushing with silver. I cheated by spray-painting all of the parts in two sessions, then brushing-on the flat black as required.
I was surprised that this model didn’t need much filler. My squeezing a bead of plastic from each joint helped a lot. I let this bead dry, scraped it off, and was rewarded with relatively smooth joints. Naturally, I had to exercise a little care when trapping a moving part (feet, limbs, sleeves, head) between two halves, and again when filling the seam between the two halves. For a little contrast, the ‘knee’ and ‘elbow’ areas were painted silver.
 I dumped the kit-supplied hands and manufactured a pair of my own from
lengths of rod. While they were still straight, I rolled them under a
knife-blade, at appropriate intervals, to form the joints that allowed me
to bend his fingers a little. I gave the new hands a long ‘wrist’ rod so
that I could glue them into the arms. The robot’s boulder was fashioned
from a piece of sponge painted with various shades of brown. The underside
is darker to replicate the portion of it that was in the ground. I sewed
both of the robot’s hands to the boulder with black thread.
I cut the long spear from the weapon – I didn’t like the look of it. I still had to concoct a reason why the robot ‘aint using his weapon. I ground-out a portion of the weapon, painted it silver, then glued a piece of foil over the area. This foil was pierced with a U-shaped piece of fuse-wire. Now, I painted the whole weapon gloss black. When it had dried and was drybrushed, I pulled the wire to ripped-up the piece of foil. This simulated a weapon destroyed by an explosion in the breech.
| PRESENTATION |
I now brought the sub-assemblies together – body & head, two arms & boulder, both legs and the gun. The two thigh-plates were added and the robot was complete. My only problem was that the boulder fouled the crest on top of his head. OK, trim the underside of the boulder a bit.
I grabbed a small piece of scrap wood, masked-off a border with tape, then spotted-on a liberal coat of contact cement. Into this, I pressed some dark-coloured sand (several shades), then removed the masking. I positioned the robot and the busted weapon, then added some more sponge/rocks. The gun is glued to the base, but the robot is only held in place by a thick plastic peg in his foot that is dry-socketed into a hole I drilled in the base. This means that I can dismantle it (a little) to transport it.
| CONCLUSIONS |
 As a simple kit it is aimed at younger modellers, and I reckon that it
would suit them to a T.
I found that robot’s right hand didn’t fit the weapon well, and this might frustrate younger modellers.
If I had to build another Surge, I’d definitely choose a better colour scheme. I’d probably detail him with pushrods and hoses at his joints, and paint some/lots of panels and hatches on him. I’d go to town on detailing that weapon, and I’d put something on the base to tell a viewer that Surge is a 50’-tall robot. If Surge was un-scaled, I’d use something like a human figure, small car or a large ant. Personally, since Surge is touted as an Internet attacker, I’d prefer the concept that he is a micro-robot (nanite) and place him inside a computer (which would explain why MY computer can’t spell). However, I still like the low-tech boulder idea, and now, I have something different on my shelf.
OK, I was forced to build this one, but still enjoyed the job (and isn’t that the reason we build models?) I only wish that I’d taken a photo(s) of the other models of Surge as entered by the other club members. One of the juniors built his as an Olympic Torch carrier. One robot had its head swapped for a human head - the (now) helmet was on the floor beside the wearer of the (now) suit of armour(?) who was drinking a beer. The club’s President (Hi Sue) had hers emerging, fully armed, from a black egg.
November 2004
Copyright ModelingMadness.com.
If you would like your product reviewed fairly and fairly quickly, please contact the editor or see other details in the Note to Contributors.