Revell 1/72 X-15
|
KIT #: |
? |
|
PRICE: |
$15.99 SRP |
|
DECALS: |
Two options |
|
REVIEWER: |
Zach Pease |
|
NOTES: |
A couple of pitfalls to watch out for
but overall a good value for $ spent. |

The National Advisory Committee on Aeronautics
(NACA), NASAís forefather, the
US
Air Force, and the
US
Navy sponsored a series of X-planes that were used to achieve transonic and
supersonic speeds. These flight programs began in the late 1940ís and involved
aircraft such as the X-1 and X-2 from the Air Force, and the D558-I and D558-II
from the Navy. The D558-I was used to investigate transonic flight, speeds up to
but not including Mach 1. The X-1 was the first aircraft to break the sound
barrier in level flight in October of 1947 with Air Force Captain Chuck Yeager
piloting. This achievement was followed in 1953 by the D558-II and NACA pilot
Scott Crossfield busting through Mach 2. Air Force Captain Milburn Apt broke
Mach 3 in the X-2 moments before his aircraft spun out of control leading to his
death.
After these milestones NACA, the
Air Force, and the Navy began looking at the feasibility of reaching hypersonic
speeds. The word hypersonic is used
to describe speeds in excess of Mach 5. Conceptual research for hypersonic
flight was done in the 1940ís for the Sanger/Bredt antipodal bomber concept. In
1954 NACA hosted a meeting with the
US
Air Force and
US
Navy which produced the first concrete proposal for a hypersonic research
aircraft. At this meeting the Navy revealed that it was already investigating a
hypersonic craft and they had commissioned
Douglas
to carry out a design study.
This activity led to Project 1226
which was a joint effort by NACA, the USAF and the USN to develop a hypersonic
craft. When the call for bid proposals was released to the aerospace industry,
four companies submitted potential designs,
Bell,
Douglas,
.jpg) Republic,
and North American.
Douglas
was considered to have an inside track due their previous study of hypersonic
craft and their experience with x-planes from the d-558 program.
Bell
was also initially looked upon favorably considering their experience with the
X-1 & X-2. Republic and North American were the underdogs. However, Republic
recently worked on a mach 3 fighter concept, the Xf-103, and it was believed
that this would give Republic an edge over North American. After evaluating each
companyís proposal the North American design was selected.
Republic,
and North American.
Douglas
was considered to have an inside track due their previous study of hypersonic
craft and their experience with x-planes from the d-558 program.
Bell
was also initially looked upon favorably considering their experience with the
X-1 & X-2. Republic and North American were the underdogs. However, Republic
recently worked on a mach 3 fighter concept, the Xf-103, and it was believed
that this would give Republic an edge over North American. After evaluating each
companyís proposal the North American design was selected.
The North American proposal led to
the construction of the aircraft we know as the X-15. Three airframes were
constructed with the first glide flight occurring in 1959 with Scott Crossfield
at the controls. Initial powered flights were made with two XLR-11 rocket
engines instead of the XLR-99 which was not yet ready. The XLR-11 was the same
rocket engine used by the
Bell
X-1 when it the sound barrier in 1947. These early flights were proving flights.
After the XLR-99 engine entered the program the momentum picked up
and after 199 flights over almost an entire decade the X-15 and the
modified X-15A-2 set a number of records that were only recently broken.
On
August
22, 1963,
NASA pilot Joe Walker piloted X-15 airframe # 3 to a maximum altitude of 107.96
Km above the surface of the earth. This was the highest flight of the program
and the highest flight by any winged aircraft until this record was beaten by
SpaceShipOne during its second X-prize flight in 2004. On
October
3, 1967
Air Force pilot Pete Knight flew the X-15-A2 to the maximum speed attained
during the program of 4,250 mph (Mach 6.7). This record stood until 1981 when
the Space Shuttle
Columbia
beat it on its reentry flight.
Ultimately 13 of the 199 X-15
flights crossed the threshold into space. But, the stunning success of the X-15
program was tempered somewhat by the death of Air force pilot Mike Adams who
lost control of his aircraft during a flight on November, 15 1967. During
reentry
Adams
entered a mach 5 spin at 230,000 ft. After unsuccessfully trying to regain
control of the aircraft X-15 airframe 3 broke apart at 60,000 ft. while
traveling 160,000 ft per minute. Adams was posthumously awarded Air Force
Astronaut wings for his flight that day. His name now appears on the Astronaut
Memorial. Only one flight would
follow Adamsí death with Bill Dana piloting the final flight on August 21, 1968.
 This kit
has been around for a while. The date I sanded off the kit was from the middle
1980ís though I forget which year exactly. The kit comprises 36 pieces molded in
gray and clear with fine raised panel lines. The kit is broken down in a way
that will move assembly along quickly. The fuselage is split horizontally with
the wings molded to the upper half. The Dorsal and ventral fins are also molded
to their respective fuselage haves. Pleasantly the kit also includes a stand for
those that may want to display their X-15 in flight. The instructions are
presented in 13 construction steps and a marking diagram for the decals. Two
markings options are given. The options represent the X-15A-2 at different times
in the flight program but the instructions label them as X-15A and X-15B. Option
one is the X-15A-2 in the standard black scheme that was worn for the majority
of the flight program. Option two is the X-15A-2 as it appeared in 1967 when it
wore an all white ablative coating for the high speed flights. Out of the box
the model best represents the X-15A-2 from the 1967 high speed flights in the
ablative coating. I built the aircraft in the earlier scheme and made some minor
modifications to make it more accurate for this scheme.
I began construction with the interior. This is
molded as a one piece tub that includes everything except the control stick and
control panel. The upper parts of the ejection seat are molded with the top
fuselage half. I took some time painting this and it paid off. The interior
actually has a lot of detail if you take the time to highlight it with proper
painting, dry-brushing, washes etc. Once this was done I installed all the
interior parts and the lens for the camera in the bottom fuselage half.
I closed the fuselage halves and
cleaned up the seam along the side. Itís not too bad but will require careful
sanding to preserve the surrounding detail. You will also need to sand away a
mold parting line on the dorsal fin. The underside of the wing roots are some of
the worst seams on the whole model and will need some attention. I used Valejo
Model Putty which is very thin putty. I spread it like tile grout over the seam
and then wiped it down with a paper towel. I did this a few times and it took
care of the seam nicely and required no sanding. After this was all set I sanded
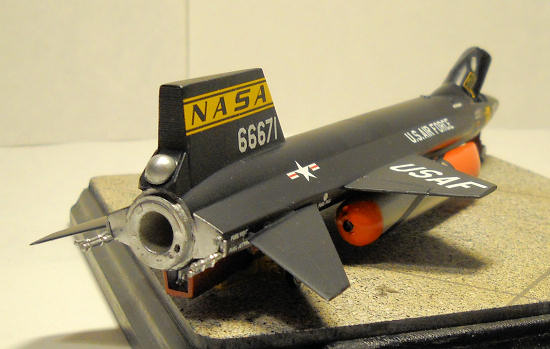
and filled the light seams at the rear of the fuselage and then added the nozzle
for the XLR-99 rocket engine.
Once that was accomplished I added
the horizontal tail surfaces. The X-15 had an all flying tail and the kit
represents this with a flat rectangular faring that butt joins to an indentation
in the fuselage side but after looking at photos of the real plane this did not
look correct to me. Photos did not appear to show this small rectangular faring.
So, I super glued the tails in place and started
 sanding
away the faring intil they mounted flush to the fuselage.
Now I tackled the external fuel
tanks. They needed a fair amount of clean up that killed most of the detail on
them but they looked alright once they were painted.
With the major components together I now began
to deviate from your standard OOB build. As I said, if left alone, the kit best
represents the X-15A-2 in the all white ablative scheme from 1967.
The white scheme is less visually enticing to me. I wanted to model the
aircraft as it appeared prior to the high speed flights in its black scheme. For
the high speed flights the port canopy window was covered with an iris. This was
needed because as the ablative coating burned off at high speed the starboard
window would cloud and obscure the pilotís view. As the aircraft descended and
slowed to less than Mach 2 the iris would open allowing the pilot to see for his
approach and landing. The kit portrays the canopy with this iris in place so my
first order of business was to sand this off and then drill out a new port
canopy window. I used a sharp pencil inserted through the starboard window to
mark off where the port window should be. Then I drilled it out with a pin vise
and then finished it off with a no. 11 blade. The plastic is fairly soft and
easy to work so things will go easily. Just be sure not to go too aggressively.
For the window I simply used the kit clear part as a pattern and made a second
window from a clear file tab.
The other minor modification needed
to backdate the airframe is lengthening the ventral fin. For the high speed
flights the X-15A-2 carried a dummy SCRAM jet engine on the ventral fin. In
order to mount this, the fin was shortened and the leading edge was squared up.
Seeing as I wanted to show the ventral fin before it was shortened, I used scrap
plastic to extend the leading edge of the ventral fin and then fared everything
together with putty and super glue. I canít tell you precisely how far to extend
because I just eyeballed in true TLAR fashion. After I had finished with the fin
I added the retracted landing skids on either side. Then I stuffed a small
amount of paper towel in each canopy window, tacked the canopy in place, and I
was ready to paint.
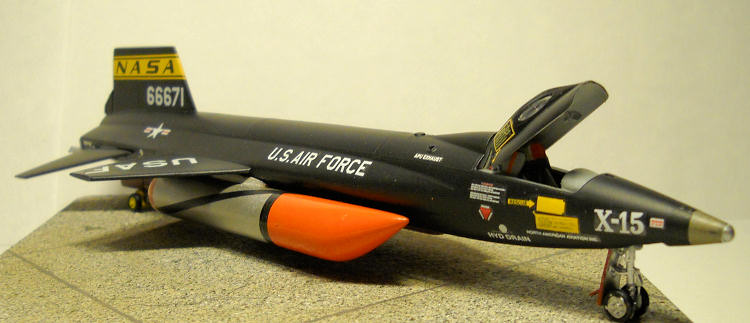
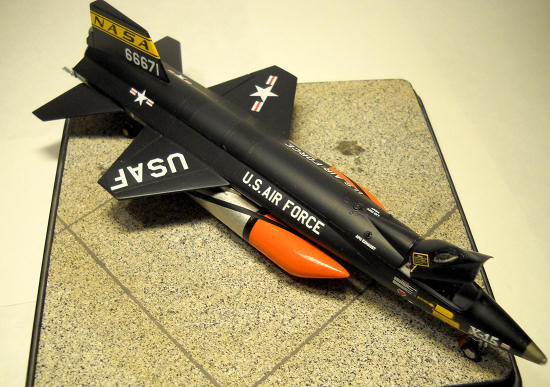
I chose to portray the X-15A-2 for flight
2-45-81 on July 1, 1966 with Bob Rushworth piloting. My inspiration was the
photo on the cover of Hypersonic by Dennis Jenkins and Tony Landis which also
served as my primary reference for this project.
 I
started by spraying the entire aircraft with Tamiya flat black lightened a
little with Tamiya German Grey. Then I picked out certain panels to spray with a
slightly lighter mix. My goal was to get a weathered look to the paint since all
the pictures I have seen of the X-15 airframes show them to be weathered.
Ultimately my efforts were too subtle and you really canít see which panels I
picked out.
For this flight the ventral fin,
nose gear door, and landing skids had a red orange ablative coating applied for
testing so I mixed up a reddish orange from some Model Master Acryl paints I had
kicking around and brush painted these elements.
Once the red orange had dried I
painted the rear section around the nozzle in model master chrome silver and
then painted the XLR-99 nozzle in MM jet exhaust. I also painted the nose cone
forward of the ballistic control jets in jet exhaust with chrome silver for the
ball nose.
I assembled the nose gear and fixed
it in place. The nose gear door has significant mold parting lines that need to
be cleaned up and I had to shorten the door so the plane sat on its gear not the
door. I then assembled the handling
dolly and painted it Poly Scale RR colors CP yellow and then cemented it in
place on the ventral fin.
 After
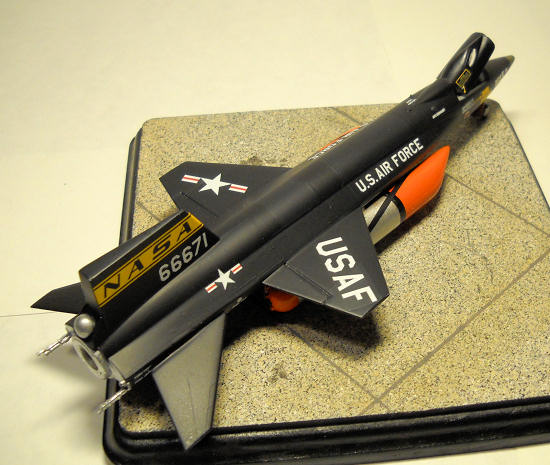
letting everything dry for an evening I applied the decals. This is where this
model really comes to life. The decals behaved excellently. I had a couple
silver but that was my fault more than theirs. The big NASA decals were the
biggest challenge since they did not immediately want to wrap around the leading
edge of the Dorsal fin but some Solvaset helped the situation and got them under
control.
With the decals done I brought my X-15 upstairs
and away from my bench while I finished up the fuel tanks. I needed to spray
them silver and wanted to lessen the urge to touch the model with silver fingers
by putting it out of sight.
I sprayed the tips of both tanks
red orange and the rear of the starboard tank was also sprayed in this color. I
mixed the color from Tamiya Red and Orange. Then I masked off the orange bits
and sprayed the tanks silver. I then added the black rings that appear in my
reference photos. I masked these with Tamiya tape and then brush painted them
with Valejo black. Some of them look a little rough but they look that way in
the photos too.
Once all of this was dry I gloss
coated the tanks and once they were dry I super glued them to the airframe and
called it done.
This is a great little kit. I really enjoyed
this project and I think the kit could be made into a real show stopper without
too much effort. You do need to have good references though because the X-15
appeared with many minor changes throughout the flight program but I think this
kit gives you a solid base from which to begin.
Hypersonic: The Story of the North American X-15;
Denis Jenkins & Tony R. Landis; Specialty Press, 2003. ISBN
1580071317
North American
X-15, Wikipedia
http://en.wikipedia.org/wiki/North_American_X-15
X-15 Flight
91, Wikipedia
http://en.wikipedia.org/wiki/X-15_Flight_91
SpaceShipOne
flight 17P, Wikipedia:
http://en.wikipedia.org/wiki/SpaceShipOne_flight_17P
X-15 Flight
3-65-97, Wikipediahttp://en.wikipedia.org/wiki/X-15_Flight_191
Zach Pease
March 2011
If you would like your product reviewed fairly and quickly, please
contact
me or see other details in the
Note to
Contributors.
Back to the Main Page
Back to the Review
Index Page


.jpg) Republic,
and North American.
Republic,
and North American.  This kit
has been around for a while. The date I sanded off the kit was from the middle
1980ís though I forget which year exactly. The kit comprises 36 pieces molded in
gray and clear with fine raised panel lines. The kit is broken down in a way
that will move assembly along quickly. The fuselage is split horizontally with
the wings molded to the upper half. The Dorsal and ventral fins are also molded
to their respective fuselage haves. Pleasantly the kit also includes a stand for
those that may want to display their X-15 in flight. The instructions are
presented in 13 construction steps and a marking diagram for the decals. Two
markings options are given. The options represent the X-15A-2 at different times
in the flight program but the instructions label them as X-15A and X-15B. Option
one is the X-15A-2 in the standard black scheme that was worn for the majority
of the flight program. Option two is the X-15A-2 as it appeared in 1967 when it
wore an all white ablative coating for the high speed flights. Out of the box
the model best represents the X-15A-2 from the 1967 high speed flights in the
ablative coating. I built the aircraft in the earlier scheme and made some minor
modifications to make it more accurate for this scheme.
  sanding
away the faring intil they mounted flush to the fuselage.
